In March, I went over the US on a holiday. One of the places we visited was the Grand Canyon. Like most, I was amazed at the size and depth of it. However, I’m a mining engineer who designs big holes for a living, so I was interested to know how the river excavated it, so I had at look at the information they had posted around. Two things struck me:
The Grand Canyon is only about six million years old.
The flow rate of the Colorado river hasn’t significantly changed in that time.
This set me thinking – if it’s only 6 million years old, and the river hasn’t significantly changed in that time, then how did the river manage to carve out the canyon, that seems like a lot of dirt to move per year. So like a good engineer, I thought I’d calculate it:
Volume of the Grand Canyon – 4.17E+12 m3
Years to excavate – 6,000,000
Excavation rate per year – 695,000 m3/year
Excavation rate per second – 0.53 m3/second
Half a cube per second sounded achievable, though possibly more dirt than a river might be capable of carrying. So I looked up the sediment carrying capability of water, and while it’s on the high side, definitely within the capability.
Half a cubic metre of dirt per second isn’t particularly high when compared to a lot of earth moving equipment these days, but when done every single second for the last 6 million years, it adds up to something amazing.
I run Tiny-Tiny-RSS as my Google Reader replacement. It’s fantastic. However, now I’ve moved to a VDS, and I needed to install some additional packages. These weren’t listed on the TTRSS install site, so I’ve listed them here, so I can find them again in the future.
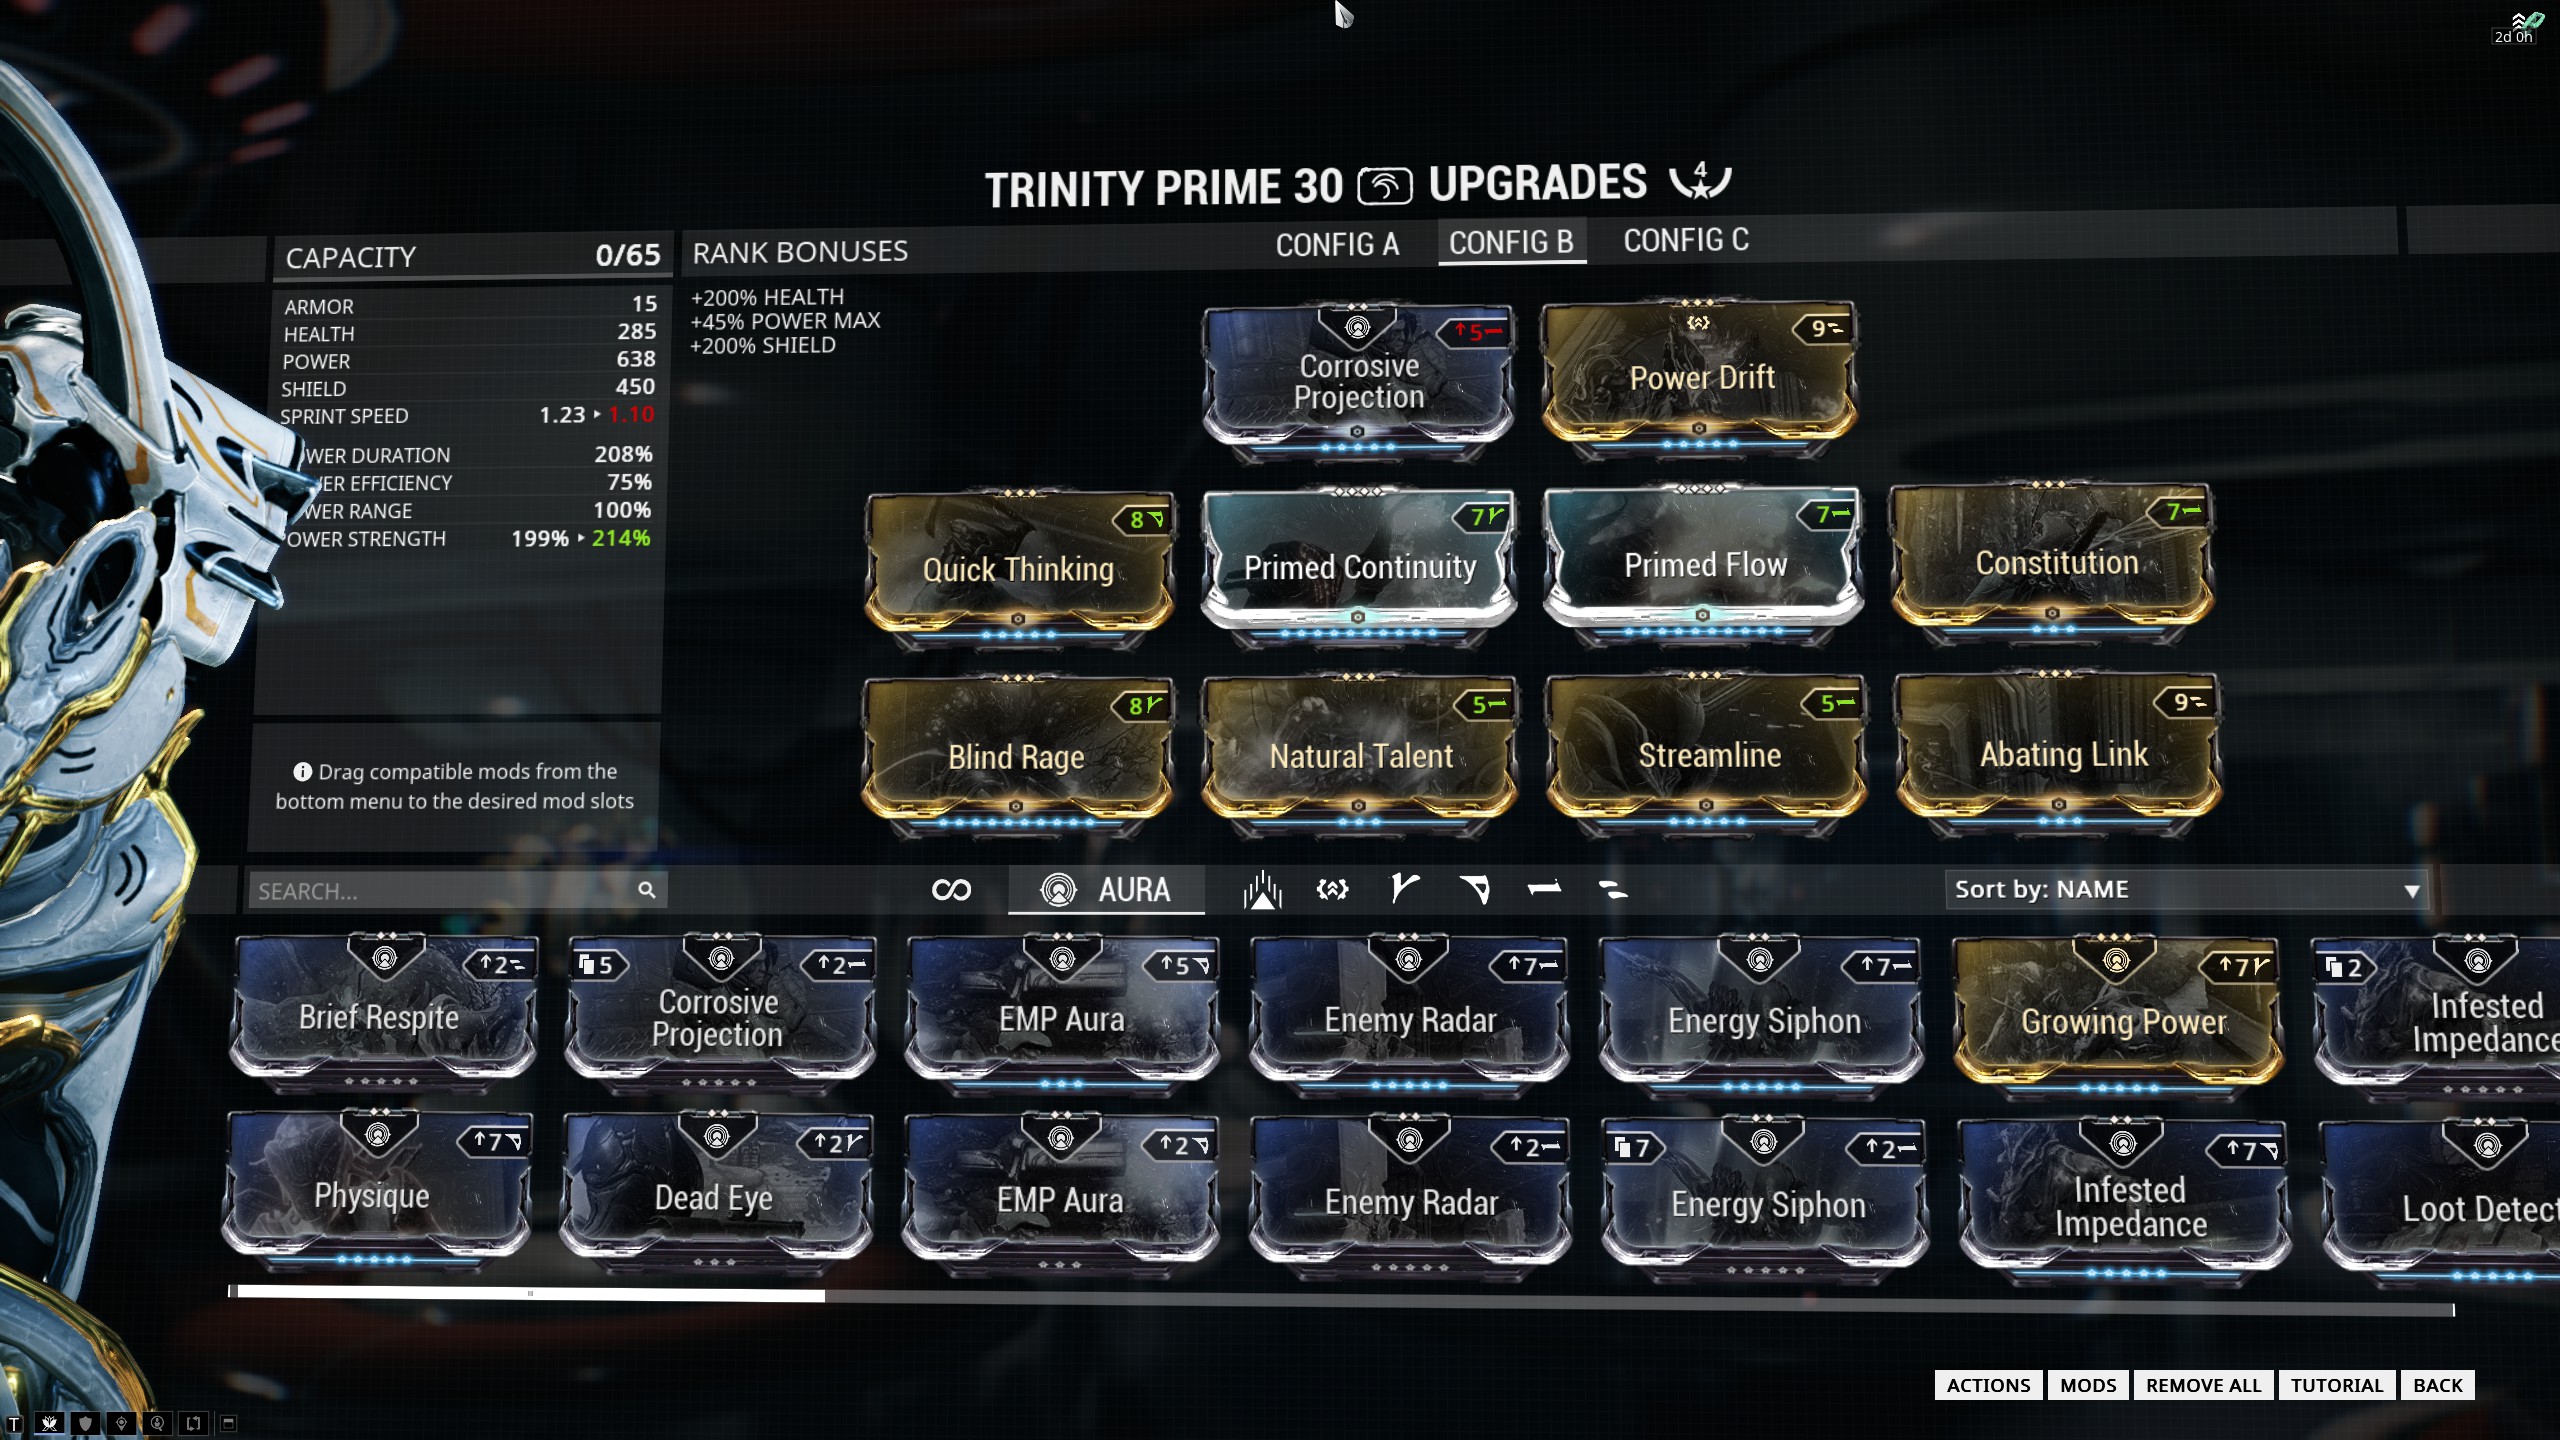
One of the games I really enjoy playing is called Warframe. I wrote this article for Wikia on my builds for the game. I thought I’d cross-post it here for my records.
I’ve been wanting to write an article for a while on my current Trinity builds, but I have been too lazy. I was finally jarred into action by this article on Reddit, which contained so many god-awful builds that I just had to jump in with my own (god-awful :)) builds.
Like many, I was originally disconcerted by the changes made to Trinity last year, but I didn’t join with many of the others who took up pitchforks to storm the DE offices. The usage of self-damaging Bless builds at the time was definitely unhealthy for the game as a whole and I agree that the changes needed to be made. However, since my main build at the time was Bless, I found myself a bit lost for a while, until I settled down on a new main build, which I’ll discuss below.
I love Trinity as a frame, so much so that I have eight of them (so far). At my current stats, I’ve got about 45% of my playtime with Trinity, with the next closest being at 10%. Her survivability is right up there with some of the frames that avoid damage completely, like Loki, and she can transfer most of this survivability to everyone in the squad.
I still remember the first time that Trinity ‘gelled’ for me: I was about MR8 doing a Infested survival mission with some friends. We were doing it tough, with one or the other of us going down fairly regularly. I was down in the pit that you get in the Eris tileset, completely surrounded by infested, and all the pieces of Trinity just came together for me. My train of thought basically ran like so:
I can build my energy and the energy of the team, that’s good, super useful.
I can use Link to reduce the damage I take.
If I wait until my health gets low, then hit Bless, I get great damage resistance.
Oh, wow. Now my whole squad is completely invulnerable for fifteen seconds.
These infested aren’t scratching me, and I’m obliterating them.
I can keep doing this forever!
At that point, I put away Oberon (my previous favourite frame), and mained Trin. I’ve never looked back. No other frame has come close to winning me over as Trinity has.
In my view, there are a few different character types.
DPS.
Individual survival
Team survival support
Team DPS support
Crowd Control
Just about all frames will fit into one or two of these categories. For example, Banshee is a classic DPS and ‘DPS support’ frame. Irradiating Disarm Loki is ‘Individual survival’ and ‘Crowd Control’. I believe that Abating Link Trinity (as described below) covers four of these five character types, making her (in my opinion) the most useful frame in the game. Her pure self-containment makes her robust enough to take into any mission type, and also play a leading role in the squad.
Builds
Whereas previously you needed two separate frames to have an ideal EV trin and an ideal Bless trinity, these days, with Bless being less important, you really only need the one frame to handle both builds, as they have the same polarisations. This is good, as really no-one but us die-hard Trin-heads will want to have more than one Trinity in their arsenal.
A note on auras.
You’ll note in both my builds below that the aura polarisation is ‘wrong’. I like to have builds which are independent of the aura polarity so that you can use whichever aura most suits the team you’re with. You can save a couple of forma if you go with a Corrosive Projection – defined slot, but I like being able to swap out with Steel Charge, or Rifle Amp, or whatever suits the current mission you’re on (Dead Eye, anyone? Anyone?)
EV Trin
I thought I’d start off with an EV build, since it’s been unchanged for years. Min duration, Max range, High Power Strength. The classic Energy Vampire build will keep your squad absolutely awash in energy, but will have no survivability whatsoever, other than that provided by overshields and Quick Thinking. A single stray bullet will take you out in high-end content, since it’ll ignore QT. Your Bless will heal your squad, but have an damage-resistance duration of just over one second.
EV Trinity build
Without a doubt, it’s useful, if very narrowly focused. Fortunately, the advent of the Zenurik Energy Overflow passive has made EV Trin largely obsolete, with the exception of extremely cheesy squads.
Abating Link Trinity
Now on to the ‘real build’ of this article. As I mentioned above, after the Trinity nerf in mid-2016, I was a bit lost for a while on how best to play Trinity. My current Bless build still had 30 seconds of duration, but was only doing a flat 50% damage resistance. I could get it up to about 70% without losing much duration, but it just didn’t have the same useful feel as before.
An off-hand comment on Reddit provided the solution. Someone mentioned Abating Link, but said that it was only okay, as it was too compromised. Too little duration, or not enough armour strip. I set about fiddling with my builds, trying to get a good build going.
The build I eventually ended up with is fantastic (IMHO). It gives excellent duration, with 100% armour strip. A combined Link / Bless will give you 92% damage resistance – right up there with the old Bless builds, but it’s available at will, and with none of the risk that surrounded the self-damage builds. (Hands up those who died because they were stuck in a QT stagger-lock after getting hit by a mob after throwing your glaive. Thank you.)
If you haven’t experienced it before, let me say that 100% armour strip is amazing. Grineer and Corrupted just absolutely melt from underneath you. In long survivals and the like, I almost always end up with the highest damage percentage.
I take this build into all missions, including those with Corpus and Infested enemies. You may ask why, as those factions don’t have armour. A few reasons:
Laziness. The most powerful force in the universe. Yes, even more powerful than a Mirage with a Simulor.
Bursas. While Corpus doesn’t have armour in general, Bursas do. A lot of it. However, a Bursa – immobilised by Energy Vampire – with its armour stripped will just disappear underneath your melee weapon.
Juggernauts. As with Bursas, Juggernauts without armour are very squishy.
So here’s the build:
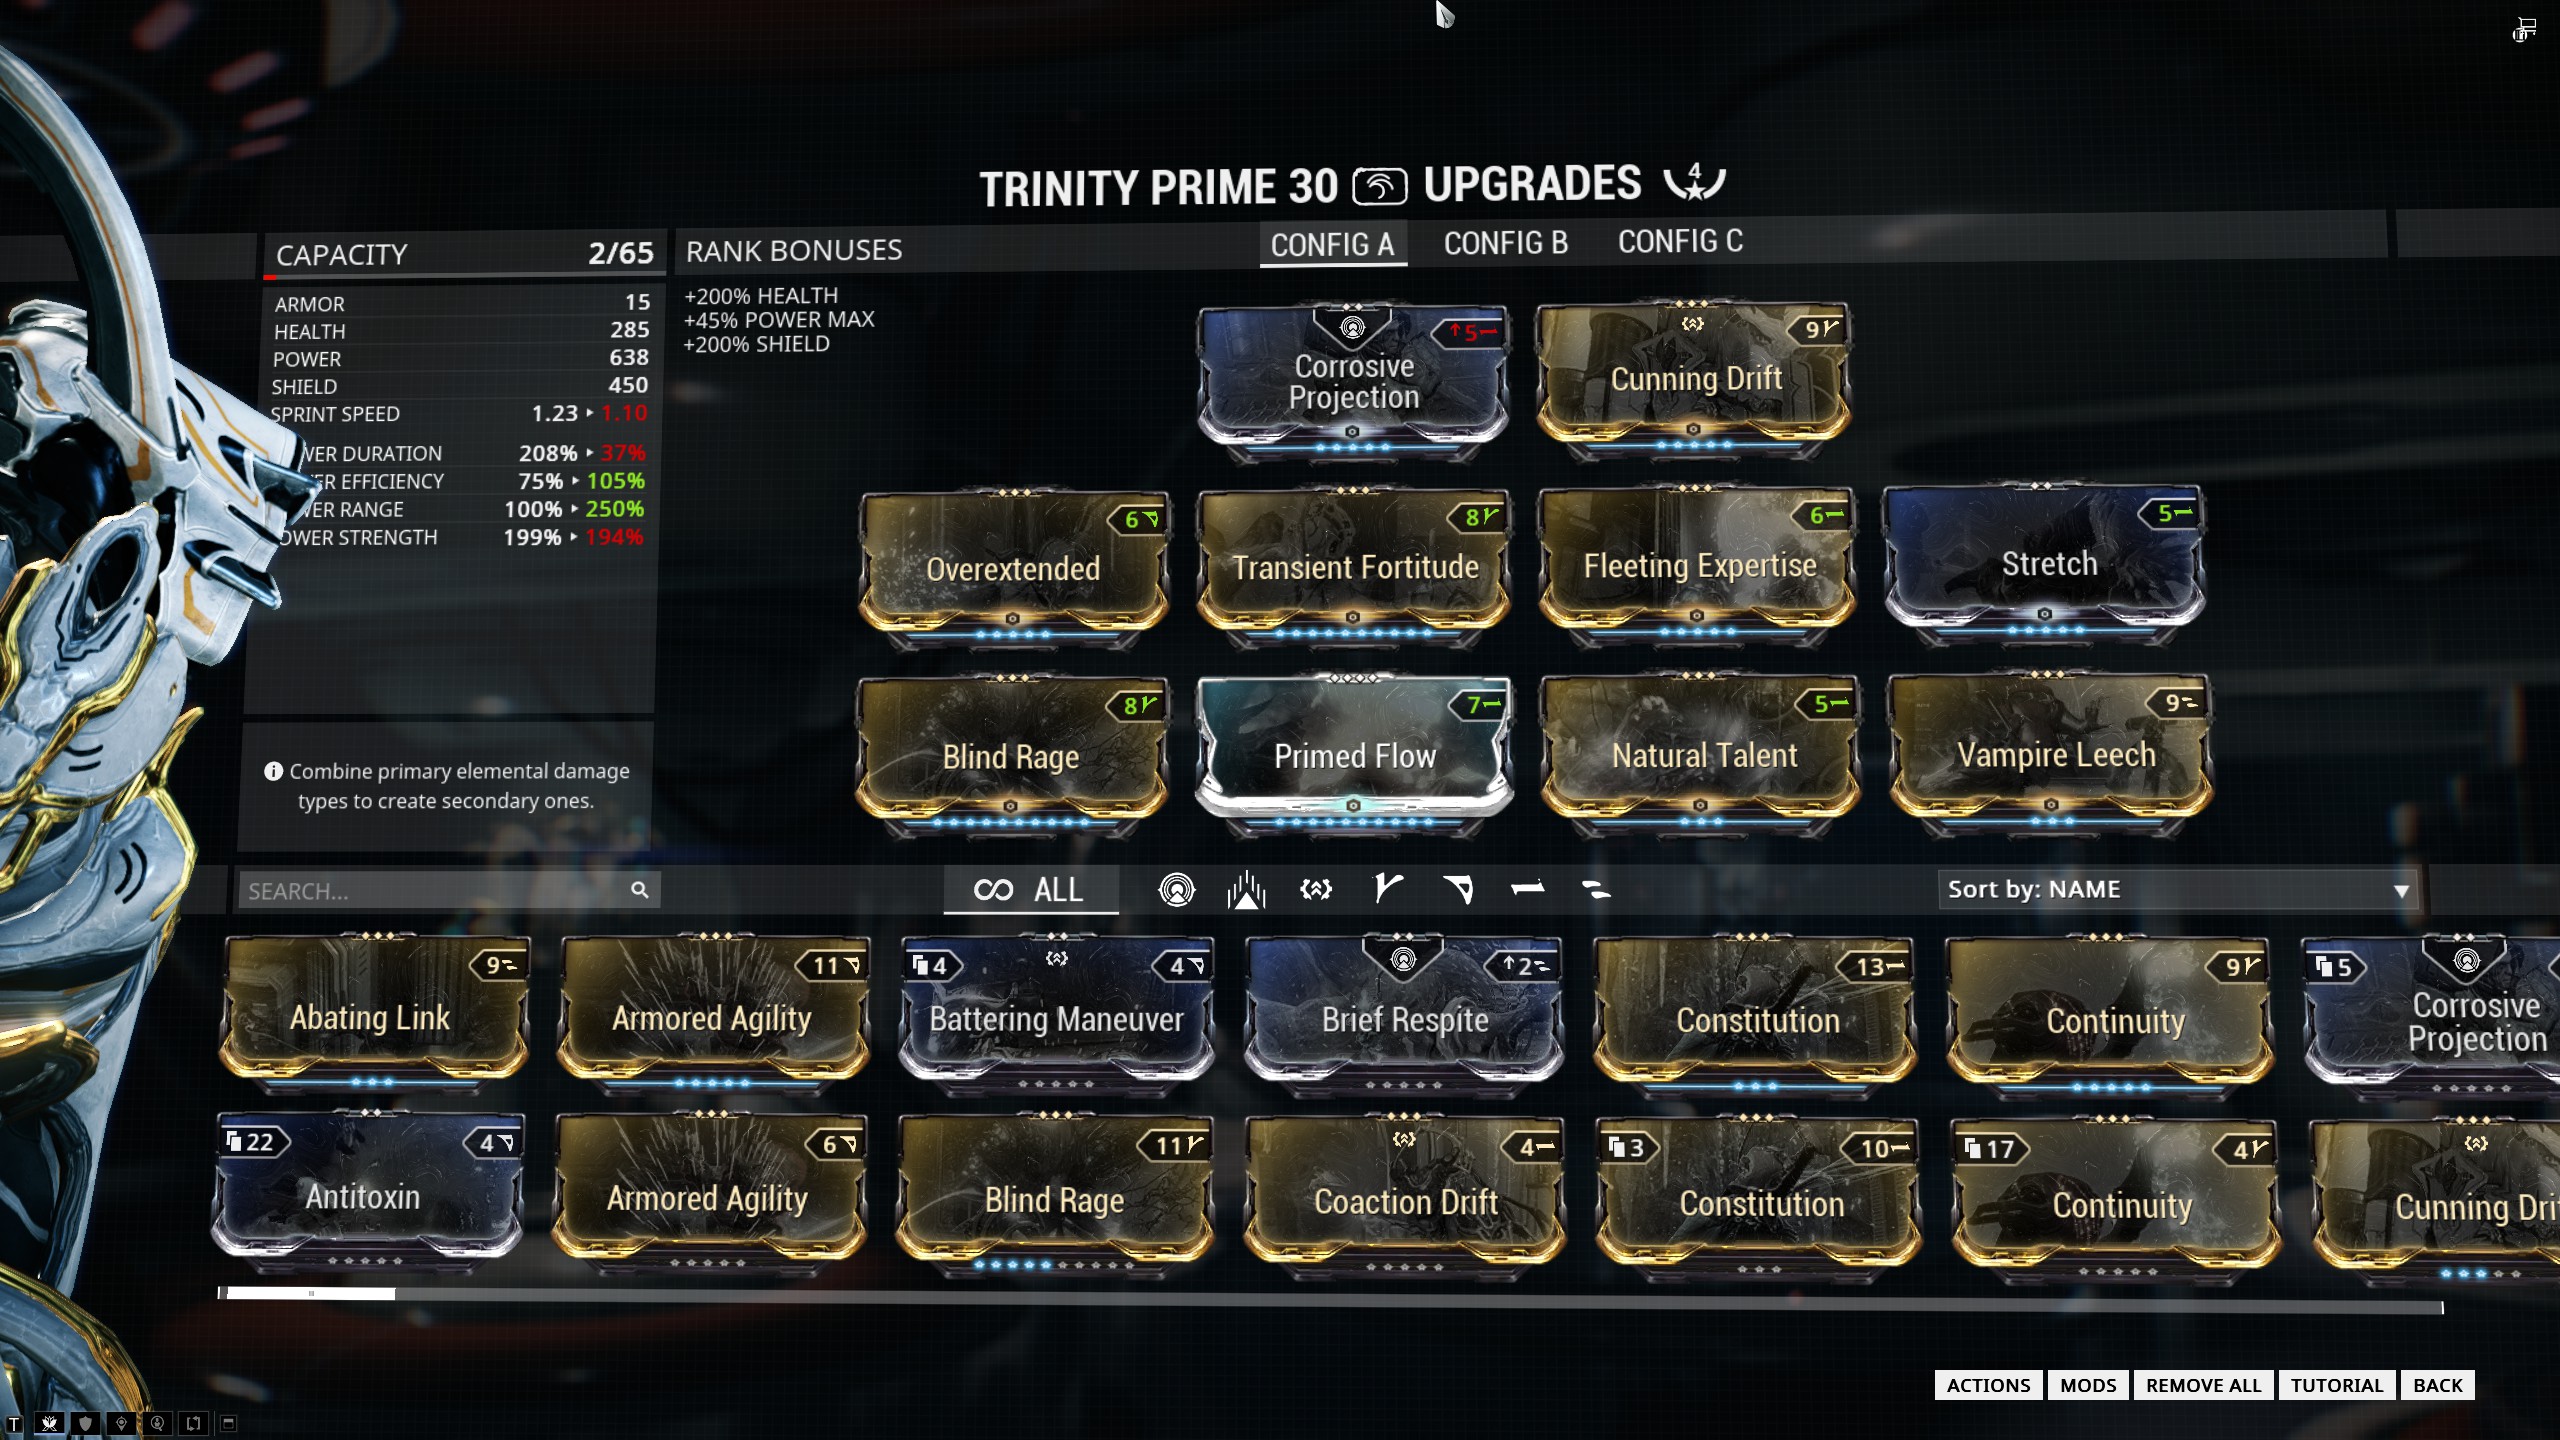
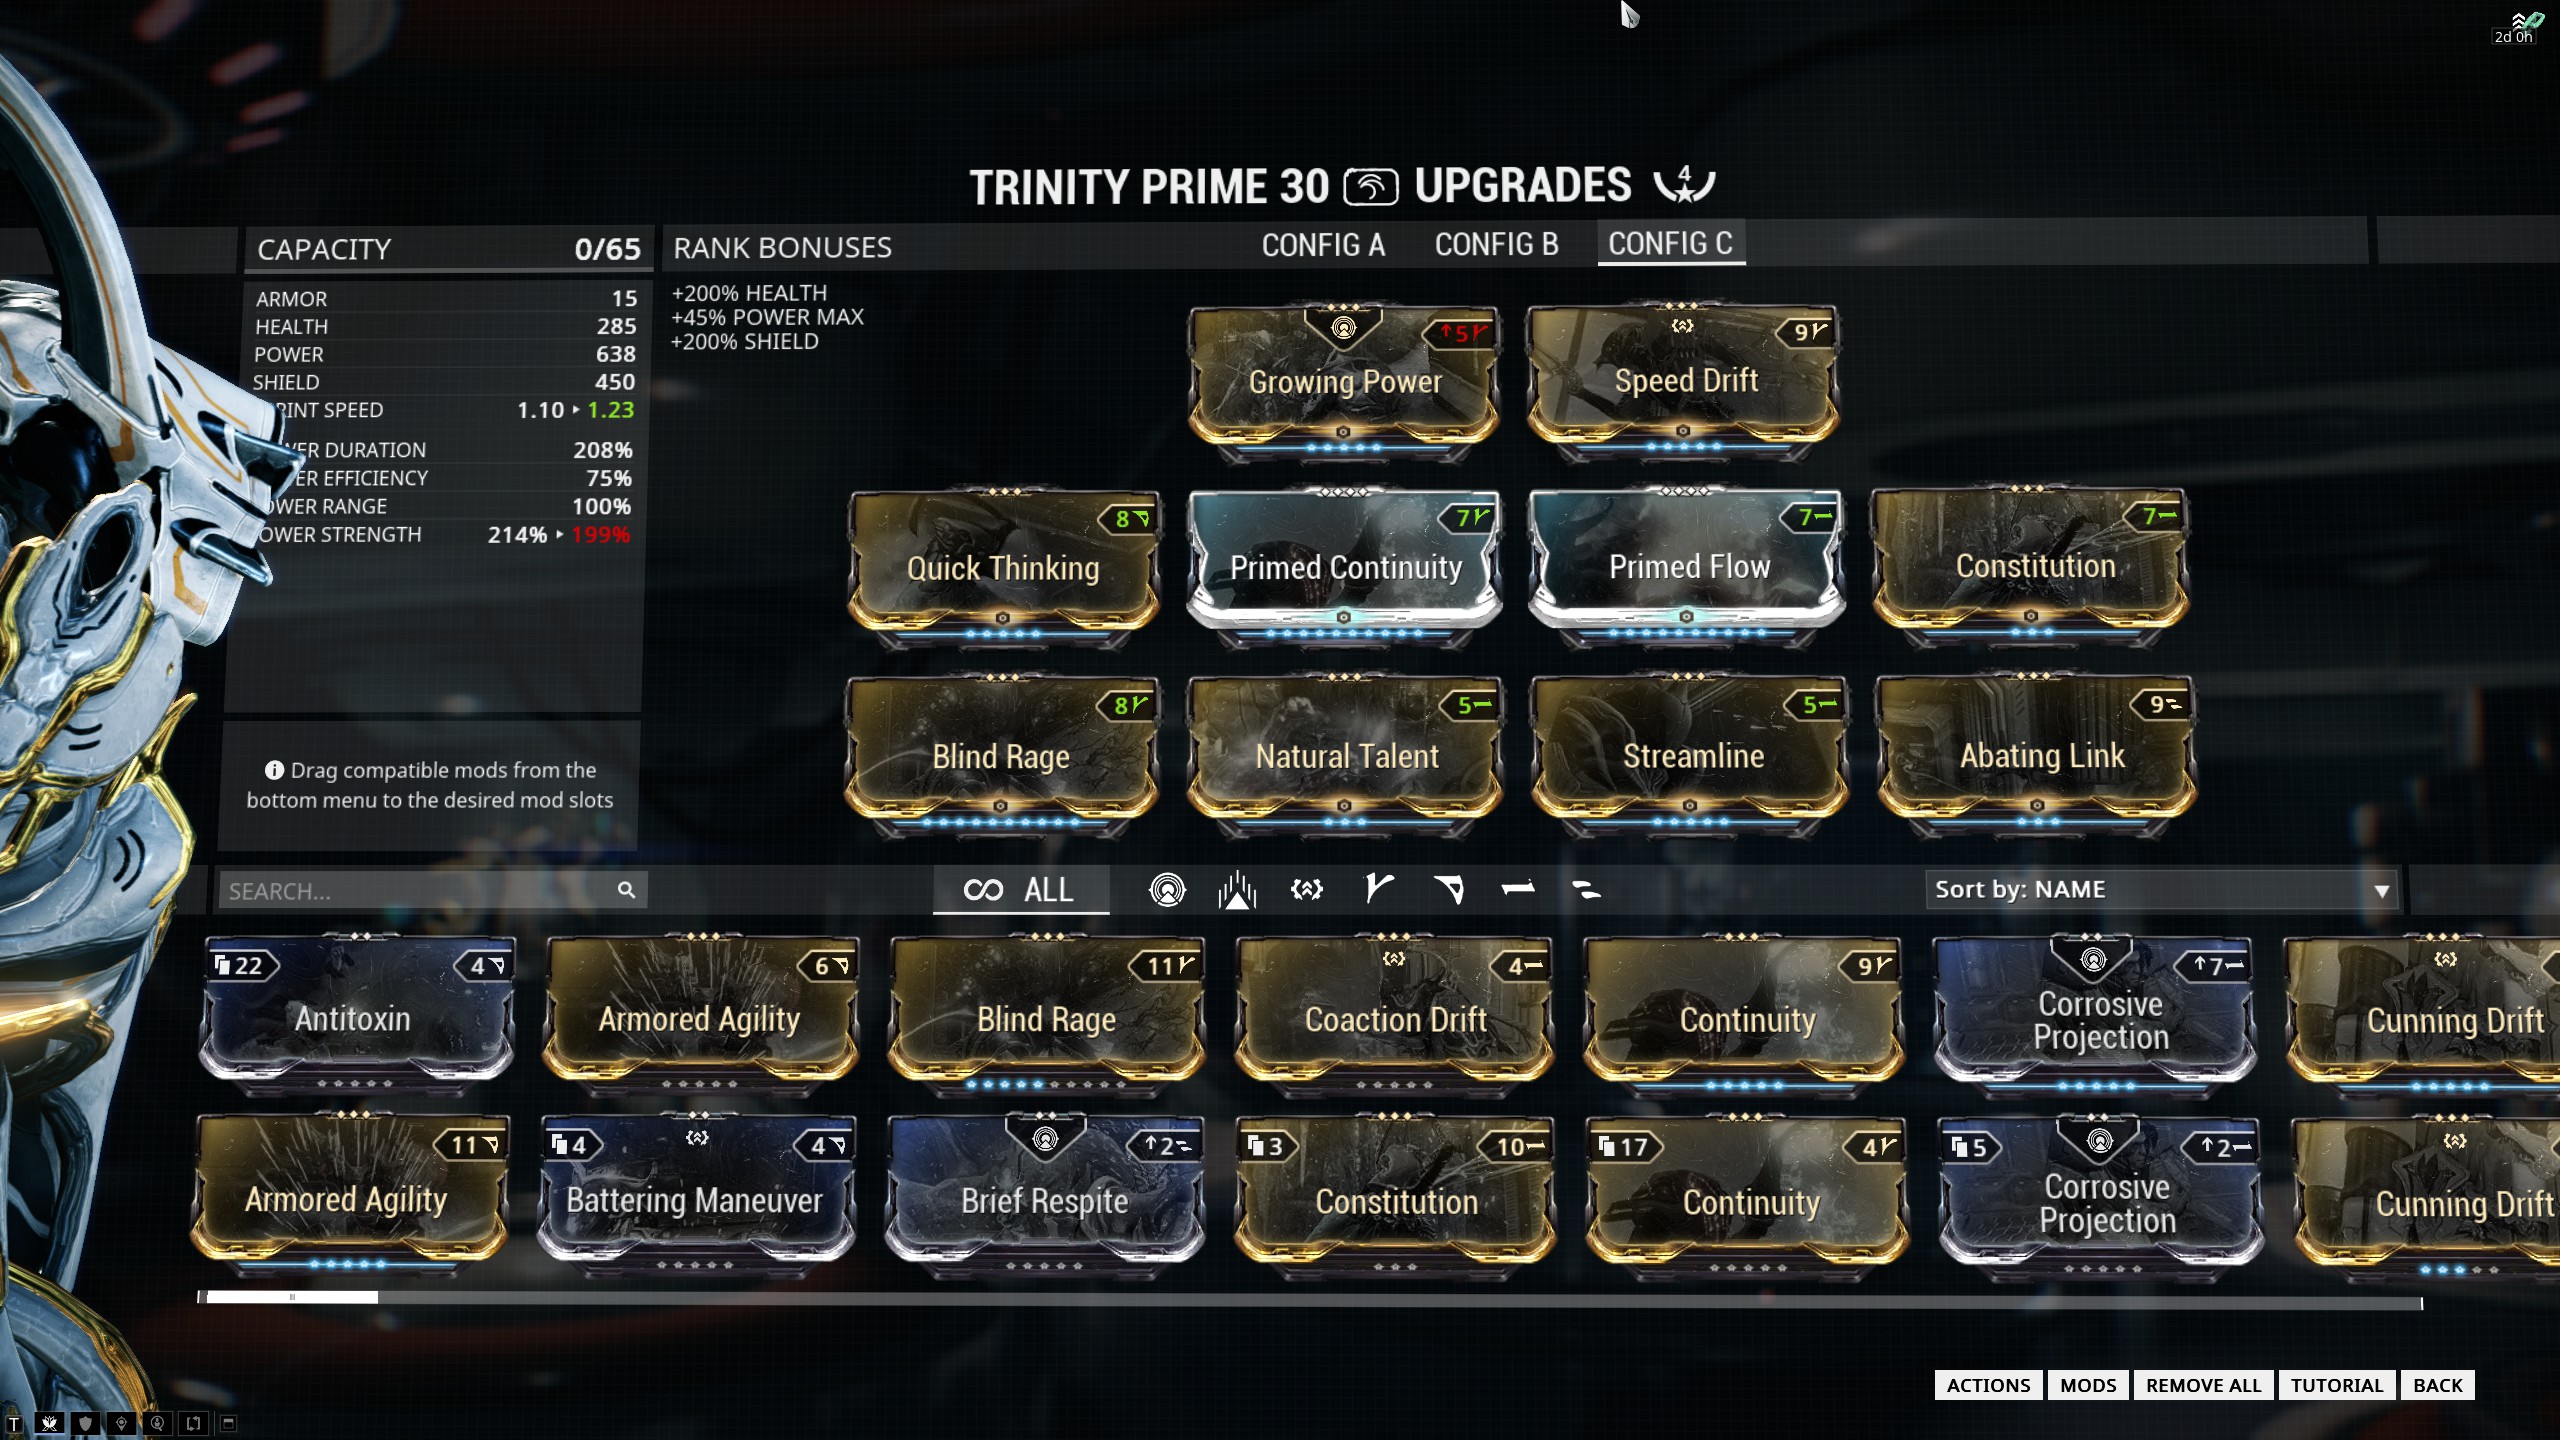
Abating Link Trinity build
As you can see, the key is getting up to the critical 223% Power Strength that you need to give you 100% Armour Strip. This build gives 224%. On top of that is keeping the range steady and upping the duration as much as possible. Efficiency is the dump stat, since you’re Trinity, and you can recover energy at will, and the high power strength means that you get a lot of energy for each EV cast.
Abating Link: This is the linch-pin of the build. It doubles the practicality of Link, since it turns it from straight damage-resistance to damage resistance and damage-boosting, greatly amplifying the DPS capabilities of Trinity.
Growing Power: This isn’t a mod you see a lot in people’s builds, but it’s extremely useful in this one. It steps up the armour strip from a very-useful ~90% to an enemy-melting 100%. It gives you that extra 25% Power Strength that you need without taking up a regular slot. It’s easy to trigger, as you only need to generate a status proc. Since, in high-end combat, you’re almost always using a weapon with at least a moderate status chance, the counter is running all the time. (If you’re using a weapon that has no real status whatsoever, bring along Taxon, and it’ll keep growing power continually running).
It’s a fairly new mod to the game, but very useful, as it now ups the maximum possible power strength to 374%. (As an aside, once you get it, make a 374% power strength Eternal War Valkyr. It’s amazingly fun.) It’s not the easiest mod to get, but as long as you take your scanner with you on every mission, you’ll easily pick up the plant scans that you’ll need in a reasonable time-frame.
(Primed) Continuity, Constitution: Duration. Duration is good, as you don’t want to have to recast too often. With the Arcane Aura helmet, the duration for Bless is up over 20 seconds.
Quick Thinking, Natural Talent, Primed Flow: These mods are pretty straightforward, and speak for themselves. I put Quick Thinking on any frame that has >600 energy pool, as it greatly increases survivability. Natural Talent is also an essential on all heavy-casting frames.
Exilius Slot: For me, this is the only ‘variable’ slot in the build. As I see it, you have two options here – Cunning Drift for the increased range, or Speed Drift for reduced cast time. I’ve gone with Speed Drift, as casting time is critical, since you’re casting a lot. I don’t see the extra range as being particularly useful. If you’re on a big map, you’re primarily relying on Bless to give you the damage resistance you require while you close in on the enemy.
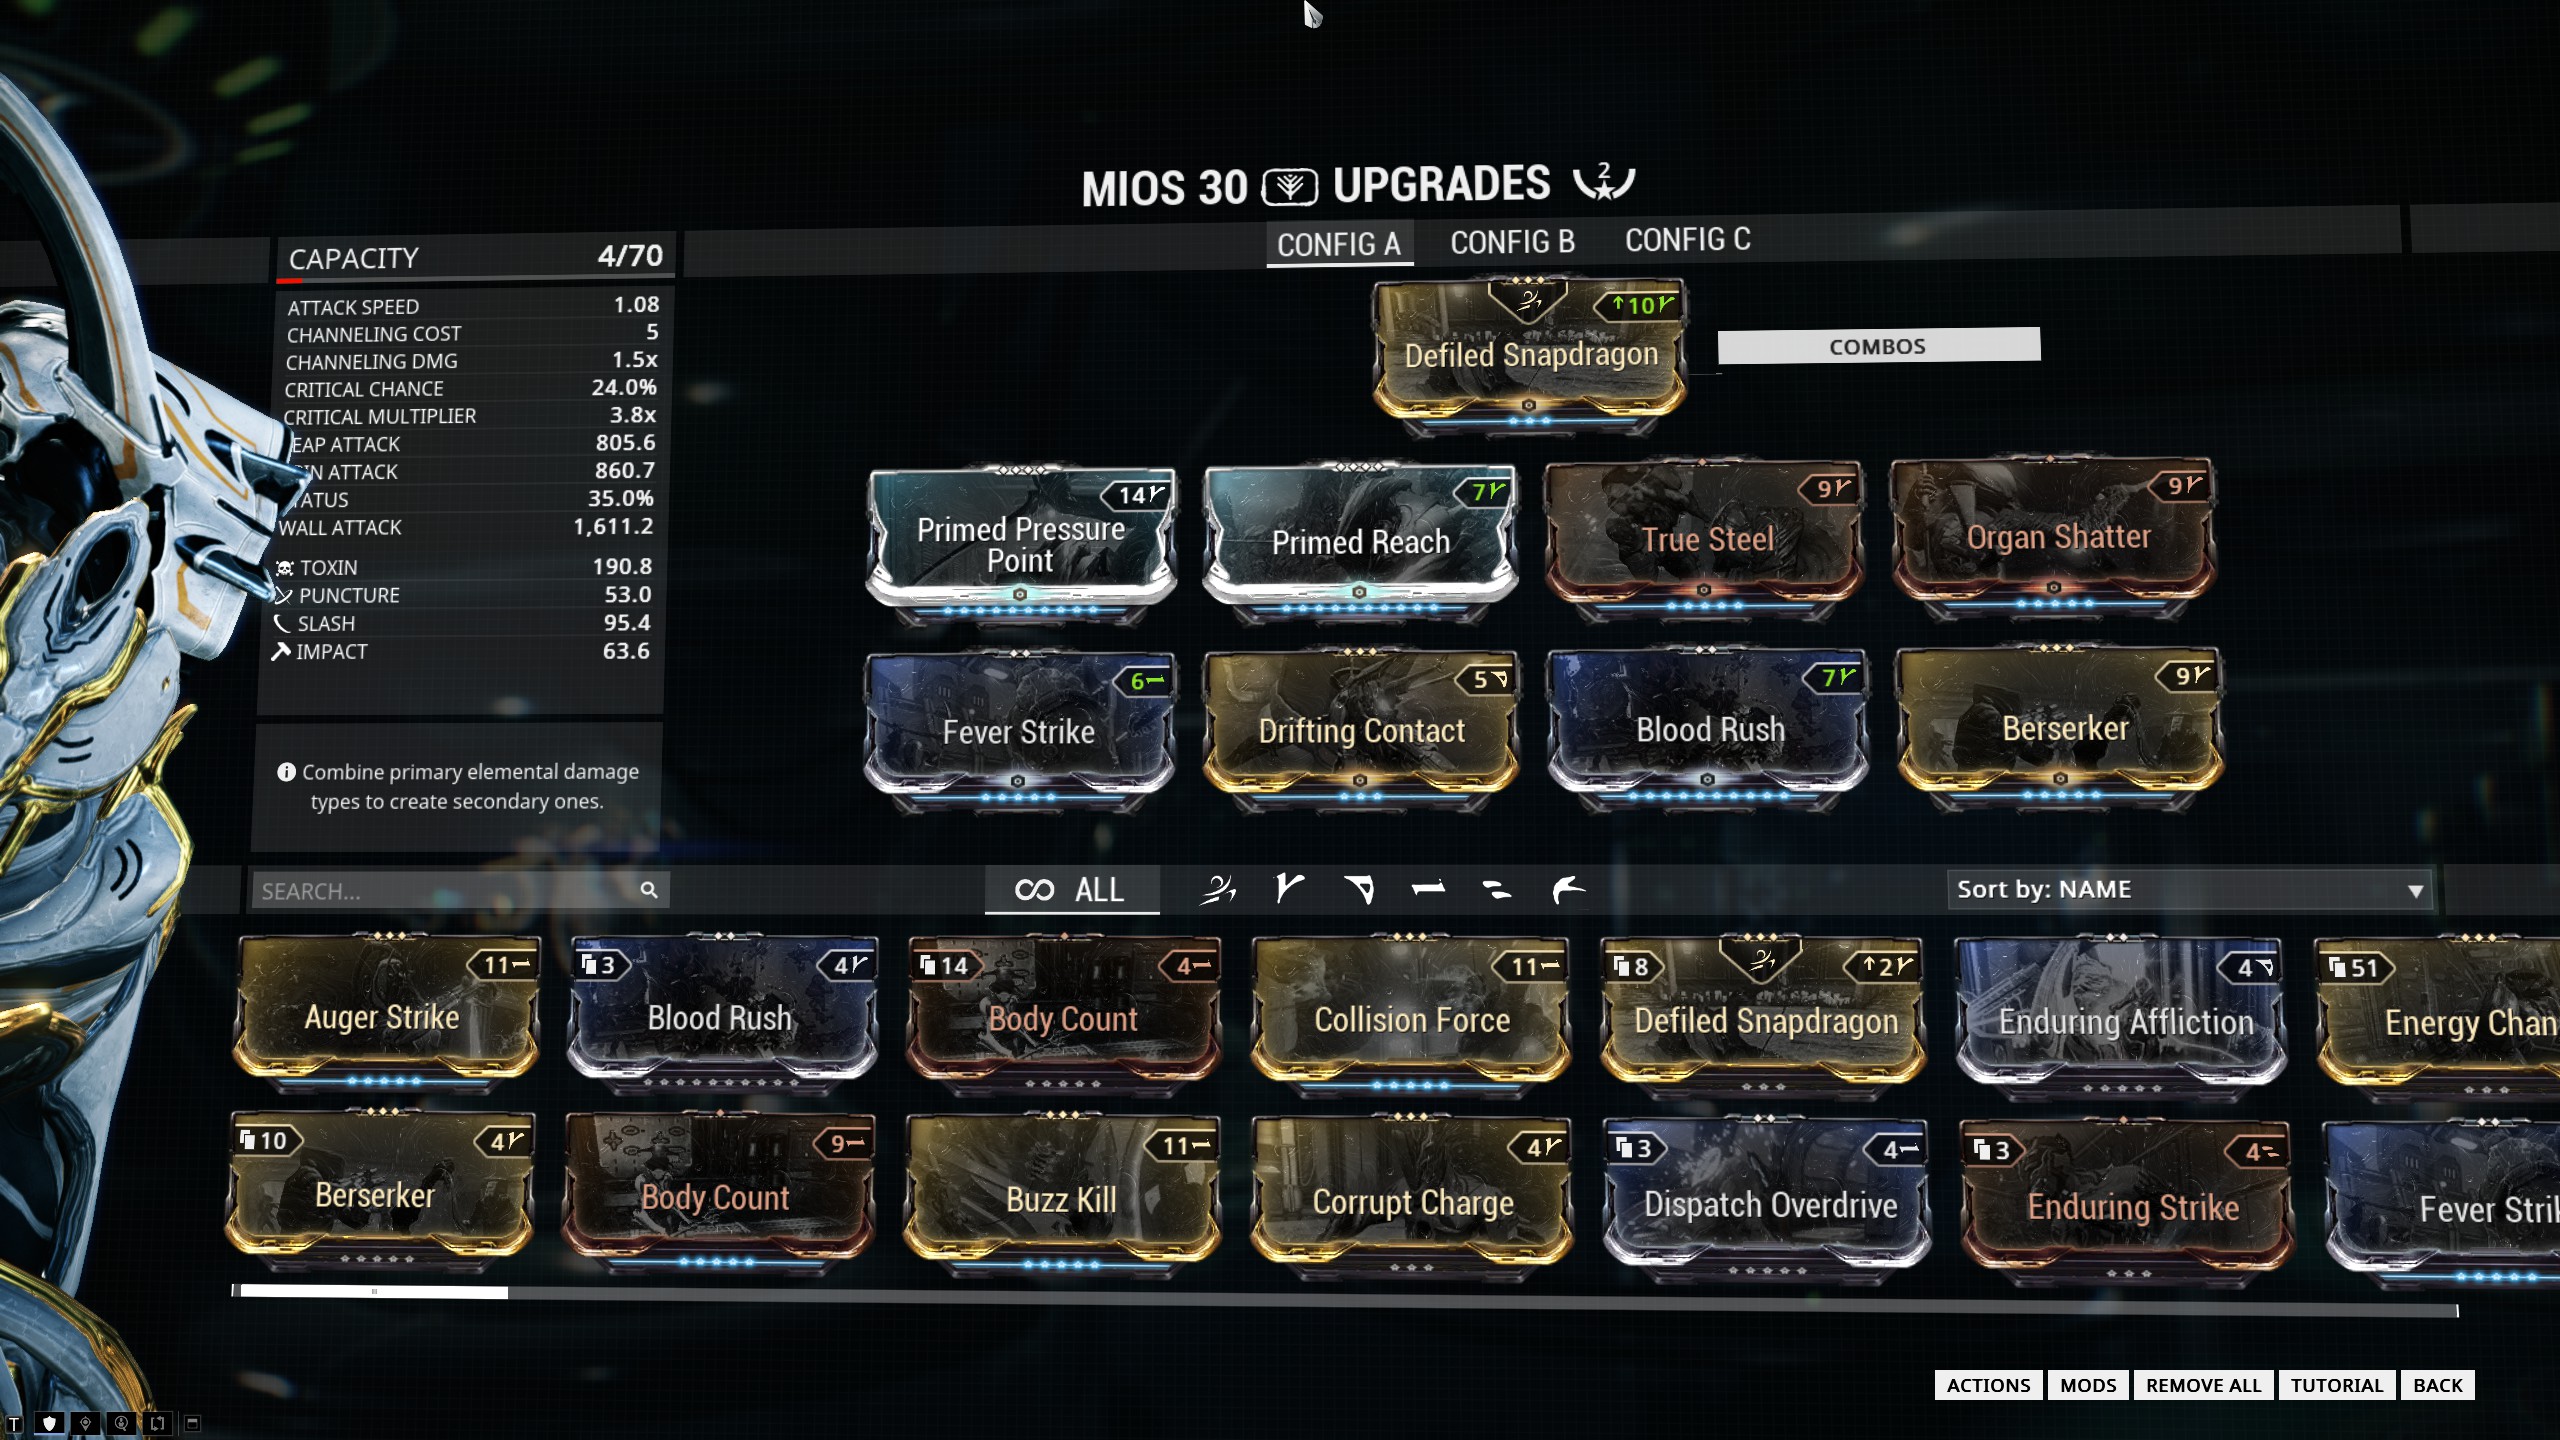
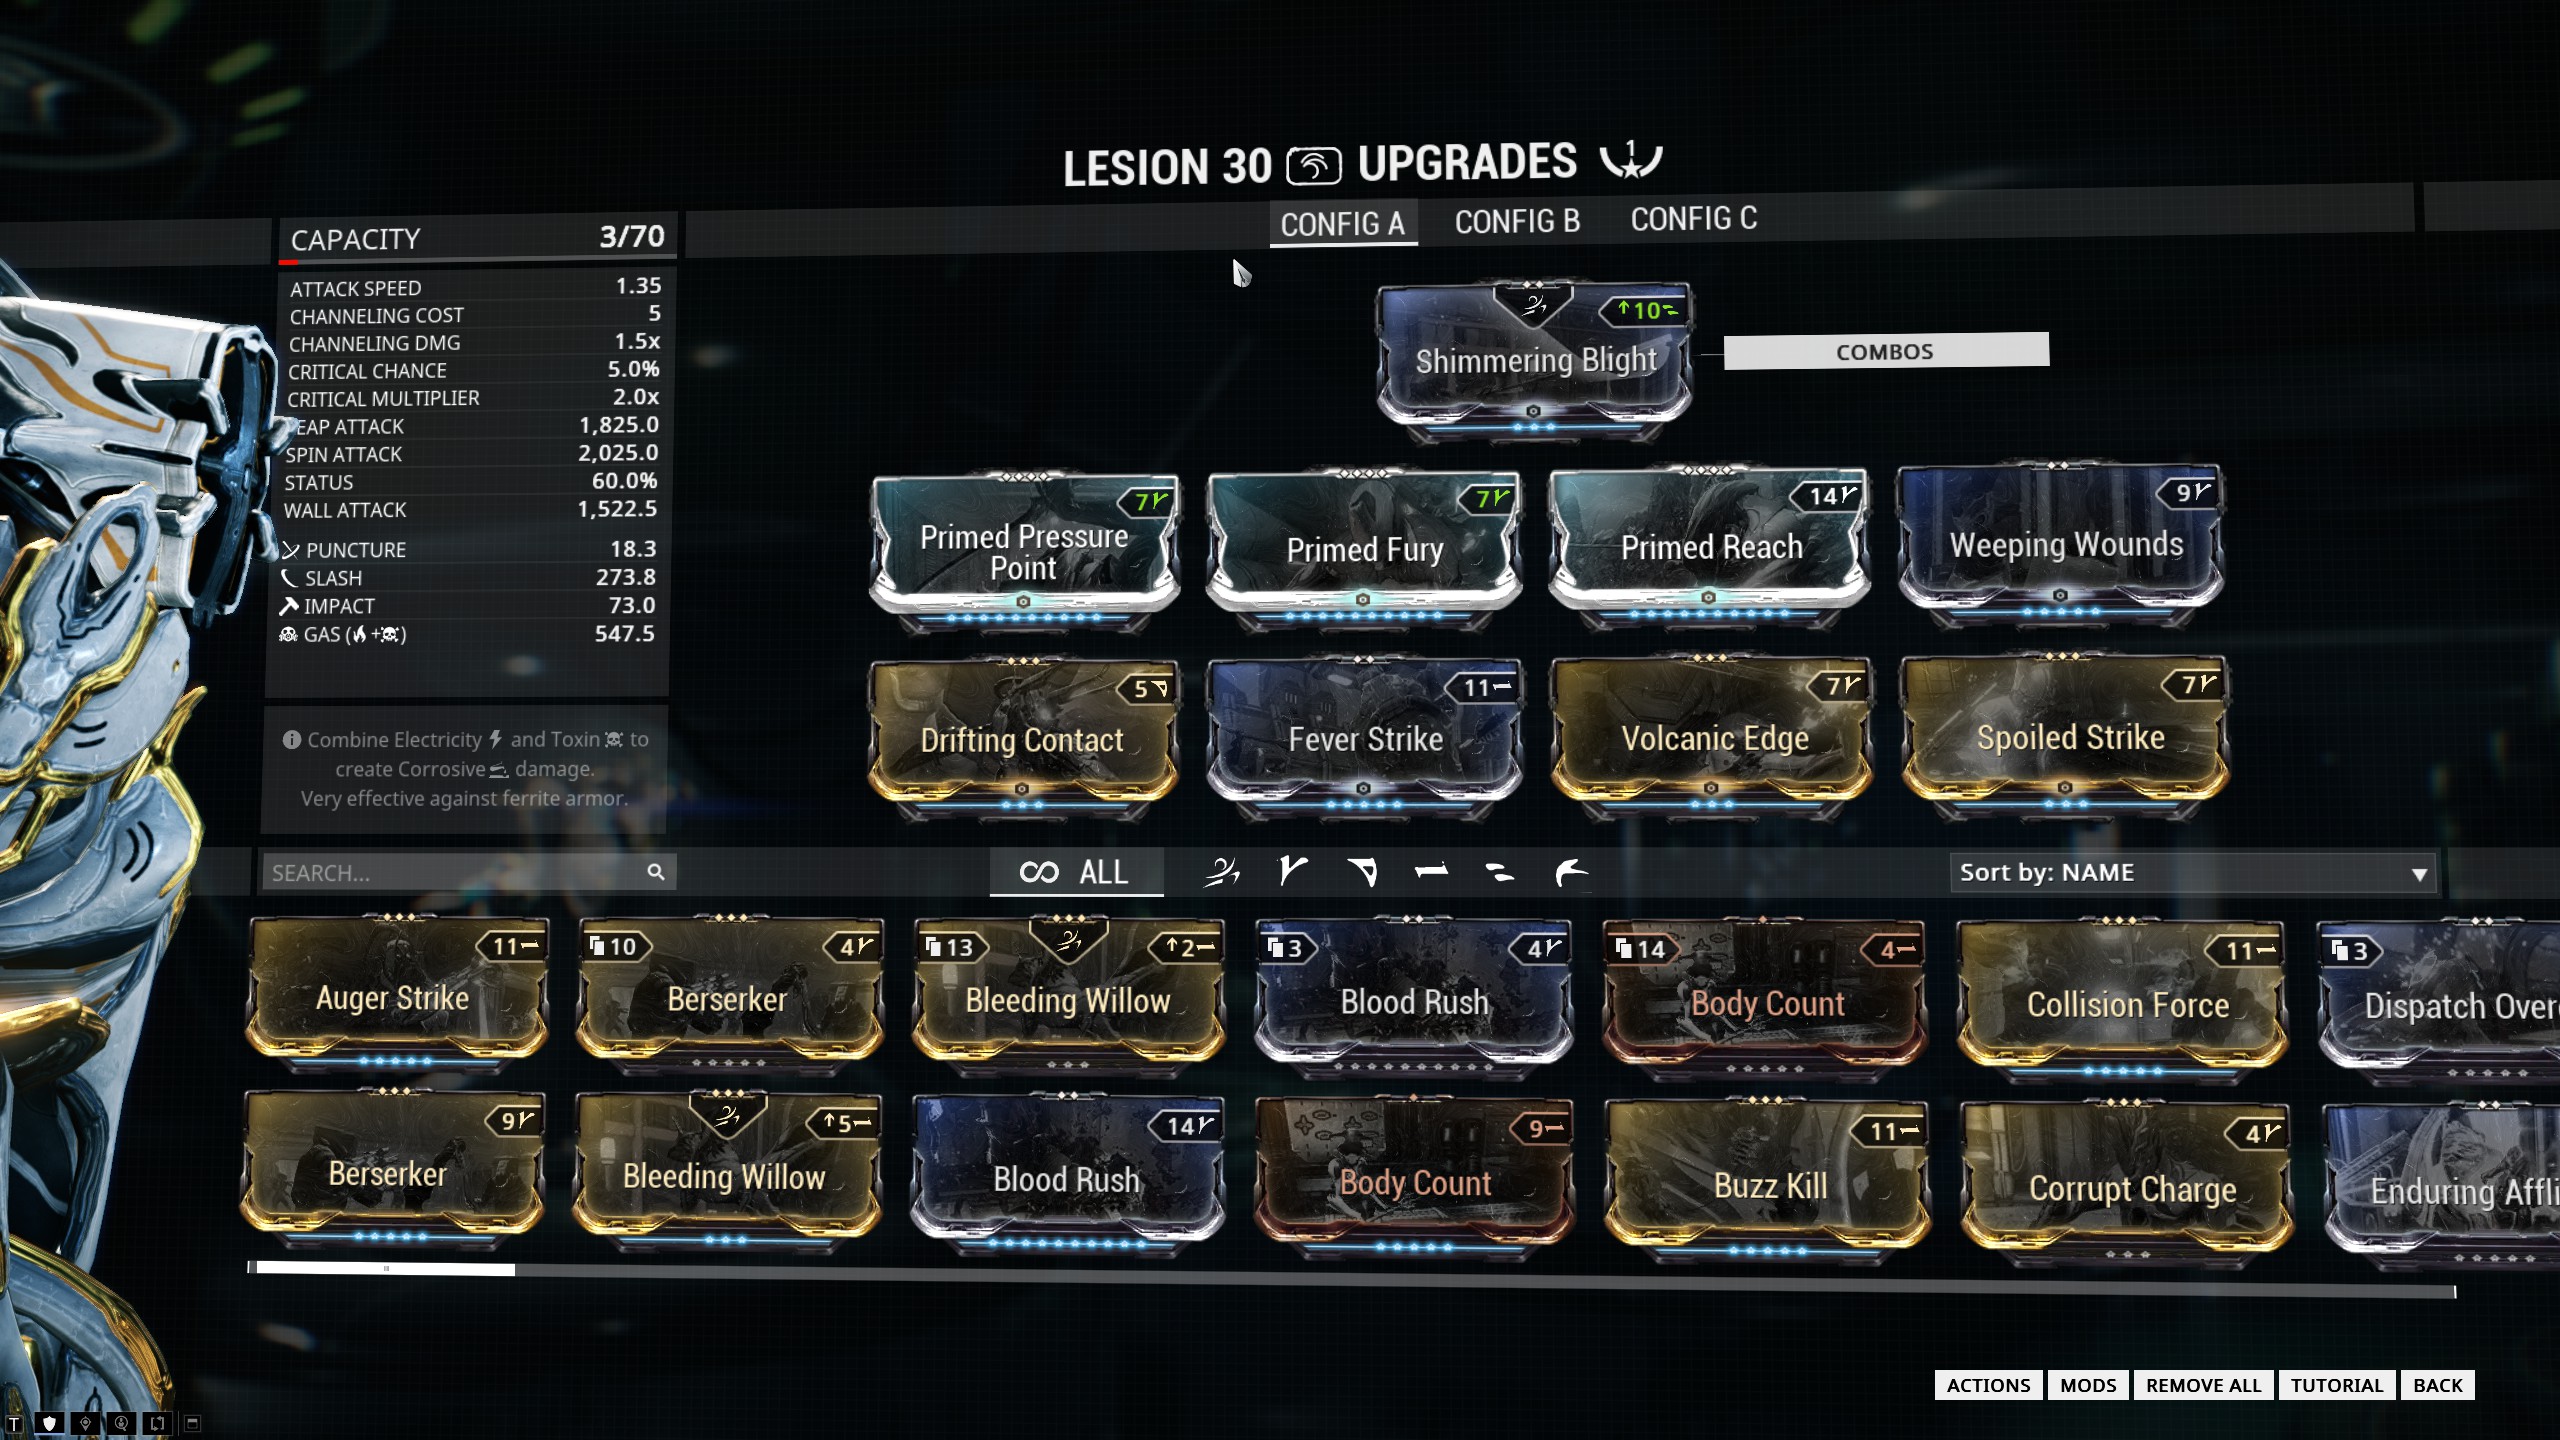
Weapons: I prefer to go melee with this build. Since you’re focussing on Link to provide you with both damage boost and damage resistance, you’re in fairly close range already. Close that gap a little further and go melee. The primary weapon that I use with Trinity is Mios. Good status chance, enormous range and great attack speed. The range and the rag-doll that Mios does gives the CC boost that Trinity needs. Another top weapon option is Lesion with its pure elemental damage and bonus toxic proc. It’s got some advantages in that it doesn’t need the ‘spool up’ time that a critical-damage weapon like Mios has. Primary and Secondary are whatever you feel like, but focus on Toxin and Slash damage.
Mios build
I prefer the Mios for missions in which there is a continuous stream of enemies, like Survivals, and also missions which have a lot of Nullifiers. The enormous range helps pop the bubbles safely.
Lesion build
The Lesion works better for missions in which the enemies are start-stop, like Defense, where you can’t keep your combo counter up continuously.
Energy Reduction Sortie
This is a significant weakness with the build above. In an energy-reduction sortie, you’ve only got 150 energy, which is not enough to pop Link, Bless and then have enough energy left over to cast Energy Vampire to top your energy pool back up. In these sorties, I swap out the Blind Rage with an Intensify.
‘Poor Man’s’ Abating Link build
If you would like to try out Abating Link, but don’t want to have to sink five forma into Trinity and get Growing Power, try this build. It’ll give you 97.2% armour strip, which is great, but won’t give you those tasty red bars.
Abating Link build 2
The main loss here is the 15% casting speed, and the 10% power strength.
How to Play
It’s fairly straightforward. The most dangerous part of the mission for a Trinity is literally the first 20 seconds, until you can start building your energy pool. With a small starting energy and low efficiency, you don’t have enough to cast Link or Bless, and then cast Energy Vampire. So you have to cast EV first, which means getting close to an enemy without any protection. So find your first enemy, EV, then drop Link. After that, it’s pretty smooth sailing. Just keep Link active all the time, for the protection and armour strip. Pop Bless when you or your squadmates need it, and keep topped up with energy. Have fun!
Here’s a video of the build in action, versus twenty level 145 Corrupted Heavy Gunners.
INTRODUCTION
In the CB400 thread on Netrider, Positron007 speculated that the CB400 (which accelerates really quickly to 70kph) accelerates as fast as a 600cc sportsbike, at least up to the first gearchange.
He speculated that the limiting factor (up to 70km/h) was not the power of the bikes (which are vastly different) but the fact that you’re trying to prevent the bikes from doing a wheelie for this whole time.
So today, I thought I’d use my nerd powers for good instead of evil, and take a crack at explaining a wheelie formulaically. I couldn’t really find anything explaining the physics behind a wheelie on Google, so I thought I’d have a crack at it myself.
Disclaimer: May be wrong.
TL;DR: Positron is right, 600cc bikes don’t really accelerate faster (to 70kph) than the CB400.
ASSUMPTIONS
Assumption 1 – That both the CB400 and the 600cc sportsbike (which I’ll call the CBR600RR from now on) are both at their ‘liftoff point’ for the whole drag-race (which will be up to 70km/h, after which the CB400 is not capable of wheelie-ing).
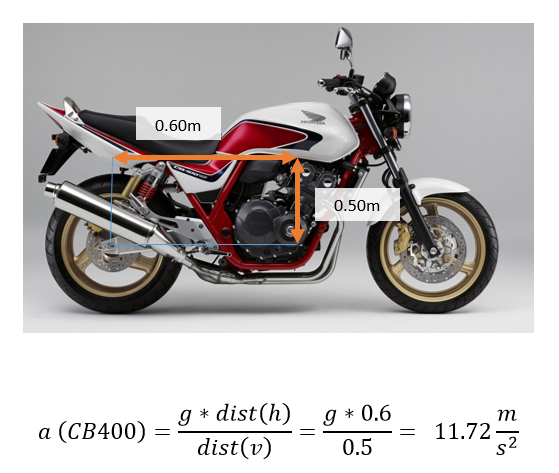
Assumption 2 – The CB400 weighs 270kg fully laden with 76kg rider, and it’s COG (with rider) lies 600mm and 500mm from the rear axle.
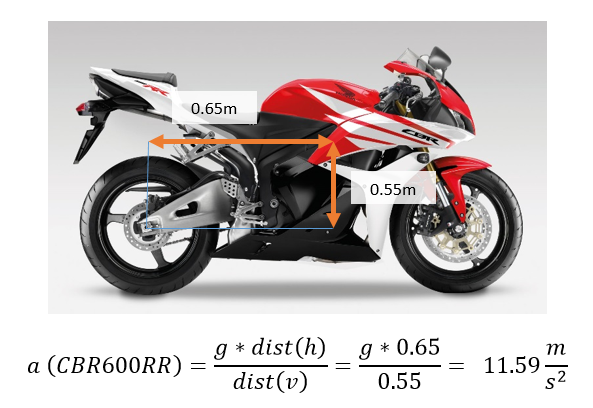
Assumption 3 – The CBR600RR weighs 273kg fully laden with 76kg rider, and it’s COG (with rider) lies 650mm and 550mm from the rear axle.
Assumption 4 – Gravity is 9.81 m/s2
DISCUSSION
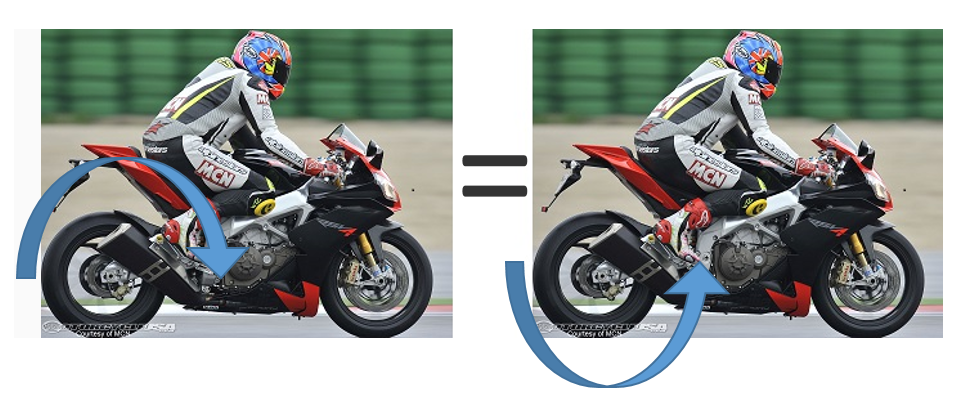
Why is the liftoff point important? A bike is accelerating at its fastest when the front wheel is at the point of becoming weightless. If the bike is accelerating any faster than this, then the front wheel will continue to lift off the ground, until the rider is on his back. (See endless YouTube videos to see this effect in action).
At liftoff point, both the liftoff and the gravitational turning moments are equal. What do I mean by this?
To describe this as a formula:
Moment (downwards) = Moment (upwards)
Aside:
I don’t think that this formula applies to drag-cars and other very-high performance vehicles. The principles do apply, but they also have some massive lifting forces created by the torquing action on their drivetrain. Bikes do not have torque-induced lift, especially at the low-power levels we’re looking at here.
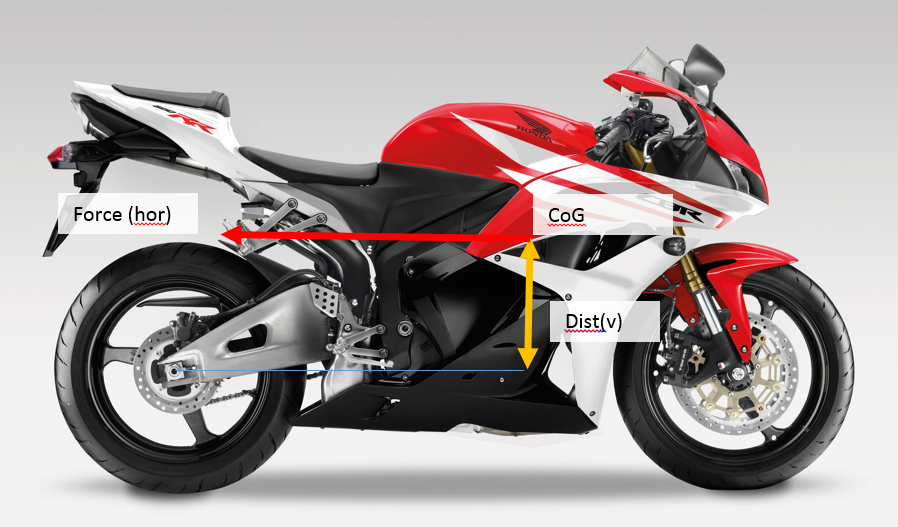
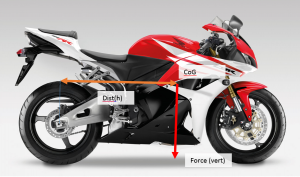
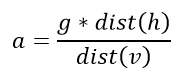
The turning moment is the force multiplied by the perpendicular distance to the turning point, and can be described by the formula:
Mt = F * D
To show the turning moments visually:
Horizontal Turning Moment
Vertical Turning Moment
Force is described by the formula
F = m * a
So, to combine all these equations
Solving for acceleration provides:
This is quite an interesting result, as the mass cancels out of both sides. Ergo, the mass of the bike has nothing to do with the bike’s ability to keep the front end off the ground. (Naturally, the bike’s mass will have a lot to do in limiting the amount of acceleration available to the bike.)
So it all comes down to the D(h) against D(v) ratio. In retrospect, this makes sense, as it is well-known that an adequately powerful cruiser can out-accelerate a sportsbike, due to its low COG and long wheelbase (more forward COG).
CONCLUSION
So comparing the CB400 against the CB600RR:
So the CB400 will actually out-accelerate the CBR, though there is not much in it.These accelerations will mean that the bikes will do 0-70km/h in 1.7 seconds. NOTE: The numbers for the vertical and horizontal distances are pure guesswork. Any assistance to provide real numbers would be greatly appreciated.
In Summary:
The maximum acceleration threshold for a bike is limited by its turning moment.
At any point below this threshold, acceleration will be limited by other factors, such as power, gearing, weight, etc.
The turning moment is a factor of the height and distance of the COG of the Bike (and rider) from the rear-axle.
Any two bikes which have sufficiently similar COG distances will have the same maximum acceleration threshold.
Motolegion are a brand of jeans designed by Australian brand RHOK. I recently purchased a pair, and this is my review of them.
For the purposes of this review, I’ll be comparing the jeans against some work-issued jeans that I have – some King Gee jeans.
King Gee’s (left), RHOK (right)
Ordering and Delivery
Ordering was very simple from the RHOK website, though the website seemed confused as to how much the jeans were – the page said $145, but the Paypal checkout said $146.
Once I placed my order, I waited for 11 days, with no jeans in sight. I sent off an email, and was quickly replied to by Marinko. They were out of stock, but had forgotten to let me know. They said that they would ship the jeans in a couple of weeks. A couple of days later, however, I received another email, saying the jeans had been mailed, but they had probably sent the wrong size.
When the jeans arrived, they were indeed the wrong size. Marinko was very apologetic, and immediately sent up the correct size jeans, and a pre-paid express post satchel to send the wrong jeans back.
First Impressions
My first impression of the jeans was how thin the material was! I was expecting a very heavy, thick denim, but the denim felt a lot thinner and flexible to my fingers than the King Gee’s. A measurement with my micrometer confirmed by suspicions – the RHOK’s measured at 0.77mm vs the King Gee’s at 0.93mm. This obviously doesn’t matter from a protection standpoint, as the Kevlar does the protecting, not the denim, but the jeans may not last as long as I’d hoped.
What the jeans lack in thickness, they definitely make up for in weight. The King Gee’s weigh in at 804 grams on the scale, the RHOK’s are 1.10kg! I don’t know where the weight comes from – probably the kevlar panels, and the huge amount of thread which has gone into stitching these jeans together.
The stitching is very heavy duty. I’ll comment more on it later.
Stylin’
The jeans are not subtle at all. Red stitching all around, and a giant logo on your ass. If there was one aspect of the style of the jeans that I could live without, it’s the logo. Given that I usually wear work-issued jeans most of the time, and these come with the corporate logo on the back, I’m not totally adverse to this idea. However, the sheer size of the logo is off-putting.
Giant Ass Logo
Some of the panels, such as above the knee, and the seat also come pre-distressed. The ‘blue’ colour is also very dark. While not black it’s definitely on the ‘navy’ side of blue.
Distressed panels
Cut
The jeans are quite long, about 1cm longer than the 87R King Gee’s, which are a very traditional 501’s – style cut.
They’re also quite wide at the boot. You’ll have no trouble at all fitting these over your Sidi race boots. Each leg averages about 1cm wider when laid flat.
Width and colour difference between the two jeans.
The belt loops are a little bit narrow in length. My belt just squeezes through.
Stitching
The stitching is extremely heavy-duty. All of the important seams are triple-stitched. One area of concern is that all the stitching is external, and doesn’t have the ‘two under, one over’ style that is found on other jeans – like the King Gee’s. This raises a slight concern that in a bad slide the stitching may possibly wear through, though this seems highly unlikely, given the strength of the stitching.
Ultra-heavy-duty stitching
Internal Stitching, RHOK’s
Internal Stitching, King Gee’s
Each stitch has a massive amount of thread going through it. I’d like to know just what percentage of the weight of the jeans is made up of thread!
Comfort
On the bike – When on the bike, the jeans are perfectly comfortable, and don’t get in the way at all. However, I found that one of the seams appears to settle right on the inside of my knee, which is uncomfortable when hugging the tank. When I sit on the bike, I need to spend a second to make sure that the leg is rotated so that the seam is out of the way.
Off the bike, the jeans are surprising uncomfortable. The main culprit is the velcro panels inside the knee pockets. Because they face towards the outside of the jeans, the velcro strip basically sits against your leg, tempered only by the thin mesh material. The sharp edges (especially the corners) of the strip poke through the mesh, and onto your leg.
This isn’t unbearably uncomfortable, but it’s pretty much continuously noticeable. I’m hoping that they soften up with wear and washing.
The Kevlar panels themselves are completely comfortable. You won’t even notice that they’re there.
Protection
The Kevlar protection is excellent, huge panels of kevlar weave covering all parts which are likely to slide along the ground in an accident. All the panels are the same size as the denim panels, and stitch into the same seams.
The hard protectors are highly weird, when compared to my other pair of riding pants (Motoline textiles). They are a standard ‘hard plastic over breathable foam’ style of protector. The knee protectors are a standard shape.
The shape of the hip protector, however, seems all wrong. They look like they have come out of a jacket, not a pair of pants. For comparison:
This is a side-by-side with the knee / elbow-forearm protectors from my Spidi jacket next to the shoulder / hip protectors from the jeans. The shoulder / hip protectors are nearly identical in shape.
Perfectly fitting ‘hip’ protector
When the hip protectors are in place, it makes you look like you’re wearing jodhpurs – it gives you fantastically wide hips. The protectors just stand out from your body, and don’t conform at all. There is a good centimetre of air from your body to the protector in the middle of the hump.
By comparison, here’s the hip protector from my Motoline textile pants.
One of these is designed for human hips.
The knee protectors can be inserted and removed through cleverly designed hidden zips below the knee.
The knee protectors go into mesh pockets that have ‘hook’ velcro on the bottom of the pocket. In addition to causing the comfort issues mentioned above, they also destroy the pocket itself. Every time you open the pocket, the hooks on the velcro tear at the mesh, which in my case is already starting to fuzz up from the abuse.
Knee pocket with Vecro ‘hook’ side up
The knee protector pockets are massive in the ‘up’ direction – they go halfway up my thigh. However, they’re not long enough in the ‘down’ direction. When I fit the pads so that they’re comfortable with a bent knee, the pads stick out the bottom of the pocket, so that the pocket can’t be done up! This is an epic flaw in the design.
They fit just fine if I rotate them 180 degrees, but I think they were meant to protect the shin, not the thigh. At this point in time, they’re just not usable. I’m going to either have to cut the knee protector with a Dremel tool (not a generally good idea, since it’ll leave some sharp edges), or buy a more standard foam protector and cut it to shape.
Summary
I bought these jeans hoping to ride them to work every day, to pop out the knee pads, and then work all day. As it stands, I can’t see myself doing that.
The knee pads are too difficult and time-consuming to put in. The hooks on the velcro also tear up the mesh extremely rapidly. Taking the protectors out once or twice a day is going to destroy the mesh in very short order.
I have two options – ride to work with the protectors in, then change to a different pair of pants. If that’s the case, I may as well wear a pair of waterproof textile pants. My second option is to ride without the protectors in place. That’s the option I’m taking at the moment, though riding without knee protectors is a concern.
The style and cut of the jeans seems aimed at a younger market segment. This is not a bad thing, but something to be aware of if you’re interested in purchasing these jeans.
Overall, I’m disappointed in the jeans. They’re not as good as I was hoping for, in comfort and practicability. I honestly can’t see myself buying another pair of these jeans, unless some of the recommended changes below are made.
Recommendations
Please note, that these recommendations are only based on my personal experience and tastes – YMMV. These are in order of my preference.
1. Fix the knee pad pockets or protectors, so that they actually match each other in size.
2. Remove the ‘hook’ velcro on the inside of the mesh pocket. Replace it with ‘loop’ velcro on the top side of the mesh pocket, then allow the owner to decide if they want to attach the ‘hook’ side to the protector.
3. Have a hip protector that is actually designed for human hips.
4. Have a second ‘subtle’ jeans style, for those who don’t want a giant logo on their ass.
5. Have a jeans style that has a more traditional tapered leg cut.
For Father’s day my ‘kids’ gave me the gift of some motorbike riding lessons. I did it with Toprider, at Rockhampton.
It was a really good course, done on a go-kart track. The track was great, as it allows you to practice all the elements of riding a low speeds.
I did the course over two days. On the first, I rode an Honda CB250. On the second, a Yamaha 400cc. The Yamaha was much heavier than the Honda, but I definitely enjoyed the extra power!