Category Archives: projects

Air-powered rocket launcher

I built a rocket-launcher on the weekend. How often can you say that? This one is air-powered, and launches paper rockets high into the air.

My brother built one for himself a while back, and for Christmas he gave me the key part (the air solenoid) and some fittings.

The basic design is a H-shape, to provide stability for the base. Apart from the solenoid, all the pieces for the launcher are made from standard PVC pipe. A quick trip to Bunnings provided everything I needed.

Typical Bunnings trip. I then cut the PVC pipe into the right lengths. I drilled a hole into one of the end-caps, and put through an old bicycle-tube valve. I made sure that it was glued and silicon-sealed it well, for air-tightness.

All the parts were then joined together with standard PVC sealant.

I then put together the solenoid section.

Put all together:

I then have another pipe that goes in the top, which the paper rocket sits one. It’s just lauched with a simple 9v battery in a box with a momentary switch:

Overall, it works great. I think I definitely over-built it, it doesn’t nearly need to be this big, could easily be half the size and still work well. I left two joins to be screwed-in, rather than sealed, so that it could be disassembled to lie flat.

New Desk

I’d been wanted to build myself a new desk for a while. The current one I had, while being a good size, was pretty terrible as a desk. The top surface was all flaking off, and it was a simple trestle style. Many years of heavy monitors had given it a distinct bow.

The place I’ve got my desk is also quite large, I can fit in something bigger than a standard 1.5m or 1.8m long desk. Trying to find bigger desks is hard, and quite expensive. The solution came to me when I was looking around Bunnings one day. They sell extruded aluminium tubes, and a bunch of angle connectors to join them together. You can basically make anything that’s of square design. I sketched up a design. The main requirement was strength, I didn’t want the desk to bow, particularly with its long 2.3m length. So I added a third leg, a third beam along the top and lots of cross-bracing.

Here’s the pile of beams from Bunnings:

I then cut them into shorter lengths with a hacksaw, and started joining them together.

Here you can see a couple of the angle-connectors.

Partially-assembled leg parts in a wine box:

The top surface is a giant piece of 22m MDF. This is definitely overkill, I should have gone with a thinner piece of MDF.

The two sides of the desk, with top. You can see the triple-leg design.

Here’s the final desk in action, complete with huge piles of crap.

The two vertical posts that you see on the right-side edge are for future upgrades – I’m thinking of putting some shelves above it. All up the total cost of the desk was about $220. I’m very happy with it. It’s large and strong, and doesn’t bend.

Lenovo x220 Hackintosh

For the last few weekends, I’ve been doing a little project, trying to get Mac OS X running on my work-issued Lenovo x220 laptop. It’s quite a good laptop with an i7 processor, 8 gigs of RAM.

However, I can’t really use it. It’s got a pretty locked-down copy of Windows 7 running on it, and I don’t have admin rights. That’s fine, my workplace pays for this computer, they can set it up how they want. So I decided to experiment, to see how I could use the computer in other ways without affecting the ‘work’ nature of the computer at all.

The first thing I tried was to swap out the hard drive. The Lenovo makes this pretty easy, with just one screw on the outside case. With one of my spare laptop drives in, I then installed Windows 8. Naturally, that worked just fine, but switching out the HD every time I wanted to do something different is a bit cumbersome.

So then I tried a new feature of Windows 8 called Windows To Go. It’s basically a full install of Windows 8 that can run from a USB stick or external hard drive. I then created a WTG external drive. This worked fine, and allowed me to play Steam games with no hassle, and without affecting the work hard drive at all.

After a few weeks, I thought that I’d see what other possibilities might be achievable. I’ve really missed my MacBook Pro since the motherboard died about a year ago now, but I was never quite able to justify to myself to buy a new one. I’ve always been an Apple and Mac fan, so one day, I did a search, to see if it was possible to create a ‘Hackinosh’ with the Lenovo.

I found a few pages that had some methods on how to do it. The main one that was very useful was from the ThinkPad Forums.

The main issues I had to work through were:

  • Creating a boot USB stick.
  • Installing Mac OS X
  • Copying across the Windows 7 partition and fixing the bootloader.

Creating the USB boot disk gave me a bit of grief at first. I tried creating one using various instructions that I found on various pages, that mostly involved copying files across from the Mountain Lion installer DMG. This method copied the files across, but didn’t leave me with a drive that the Lenovo would see as bootable. The next method I tried was from using the Lion Disk Maker tool. However, while this tool works really well with genuine macs, it doesn’t work so well for Hackintoshes.

The method which ended up working for me was by using TonyMac’s UniBeast tool. This worked well, and got me to the installer window. Then  I got stuck at the next step. The installer only works for GPT-formatted hard drive’s and the Lenovo (since it uses Windows 7) only allows MBR. (Windows 8 now works with GPT). Fortunately, the main Thinkpad Forum page came to the rescue again, pointing to this page on the OSx86.net site.

On that page are some hacked installers, which allow you to install onto MBR partitions. Once these were copied across onto the USB installer, it then allowed me to install, and get to first boot.

At first boot, things got a little tricky. At this point, you need to install various extensions to get the computer to recognise all the hardware, change a few configuration files, set up the boot manager and patch the DSDT, so that control of the processor is correct. At this point, I got a lot of kernel panics. Much fun.

The forum posts lists two methods for first-boot setup, one by ‘Fraidos125’, the other by ‘Superkhung’. Some people record success using one method, some people record success using the other. Unfortunately, neither worked for me. I kept reading through the thread, trying to figure out why I wasn’t having any success. Then, toward the end of the thread, I saw that someone suggested using both methods in conjunction, one after the other. I gave this a try and had success!

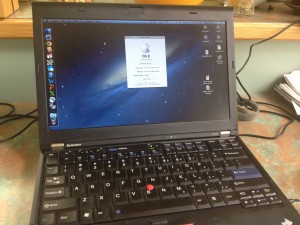
Here’s a photo of Mac OS running on the Lenovo.

IMG_1863

There are only three residual issues with the ‘Hack OS X’ install – the wifi doesn’t work, the bluetooth keyboard installer pops up every time you boot and 3rd USB port doesn’t work.

Wifi not working is a recognised issue with the 220’s. Mac OS just doesn’t have a driver for this wifi card. Most people just buy a new wifi card and install it into their laptop, since a new card only costs about $15. I don’t want to do this with a work-issued laptop though, so I’ll find a USB alternative.

The second issue – the bluetooth installer is slightly annoying. The keyboard and trackpad is PS2, and work fine with the right extension. However, on bootup, the computer doesn’t quite seem to recognise that a keyboard is connected, and starts up the bluetooth keyboard installer every time. It’s easy to quit out of it, but it’d be better if it didn’t show up at all.

The third problem is strange. The x220 has three USB ports, two USB2, and one USB3 port. The USB3 port doesn’t work at all. I suspect that there’s something wrong with my configuration files. Most x220’s only have 2 USB ports, with the i7 computers having three. I think that it’s one of the files that I downloaded from the Thinkpad forums that’s causing the issue. It hasn’t bugged me enough yet that I want to fix it, but I’ll probably add that to my list for later.

MacOS Info

 Once I had Mac OS installed, I decided to try and make the computer dual-boot, so I wouldn’t have to swap out the hard-disk everytime I went to work. Doing this was almost as tricky as the MacOS installation. The main problem is that I don’t have administrator rights on the work partition (Windows 7), so I had to work completely ‘hands off’ from it.

One of the things which helped this was the WTG boot drive, and this came in very handy for the dual-boot set up. It enabled me to boot up the 220 without having to touch the internal drive, allowing me to manipulate it as I needed.

The first step was to copy an image of the Win 7 partition from one HD to the other. I tried a couple of methods, with no success, but then I found a method that worked. For this I used a tool called DriveImage XML. It works like the image copy-and-move capabilities of Mac OS’s Disk Manager.  It allowed me to copy across the Windows 7 partition from one drive to another, with no changes.

Once the partition was copied across, I then re-installed MacOS into the other partition. Then I just had to get a bootloader working so that I could select which partition to start. The Hackintosh installer uses a boot-loader called Chameleon, but I couldn’t get this to work with the Win 7 partition. I tried creating a Win 7 rescue USB and fixing the Win 7 partition, but that didn’t work either.

The easy way to get both to work is to use a program called EasyBCD on Windows. It works very well, but I don’t have admin rights on the Win 7 partition. Fortunately, the WTG drive came to the rescue again. Running EasyBCD on it, I was able to fix the bootloader on the laptop’s drive. It boots into the Windows Boot Loader (the finest of text-based user interfaces), which then enables me to select which partition I want to boot from. If I select MacOS, it then goes to the Chameleon boot loader, which allows me to select boot-options for the MacOS partition.

Now both partitions are working great. I’ve got my pristine work partition, and a Mac OS partition for fun. It makes me want to install a few other OS’s, just to see if I can. Maybe a Quin-boot Work / MacOS / Win 8 / BSD / Linux setup.

Project for another weekend.

New Printer

For a while, I’ve been thinking about building a new printer. I’m pretty happy with how the Prusa has worked out, but I’m becoming keenly aware of its limitations.

One of the main limitations that I see with the Prusa is that it looks like it’s made by amateurs. It doesn’t have that ‘Polished’ look that makes it look like it’s being designed by an industrial designer. That makes it hard to keep inside the house.

The other limitation is the print quality. Whilst you can get excellent prints with the Prusa, I think I’m definitely at the point of diminishing returns, where I’ll have to put in exponential levels of effort to get small improvements. A superior printer design should get to a higher level of printing quality with less effort.

I haven’t quite decided what printer I’m going to build yet. For a while, I was settled on building a MendelMax printer. The problem that I see with the MendelMax is that it’s inefficient with its use of the aluminium extrusions. While replicating the Prusa frame has its advantages, I think that its structural elements are overkill, and still don’t solve the Mendel’s issue of having little support along the X-axis.

But then I saw two new printers, namely the Quantum Ord, and the ‘Aluminum Mendel’. The Ord bot looks fantastic, looks also good enough to be a commercially-made device. It’s very minimalist, and uses the Makerslide as a structural element, not just as a sliding surface.

I love the design of the Quantum Ord, but MakerSlide at the moment is highly unobtainable. I’ve been signed up for the Makerslide shop for a few weeks, but every time he releases a batch (at about 12-1am in the morning here), it’s sold out by the time I wake up and check my emails. To make matters worse, I didn’t even receive the email when Barton announced he was selling some Ord bot kits, so I missed out on them as well. I’m also considering a merge-build. Use Makerslide for the axes movement on a MendelMax. However, this seems to be extremely wasteful usage of the Makerslide, since it’s strong enough to be used as a structural element by itself.

Since the Makerslide is so hard to obtain, I’m thinking of going for the ‘Aluminum Mendel’. I really like this design. It’s much simpler than any other design, with the exception of a Printrbot, but uses Aluminium extrusions for strength and rigidity. One feature that I particularly like is that all the components of the printer are inside the frame. Nothing hangs out, not even electronics or the power supply. Extremely clean. One thing that annoys me however is the ‘Mendel’ tag. It’s not a Mendel in any way, in my opinion. Mendel printers should have the ‘raised A-frame’ design. It does have a suspended X-axis, like the Mendel, but that’s about the only similarity.

I’m still deciding at the moment. I’ll post again when I’ve made my choice.

Temperature Controller

One of my other hobbies is home-brew beer. However, here in Blackwater, it gets hot, and controlling the temperature of the fermenter is very difficult. The best I’ve been able to do is wrap a wet towel around the fermenter, and have the end of the towel in a bucket of water. As the water evaporates, it keeps the fermenter cool. This works moderately well, but it only maintains a temperature of about 24 degrees, and requires frequent checks.

To make life easier, a lot of home brewers use a dedicated fridge. I was lucky enough to get an old upright freezer for free from a friend. To then use it for home-brewing I just needed a temperature controller to keep the fridge at my ideal fermenting temperature.

There are no fully-built temperature controllers available which just plug in-line to the fridge and control its temperature. (Which seems strange, you think there’d be a market for it). However, there’s plenty you can buy which needs to be wired up. Since I’m stepping up into the world of physical computing with the Prusa, I thought it’d be a good small project to start with.

There’s heaps of temperature controllers on eBay, that look like this:

Willhi temperature controller

So I picked one up. Unknown to me at the time, there’s actually two types of temperature controllers. Ones that do heating OR cooling, or ones that do heating AND cooling. They look almost identical, and sell for the same price. I bought the OR controller, thinking I was buying the AND controller. I thought the AND controller would be more useful, since you could then wrap a heat belt around the fermenter, while its in the fridge. Then, no matter if the temperature was hot or cold, the fermenter would then stay at a constant temperature.

To wire these up, I bought some cheap $3 extension cords from Bunnings, to cut up and wire inline. A problem with these controllers is that they have exposed 240v connectors at the back. Not good from a safety perspective.

Exposed 240v connections.

So I bought a hobby box and some cable glands to put the controller in. Holes then needed to be cut into the box. This was the hardest part of the operation. I needed a 70mm by 32mm hole, and three 19mm holes in the back. After more than an hour of drilling and sawing, I could immediately see why Dremel tools are so popular. I wasn’t able to finish it that day, as my biggest drill bit was 12mm. I had to go borrow a Unibit from a guy at work. The end result:

Front of box
Rear of box

A bit rough around the edges but pretty good. The edges don’t worry me, as they’ll be hidden behind the faceplate. I then fitted the controller inside it, and wired it up, as I thought it should be, judging from the text on the top of the controller.

The wired up controller

The wiring was a bit tight inside the box, but not too much of a cause for concern.

 Box all ready to go
After I got to this stage, I plugged it in, (just the inlet power only) to give it a quick test. It all looked good, but it was operating in heating mode, not cooling mode. I fiddled with the buttons, but I couldn’t figure out how to put it into cooling mode, nor set the other features (compressor cooldown time, temperature deviation allowed, etc.)

At this point, I realised that there were two different types of temperature controllers, and that I had got the lesser model. Oh well, having the heater unit simultaneous with the cooling would only be useful two me for a couple of weeks per year. If I really want to go that way, I can just switch controller over every morning and afternoon.

I wrote off to the ebay seller, hoping to get a pdf manual from them. After shooting the email off, I had a bit of a look amongst the other ebay auctions, to see if they had some of the manual text in there. In one of the auctions for the better controller, I saw a manual which said that you need to hold down the ‘set’ button to access the other settings. I tried it with my controller, and it worked! I was all good to go, or so I thought.

A day later, I got an email back from the ebay seller, with the manual in it. Included in the manual was a wiring diagram, and I had it wrongly wired it up. One of the leads was meant to go direct from input to output, and another was meant to be wired in series with the switch. Fortunately, it was easy to change, I just had to loosen off the glands, and reconnect the cables.

Once it was wired-up again, I took it to work, to have the sparky give it a look over, and compare it to the wiring diagram. He gave it his thumbs-up, so I bought it home and plugged it in.

The working controller

A great thing with this setup is that I’ll be able to use it to make Lager beer (which has a much lower fermenting temperature, never achievable with temperatures here), as well as put it properly through the lagering process. I think I’ll give that a try next winter, when the outside temperatures mean that the fridge gets too cold for ale yeast. So instead of using a heater element, I’ll just use colder yeast.

Update:
Since there’s been some interest in this controller, and it’s manual, I’ve PDF’d it and uploaded it. You can find it here.