Author Archives: David

Assembling, Stage Three

Continuing on with my build. First up is attaching the X-carriage, and gluing it to the bushings.

X-Axis Attached

Sliding Smoothly

I went to the hardware store this afternoon, and picked myself up some 3.2mm drill bits. With this in hand, I was able to drill the holes I needed to in the base plate, and then attach it to the printer.

Y-Axis Belt attached

X-Axis Belt
Printer with all Axes finished

Next up on the list is to assemble the extruder. I don’t really need to do this step, since I’ll be replacing the extruder base with one that’s compatible with the Arcol extruder, but I thought I’d do it anyway, get the experience, and try and various running experiments without the hot end or filament.

First Pieces in Place

Springs fitted
Finished Extruder – Front

Finished Extruder – Rear

And that’s all the hardware complete! Next up will be to wire everything up.

Assembling, Stage Two

After spending overnight drying out, the bushings were well attached to the base, and were sliding smoothly up and down the rods.

As I mentioned in my previous post, I’m a bit stuck on a couple of small points, particularly the holes I need to drill in the base-plate, but I’ll keep pushing ahead. First up for today, after measuring up the base-plate, is to attach the Y-motor, and make sure that it’s all square. Due to the lack of  a 1mm allen key, I can’t attach the aluminum gears that I bought, so I’m just affixing the printed ones for now. I can definitely see the advantage in the machined gears. I have to pull the belt pretty tight to stop it from skipping over the (not perfectly sharp) gears.

Attached Y-motor

After the motor was attached, I started to work on the X-axis. This is dead simple. 

X-Axis parts

The quality of Nophead’s parts really is fantastic:

Once the X-axis was built, I set it aside on a spare chair.

Next up, I had to level everything up, so I could properly attach the smooth Z-rods:

Levelling up the printer

Attaching Smooth rods

Not quite square yet.

Then disaster struck. My one-year-old son, Ben, knocked the X-axis parts onto the ground. When I picked it up, there was a large crack through the part!

 Split!

I think that it was a combination of the drop, plus I suspect that I overtightened the retaining screws. I think that this highlights a weakness in the design, as the screws are pushing against the ‘grain’ (the printed layers) of the printed material. This can be seen in the above photo, as the part has split along a layer boundary. I suspect that it would be better to rotate the retaining screws 90 degrees, so that they push across the grain.

I found some glue, and put the part back together. Time will tell if this repair will last, but I think I’ll definitely move this part towards the top of the list of parts to print out once the printer’s running, just in case.

Glued part
One of the nice things about using Nophead’s parts is that it’s got his Z-axis couplers by default. These look to be a much more robust solution to z-wobble.
I had a bit of trouble attaching them at first. The part looks like it’s designed for a 6mm spindle, but the motor spindle was only 5mm. A quick check of the part on Thingiverse answered it for me – the spindles need rubber sleeves over the top of them.

Nophead’s Z-couplings

Z-Axis threaded rods

 Z-Axis Motors

I attached the z-couplings to the motors and driving rods. That was the end of the second day’s build.

I’ve also realised that I’ve got a problem. The hot-end I’ve got (Arcol) won’t attach to Wade’s extruder. I need to get a new one printed up. I’ll hit up the Australian Forums, to see if I can get someone to help.

End of second day

Attached Couplings

Glued Z-Axis bushings
A Bit Stuck

Argh. I’m trying to move onto the next stage of construction, but I’ve got a small problem. The next stage involves drilling two 3mm holes in the base-plate to attach the toothed belt, but both my 3mm drill bits are broken.

In addition, I need a 1mm hex key to tighten the grub screw holding the toothed gear to the y-motor. However, the smallest hex key I’ve got is a 2.5mm. Fortunately, I’ve been able to get around this one through the use of a T6 Torx screwdriver.

Time to go non-linear, and build out of sequence.

Assembling, Stage One

Time to start construction! First up is to construct the side A-frames. Everything started off well.

First frame-base

Slightly messy work-bench (aka kitchen table)

First A-frame assembled

Second A-frame assembled

Next up was to build the front and rear threaded rods.

Front Threaded Rods

The front rods assembled fine. Then in was time to assemble the rear rods here I ran into some small troubles. I only had one rod left! Checking the prusa-build website, I soon found my problem. I was using the 440mm threaded rods instead of the 294mm threaded rods. The Visual Instructions I was using don’t specify which rods you need at this stage, so I just grabbed the ones that I thought were right.

So I made myself a mental note: submit a bug report to Visual Instructions to specify which threaded rod you need. I was quite annoying (and slow) to have to unthread all the nuts off the rods, then thread them onto the correct rods.

Front and Rear rods in place

Front and Rear rods in place 

Next up is to assemble the top threaded rods. I made sure to grab the right length this time! These were pretty easy to assemble
 

 Top Threaded Rods

After the top rods are in, it’s back to the bottom, to put in the Y-Axis rods and the lower z-bar holders

 Lower Bars in Place

Lower Bars in Place

Once the Y-Axis smooth rods were in place, I spent a fair amount of time (as recommended in the instructions) making sure that the rods were parallel, both to themselves and the frame. The PLA bushing were then attached

The last stage for today will be to glue the base-plate onto the Y bushings. I’ll let that dry overnight, and resume tomorrow.

Spinning Motor, Take 2

Now armed with a full set of jumpers, I thought I’d try and re-create my motor-spinning test from a couple of weeks ago.

I carefully fitted all the jumpers to the shield (three jumpers per stepper motor for 1/16 stepping), then hooked up the power and started Pronterface.

Success! The motor is now spinning backwards and forwards. I’m now definitely all set to start assembling the printer over the weekend.

One of These Things is Not Like the Other

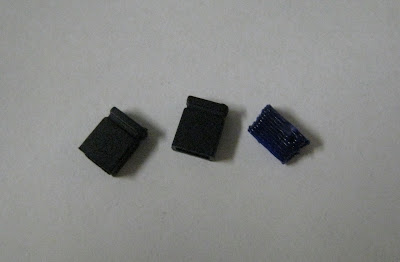
As I mentioned in a previous post, my efforts to get the stepper motors to move were stymied back a lack of jumpers on the RAMPS shield. Auzze sent up some jumpers in the post, but there were only 11 jumpers and one random bit of plastic:

It looks like it’s a tiny little test-piece that Auzze might have been using for calibration purposes. Fortunately, I’ve got a spare jumper lying around, so it won’t be a drama in getting the printer up and running.

Hardware Arrives!

My lovely wife went to the post office today to pick up a parcel. When I got home, I saw that it was the long-awaited hardware kit!

Needless to say, I’m pretty excited that I can finally begin work on the printer. Unfortunately, I was already going to be spending a lot of time this weekend bottling the first batch of beer made in the temperature-controlled fridge, so I won’t be able to spend too much time on the printer.

Getting a Motor To Spin

Since I’m still waiting for the hardware to arrive, I thought I’d try and hook up one of the stepper motors to the electronics, and try and get it to spin. Easy enough little task.

So I hooked up the power supply to the board, taking extreme care to make sure I get the polarity right on the cable. I then hooked up the motor to the extruder port, and then the electronics to the computer. I then put on one of the toothed gears on the motors, so that its movement would be clear.

Motor Test Setup

I then fired up pronterface using my little script, connected to the electronics, and hit ‘extrude’.

‘hmm’ went the motor, but with no movement. That seemed a little strange. I tried extruding a larger amount. Still no luck.

I went through various alternatives, plugging in a different motor, trying a different axis, even adjusting the potentiometers on the stepper motor drivers. No luck. With nothing else I could think of, I went to the reprap IRC channel, where there where many willing helpers with suggestions. Most of them suggested ideas that I had already thought of.

One IRC-er suggested that the problem was that I was missing jumpers on the RAMPS shield board. To check, I pried up the stepper motor drivers and had a look. No jumpers! With no jumpers in place, the board was trying to do full stepping, rather than 1/16th stepping.

Cursing Auzze under my breath, I shot him a quick email, letting him know that I was short 12 jumpers. He was extremely apologetic, and promised to quickly throw some in the post.

Hopefully the jumpers will fix the problem, and the motor will spin on command.

Easier Starting of Pronterface

Starting Pronterface from the command line gets old pretty quickly. Ordinarily, I’m a big fan of of the command line, and usually use it several times a week, but using it just to start up a graphical program is not ideal.
To make it easier, I wrote a little micro-script in TextWrangler (my favorite Mac text editor) that looks like this:
# This little script starts pronterface
python /Users/david/Documents/Reprap/Printrun/pronterface.py 
Then saved the text file (creatively called ‘Start Pronterface’) to the Reprap directory. I then open up the file information dialog (command – I) and changed the ‘open with’ section so that the file opens in Terminal, like so:
File Information Dialog
Once that option has been set, a simple double-click will open up the script in Terminal, which will then start the Pronterface program.

Missing Virtual Com Port

As I mentioned in a previous post, when using Pronterface or Arduino, I mentioned that the virtual com port was dropping out, and requiring re-installation.

When I was attempting to do more experiments with the electronics, I had the same problem again. The virtual com port was just not showing up. I tried re-installing the software several times, but the port was still not showing up in Arduino.

It was becoming quite frustrating, so I turned to Google. I started searching for “arduino virtual com port”. Luckily, on the Arduino website, it came up with this line:

Make sure that the board is plugged in: the serial port menu refreshes whenever you open the Tools menu, so if you just unplugged the board, it won’t be in the menu.

So my problem was that I was starting up Pronterface or Arduino without having the RAMPS board plugged in first. So yeah, that was frustrating.