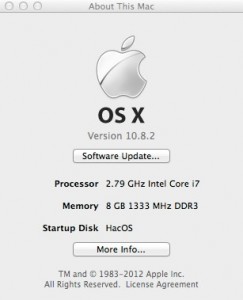
For the last few weekends, I’ve been doing a little project, trying to get Mac OS X running on my work-issued Lenovo x220 laptop. It’s quite a good laptop with an i7 processor, 8 gigs of RAM.
However, I can’t really use it. It’s got a pretty locked-down copy of Windows 7 running on it, and I don’t have admin rights. That’s fine, my workplace pays for this computer, they can set it up how they want. So I decided to experiment, to see how I could use the computer in other ways without affecting the ‘work’ nature of the computer at all.
The first thing I tried was to swap out the hard drive. The Lenovo makes this pretty easy, with just one screw on the outside case. With one of my spare laptop drives in, I then installed Windows 8. Naturally, that worked just fine, but switching out the HD every time I wanted to do something different is a bit cumbersome.
So then I tried a new feature of Windows 8 called Windows To Go. It’s basically a full install of Windows 8 that can run from a USB stick or external hard drive. I then created a WTG external drive. This worked fine, and allowed me to play Steam games with no hassle, and without affecting the work hard drive at all.
After a few weeks, I thought that I’d see what other possibilities might be achievable. I’ve really missed my MacBook Pro since the motherboard died about a year ago now, but I was never quite able to justify to myself to buy a new one. I’ve always been an Apple and Mac fan, so one day, I did a search, to see if it was possible to create a ‘Hackinosh’ with the Lenovo.
I found a few pages that had some methods on how to do it. The main one that was very useful was from the ThinkPad Forums.
The main issues I had to work through were:
- Creating a boot USB stick.
- Installing Mac OS X
- Copying across the Windows 7 partition and fixing the bootloader.
Creating the USB boot disk gave me a bit of grief at first. I tried creating one using various instructions that I found on various pages, that mostly involved copying files across from the Mountain Lion installer DMG. This method copied the files across, but didn’t leave me with a drive that the Lenovo would see as bootable. The next method I tried was from using the Lion Disk Maker tool. However, while this tool works really well with genuine macs, it doesn’t work so well for Hackintoshes.
The method which ended up working for me was by using TonyMac’s UniBeast tool. This worked well, and got me to the installer window. Then I got stuck at the next step. The installer only works for GPT-formatted hard drive’s and the Lenovo (since it uses Windows 7) only allows MBR. (Windows 8 now works with GPT). Fortunately, the main Thinkpad Forum page came to the rescue again, pointing to this page on the OSx86.net site.
On that page are some hacked installers, which allow you to install onto MBR partitions. Once these were copied across onto the USB installer, it then allowed me to install, and get to first boot.
At first boot, things got a little tricky. At this point, you need to install various extensions to get the computer to recognise all the hardware, change a few configuration files, set up the boot manager and patch the DSDT, so that control of the processor is correct. At this point, I got a lot of kernel panics. Much fun.
The forum posts lists two methods for first-boot setup, one by ‘Fraidos125’, the other by ‘Superkhung’. Some people record success using one method, some people record success using the other. Unfortunately, neither worked for me. I kept reading through the thread, trying to figure out why I wasn’t having any success. Then, toward the end of the thread, I saw that someone suggested using both methods in conjunction, one after the other. I gave this a try and had success!
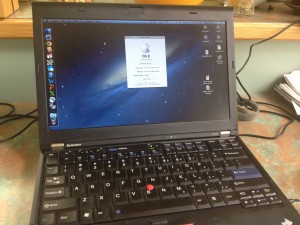
Here’s a photo of Mac OS running on the Lenovo.
There are only three residual issues with the ‘Hack OS X’ install – the wifi doesn’t work, the bluetooth keyboard installer pops up every time you boot and 3rd USB port doesn’t work.
Wifi not working is a recognised issue with the 220’s. Mac OS just doesn’t have a driver for this wifi card. Most people just buy a new wifi card and install it into their laptop, since a new card only costs about $15. I don’t want to do this with a work-issued laptop though, so I’ll find a USB alternative.
The second issue – the bluetooth installer is slightly annoying. The keyboard and trackpad is PS2, and work fine with the right extension. However, on bootup, the computer doesn’t quite seem to recognise that a keyboard is connected, and starts up the bluetooth keyboard installer every time. It’s easy to quit out of it, but it’d be better if it didn’t show up at all.
The third problem is strange. The x220 has three USB ports, two USB2, and one USB3 port. The USB3 port doesn’t work at all. I suspect that there’s something wrong with my configuration files. Most x220’s only have 2 USB ports, with the i7 computers having three. I think that it’s one of the files that I downloaded from the Thinkpad forums that’s causing the issue. It hasn’t bugged me enough yet that I want to fix it, but I’ll probably add that to my list for later.

Once I had Mac OS installed, I decided to try and make the computer dual-boot, so I wouldn’t have to swap out the hard-disk everytime I went to work. Doing this was almost as tricky as the MacOS installation. The main problem is that I don’t have administrator rights on the work partition (Windows 7), so I had to work completely ‘hands off’ from it.
One of the things which helped this was the WTG boot drive, and this came in very handy for the dual-boot set up. It enabled me to boot up the 220 without having to touch the internal drive, allowing me to manipulate it as I needed.
The first step was to copy an image of the Win 7 partition from one HD to the other. I tried a couple of methods, with no success, but then I found a method that worked. For this I used a tool called DriveImage XML. It works like the image copy-and-move capabilities of Mac OS’s Disk Manager. It allowed me to copy across the Windows 7 partition from one drive to another, with no changes.
Once the partition was copied across, I then re-installed MacOS into the other partition. Then I just had to get a bootloader working so that I could select which partition to start. The Hackintosh installer uses a boot-loader called Chameleon, but I couldn’t get this to work with the Win 7 partition. I tried creating a Win 7 rescue USB and fixing the Win 7 partition, but that didn’t work either.
The easy way to get both to work is to use a program called EasyBCD on Windows. It works very well, but I don’t have admin rights on the Win 7 partition. Fortunately, the WTG drive came to the rescue again. Running EasyBCD on it, I was able to fix the bootloader on the laptop’s drive. It boots into the Windows Boot Loader (the finest of text-based user interfaces), which then enables me to select which partition I want to boot from. If I select MacOS, it then goes to the Chameleon boot loader, which allows me to select boot-options for the MacOS partition.
Now both partitions are working great. I’ve got my pristine work partition, and a Mac OS partition for fun. It makes me want to install a few other OS’s, just to see if I can. Maybe a Quin-boot Work / MacOS / Win 8 / BSD / Linux setup.
Project for another weekend.
