I’ve recently been modifying the website for the church I used to attend when I lived in Blackwater – coalcitycc.com.au
The main thing I did was change the theme from the old ‘Pinboard’ theme to the newer ‘Twenty Seventeen’ them. It’s a fantastic theme that I was able to do a lot of things with. There were a few things that I had to figure out how to do. The next couple of posts will be a few short ones so I can document the changes I made.
The most annoying thing with the new theme was the uppercase title on the homepage. To change this – go to ‘Admin > Appearance > Editor’ then select ‘Stylesheet’ ‘style.css’. Then scroll down to line 1580. The ‘site-title’ section should look like this:
I run Tiny-Tiny-RSS as my Google Reader replacement. It’s fantastic. However, now I’ve moved to a VDS, and I needed to install some additional packages. These weren’t listed on the TTRSS install site, so I’ve listed them here, so I can find them again in the future.
When the Odroid is running, it’s got a bright flashing blue light. I found this to be very annoying, so I found a way to switch it off. You can switch it off directly by running the code:
su -
echo none > /sys/class/leds/blue\:heartbeat/trigger
But for a more permanent solution, just add the second line to the file –
/bin/odroid-tweaks
This file gets called by odroid-tweaks.service, which gets run at startup.
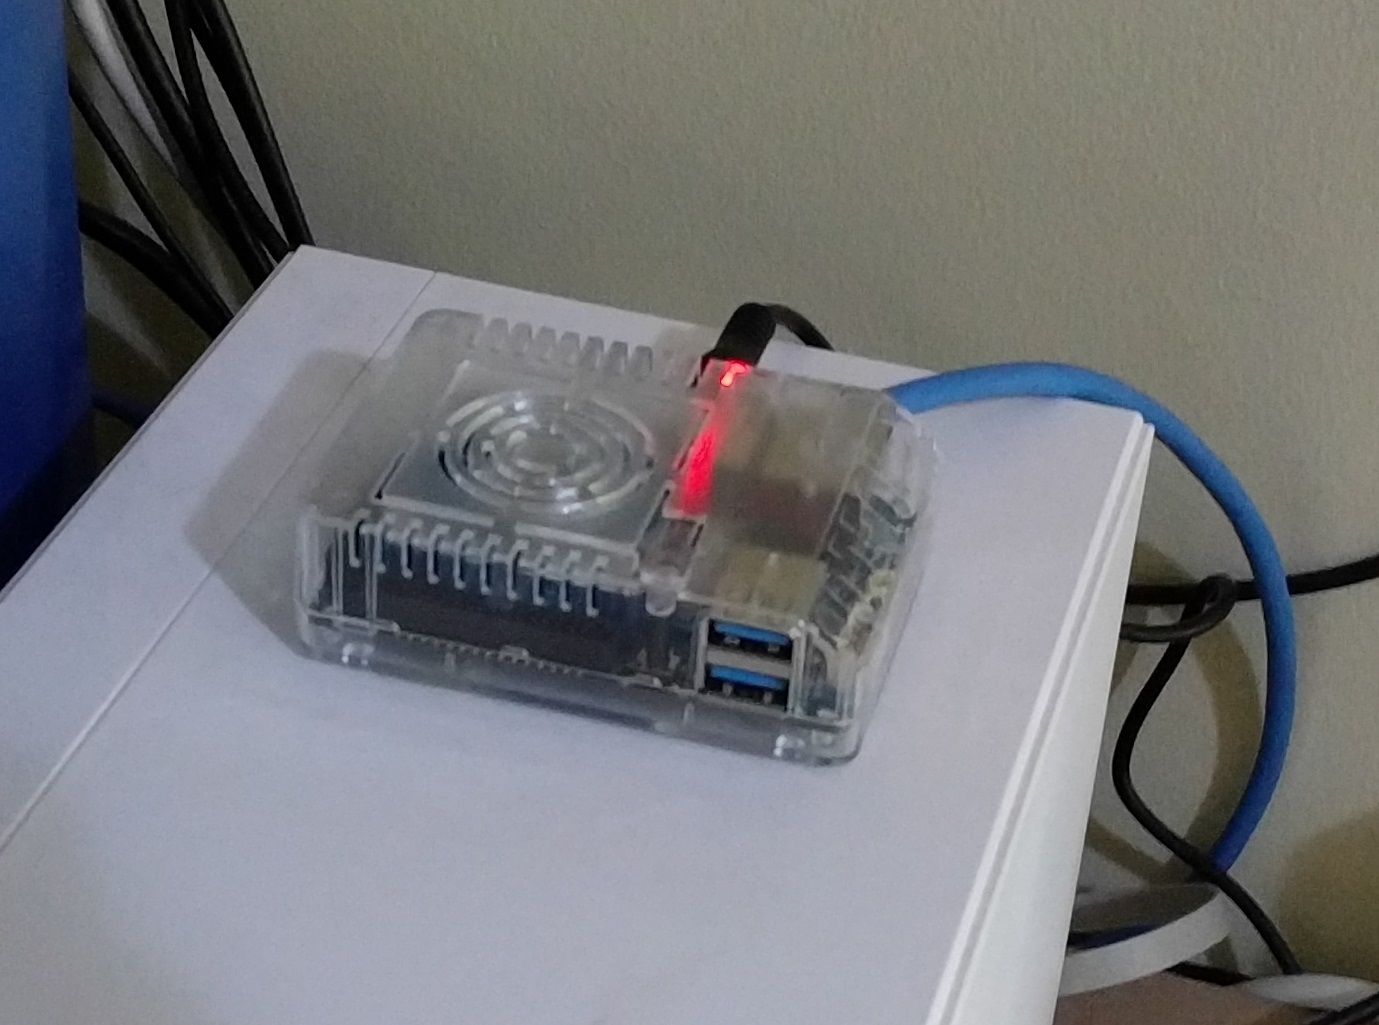
I picked this up a couple of weeks ago. It’s the Odroid XU-4. It’s basically a Raspberry Pi, but with significantly enhanced specifications – it uses a Samsung Exynos processor, EMMC storage and 2GB ram.
It’s about twice the price of the Pi, but with over 4x the performance. It can run a variety of Linux and Android OS’s, with images supplied by the factory, though you can use any you want, provided you can compile up the right kernel.
You really notice the performance increase over the Pi. The eMMC storage, in particular, is vastly faster than running of an SD card like the Pi does.
I thought I’d use it as a Linux server. I wanted to try to run one at home, but I didn’t want to run my large desktop computer, with its high power needs. The Odroid only uses a few watts at peak.
So how’s it working? It works great. I’ve currently got this blog and another site that I use hosted on it, and I think it actually works quicker than the shared hosting that I was using previously.
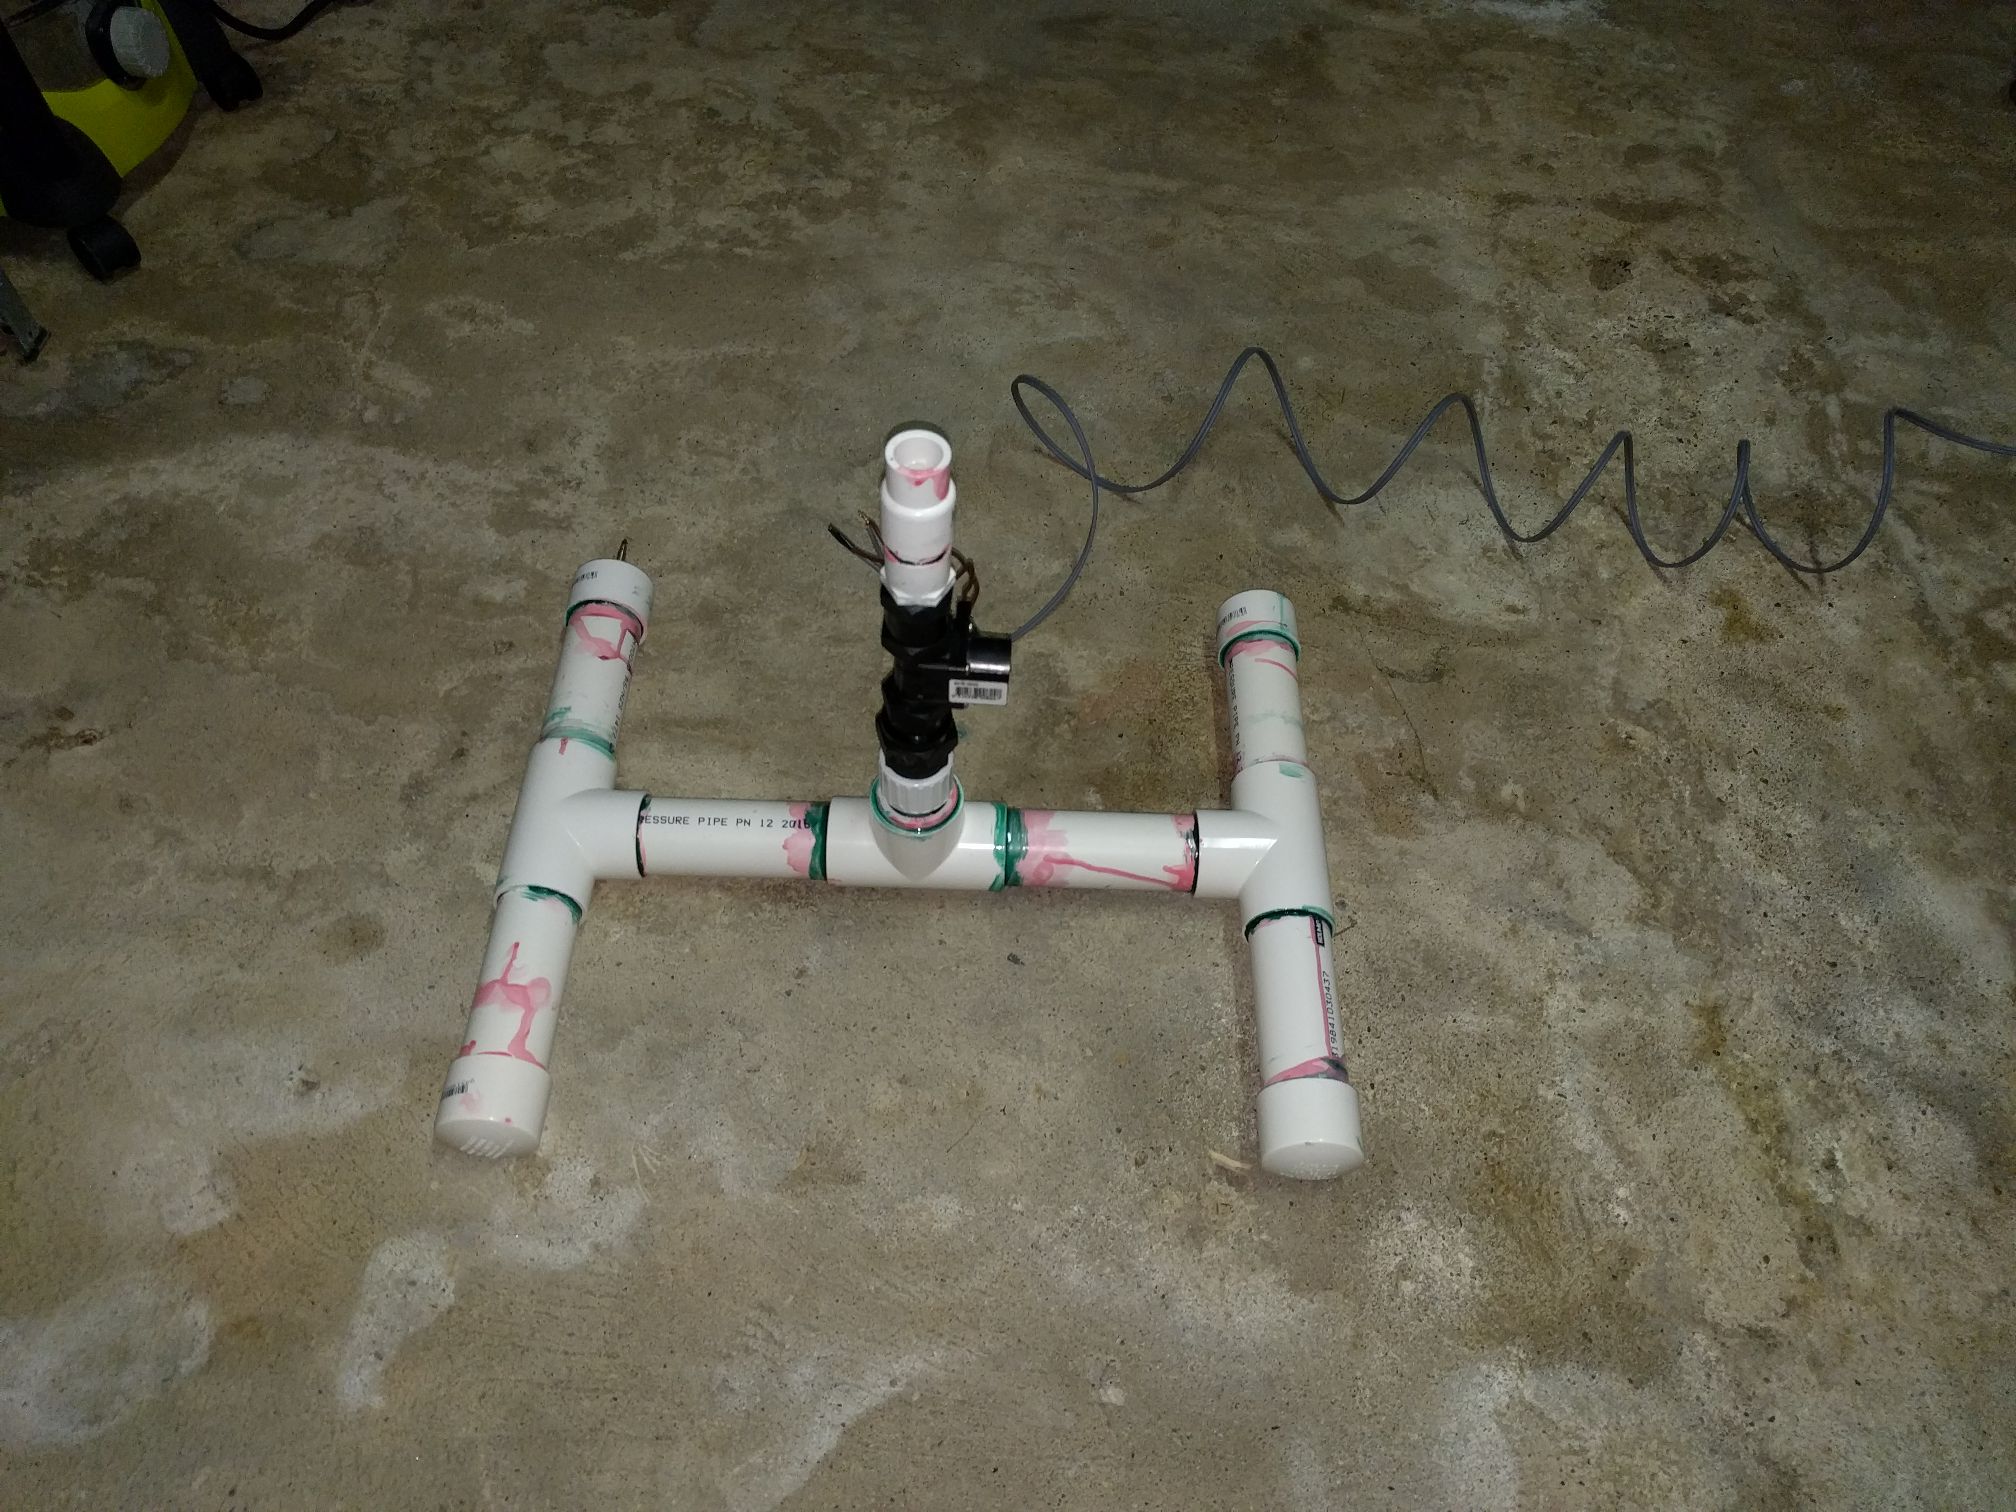
I built a rocket-launcher on the weekend. How often can you say that? This one is air-powered, and launches paper rockets high into the air.
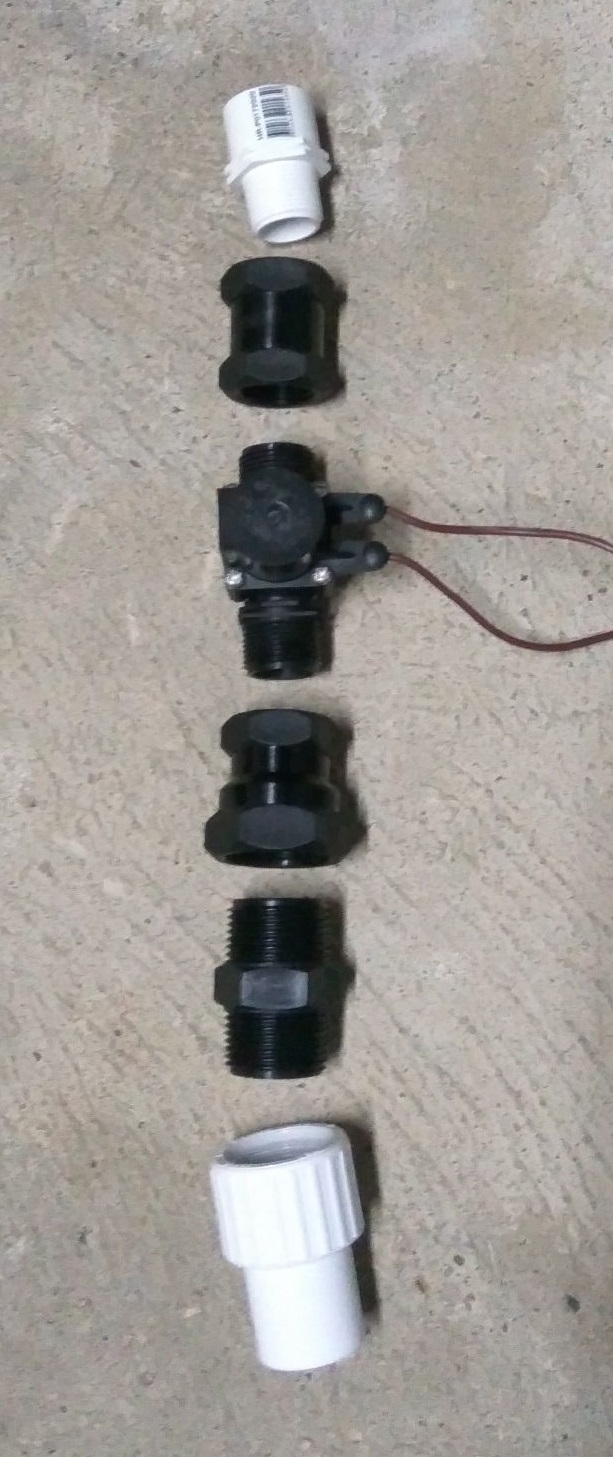
My brother built one for himself a while back, and for Christmas he gave me the key part (the air solenoid) and some fittings.
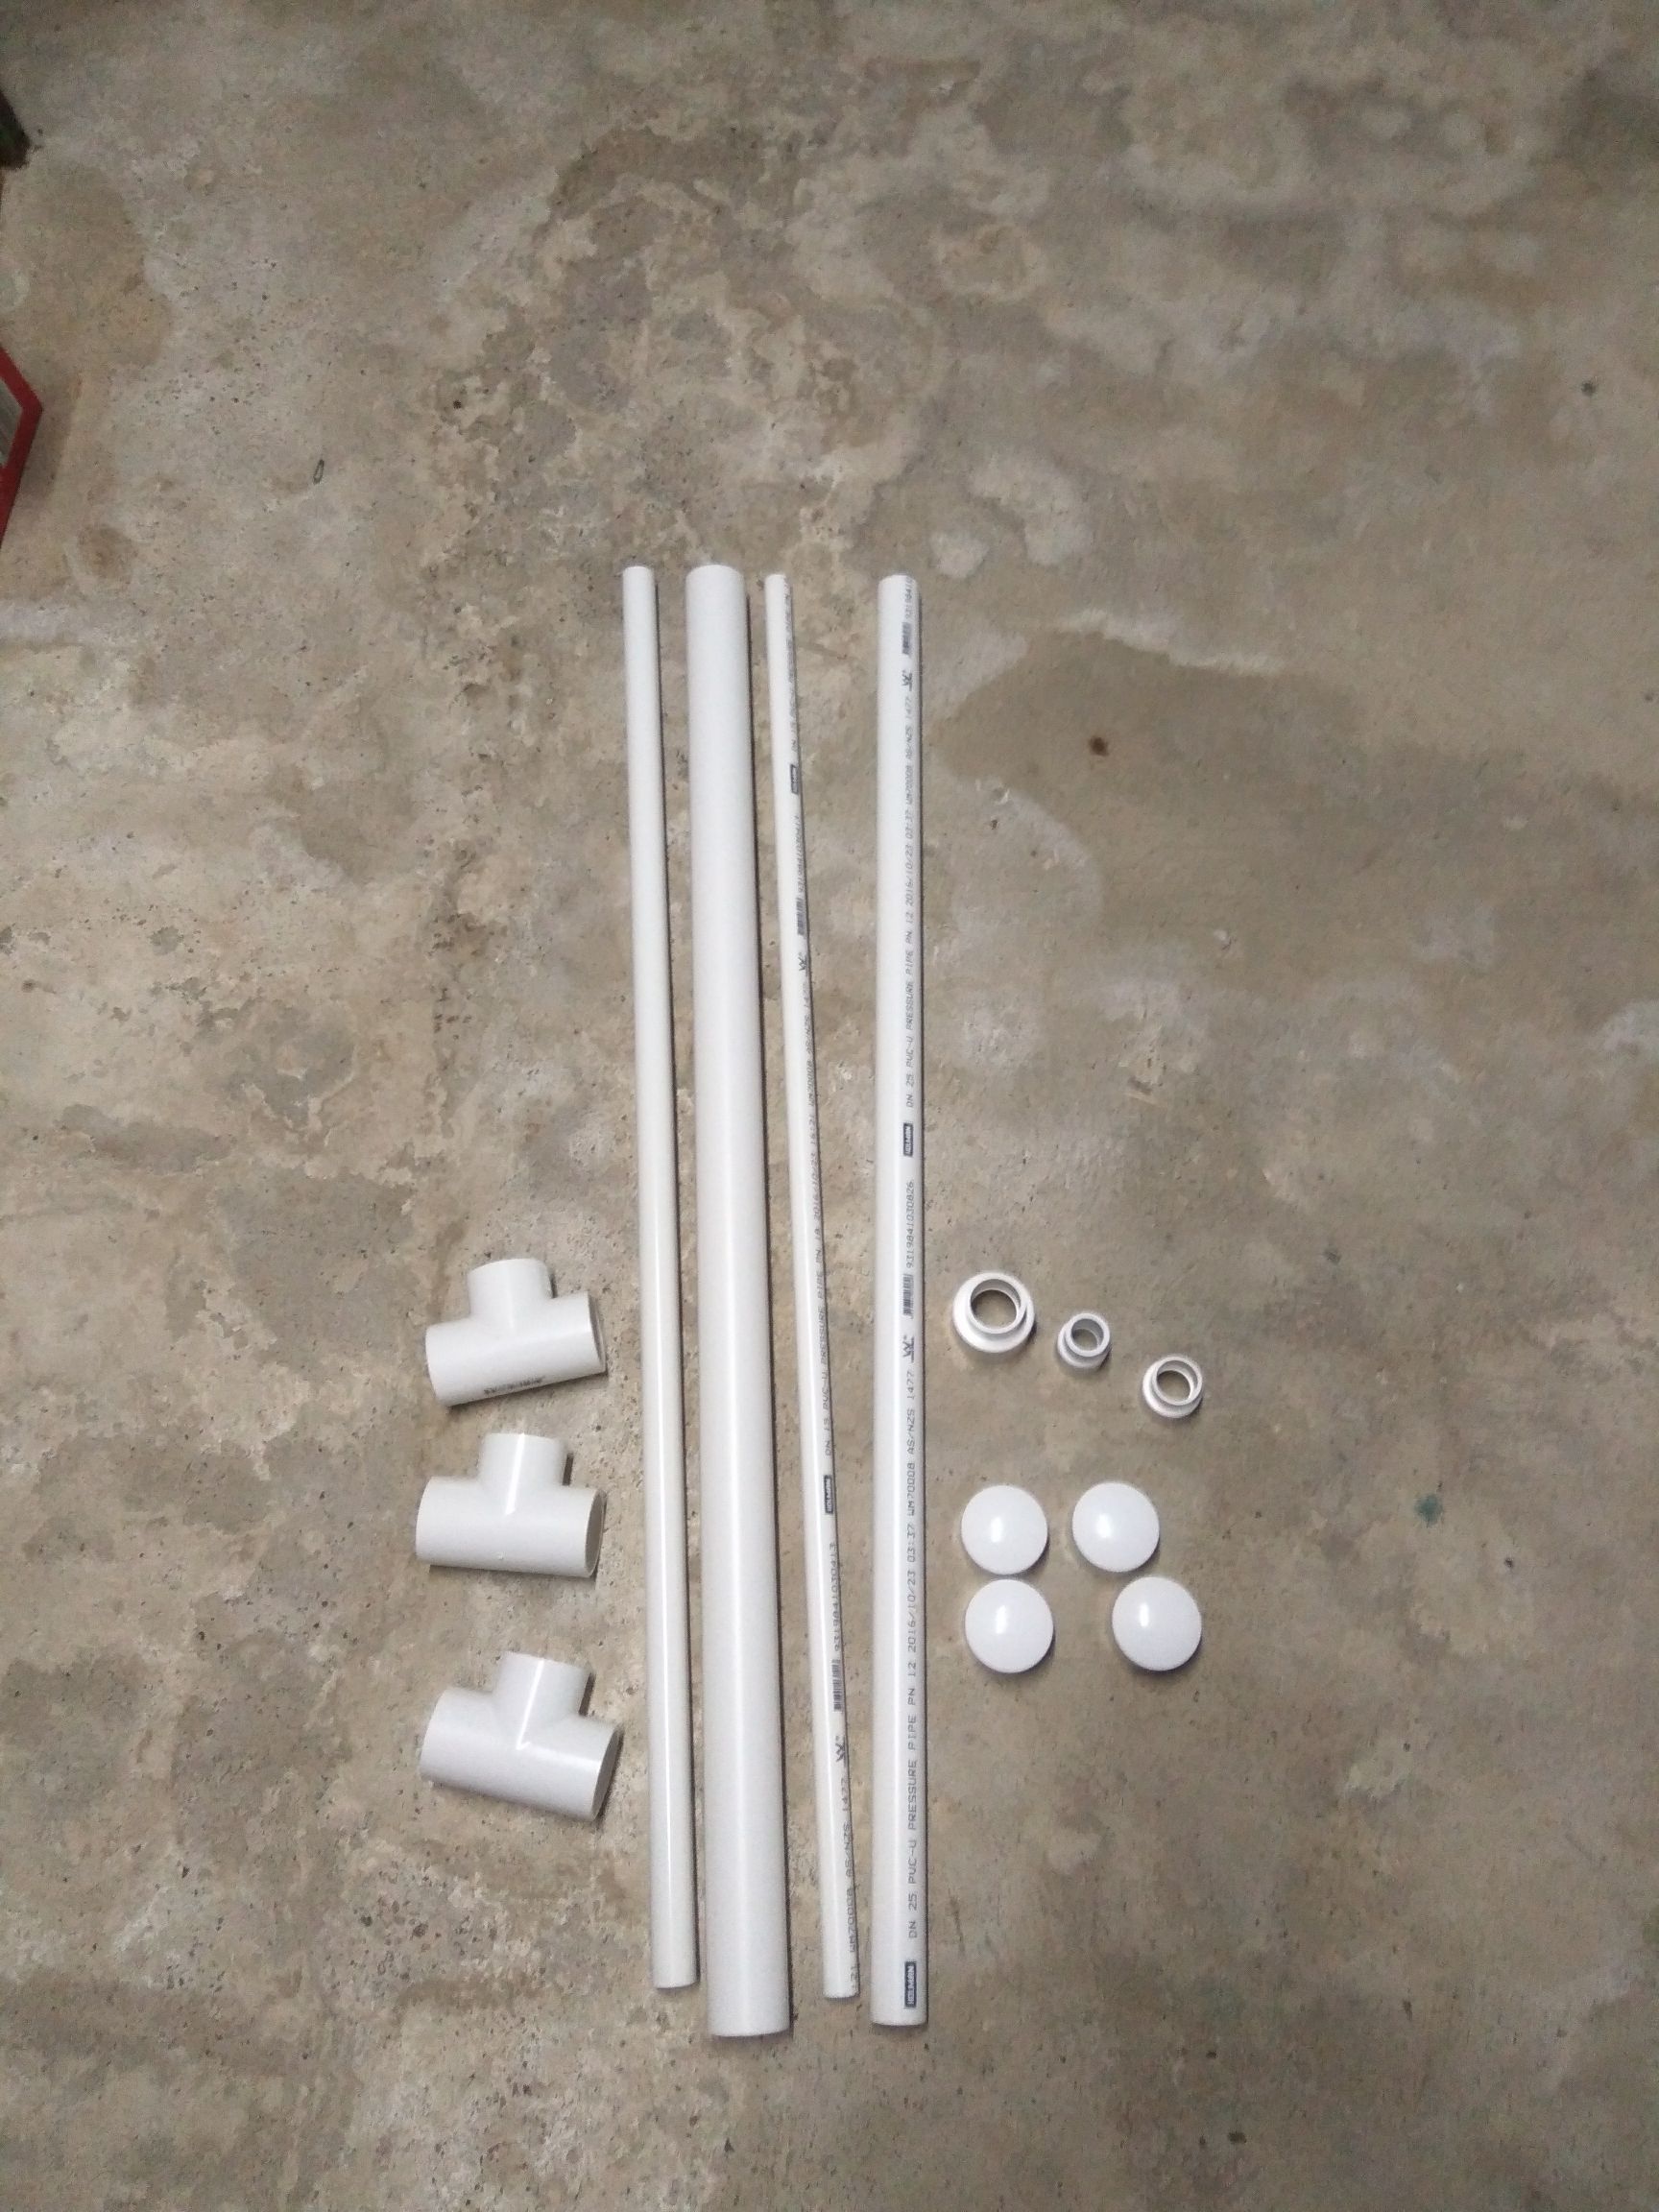
The basic design is a H-shape, to provide stability for the base. Apart from the solenoid, all the pieces for the launcher are made from standard PVC pipe. A quick trip to Bunnings provided everything I needed.
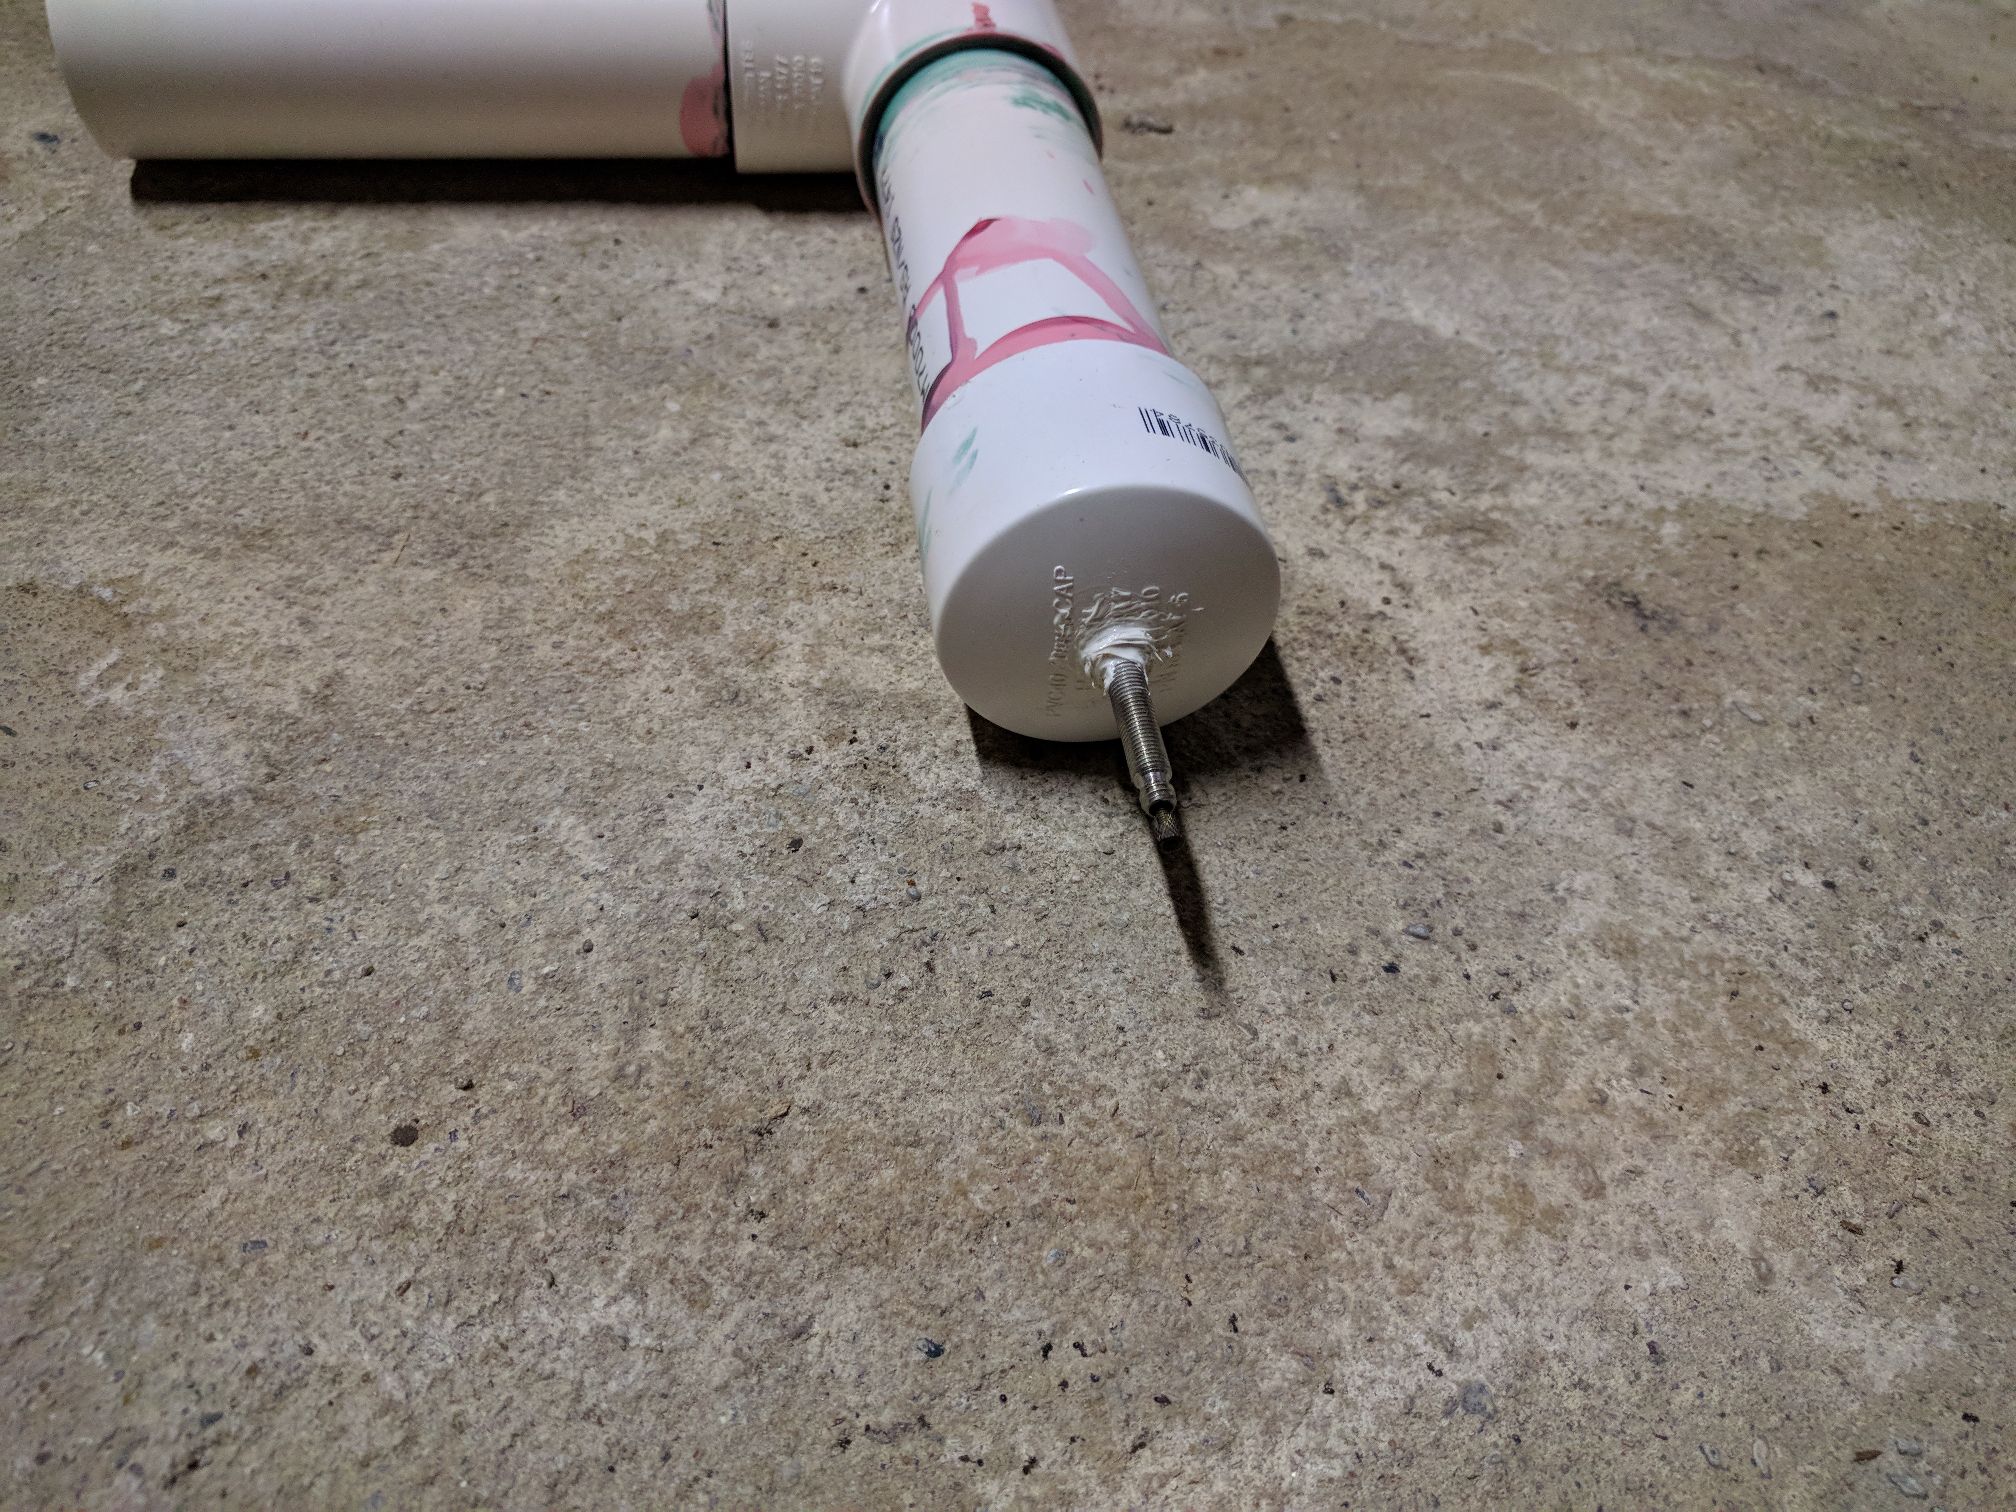
Typical Bunnings trip. I then cut the PVC pipe into the right lengths. I drilled a hole into one of the end-caps, and put through an old bicycle-tube valve. I made sure that it was glued and silicon-sealed it well, for air-tightness.
All the parts were then joined together with standard PVC sealant.
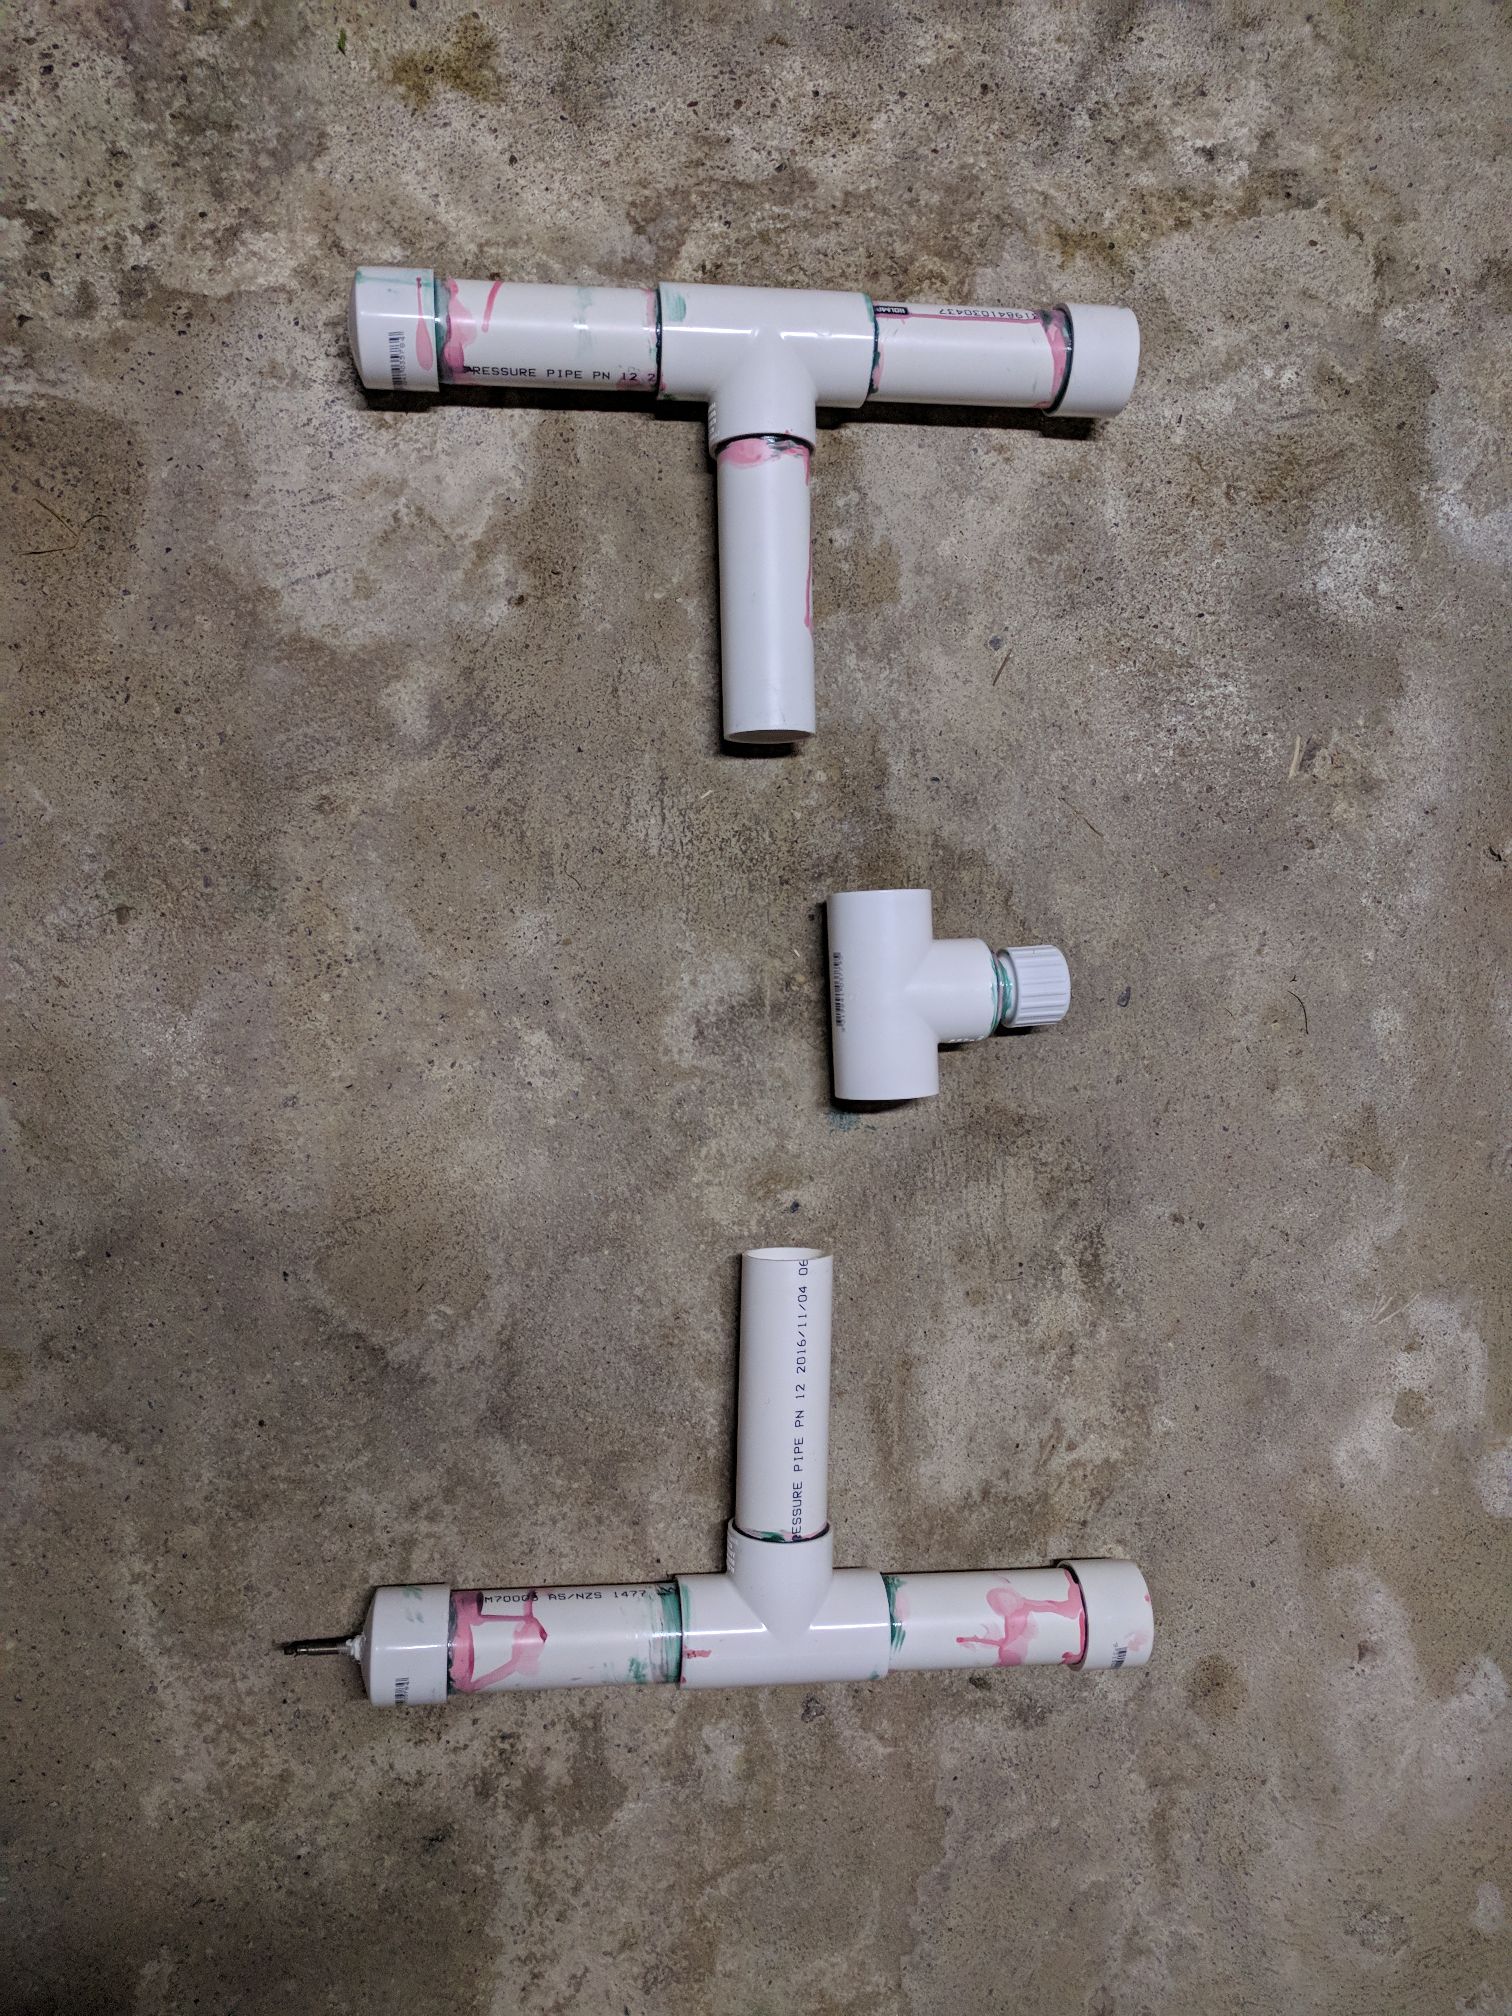
I then put together the solenoid section.
Put all together:
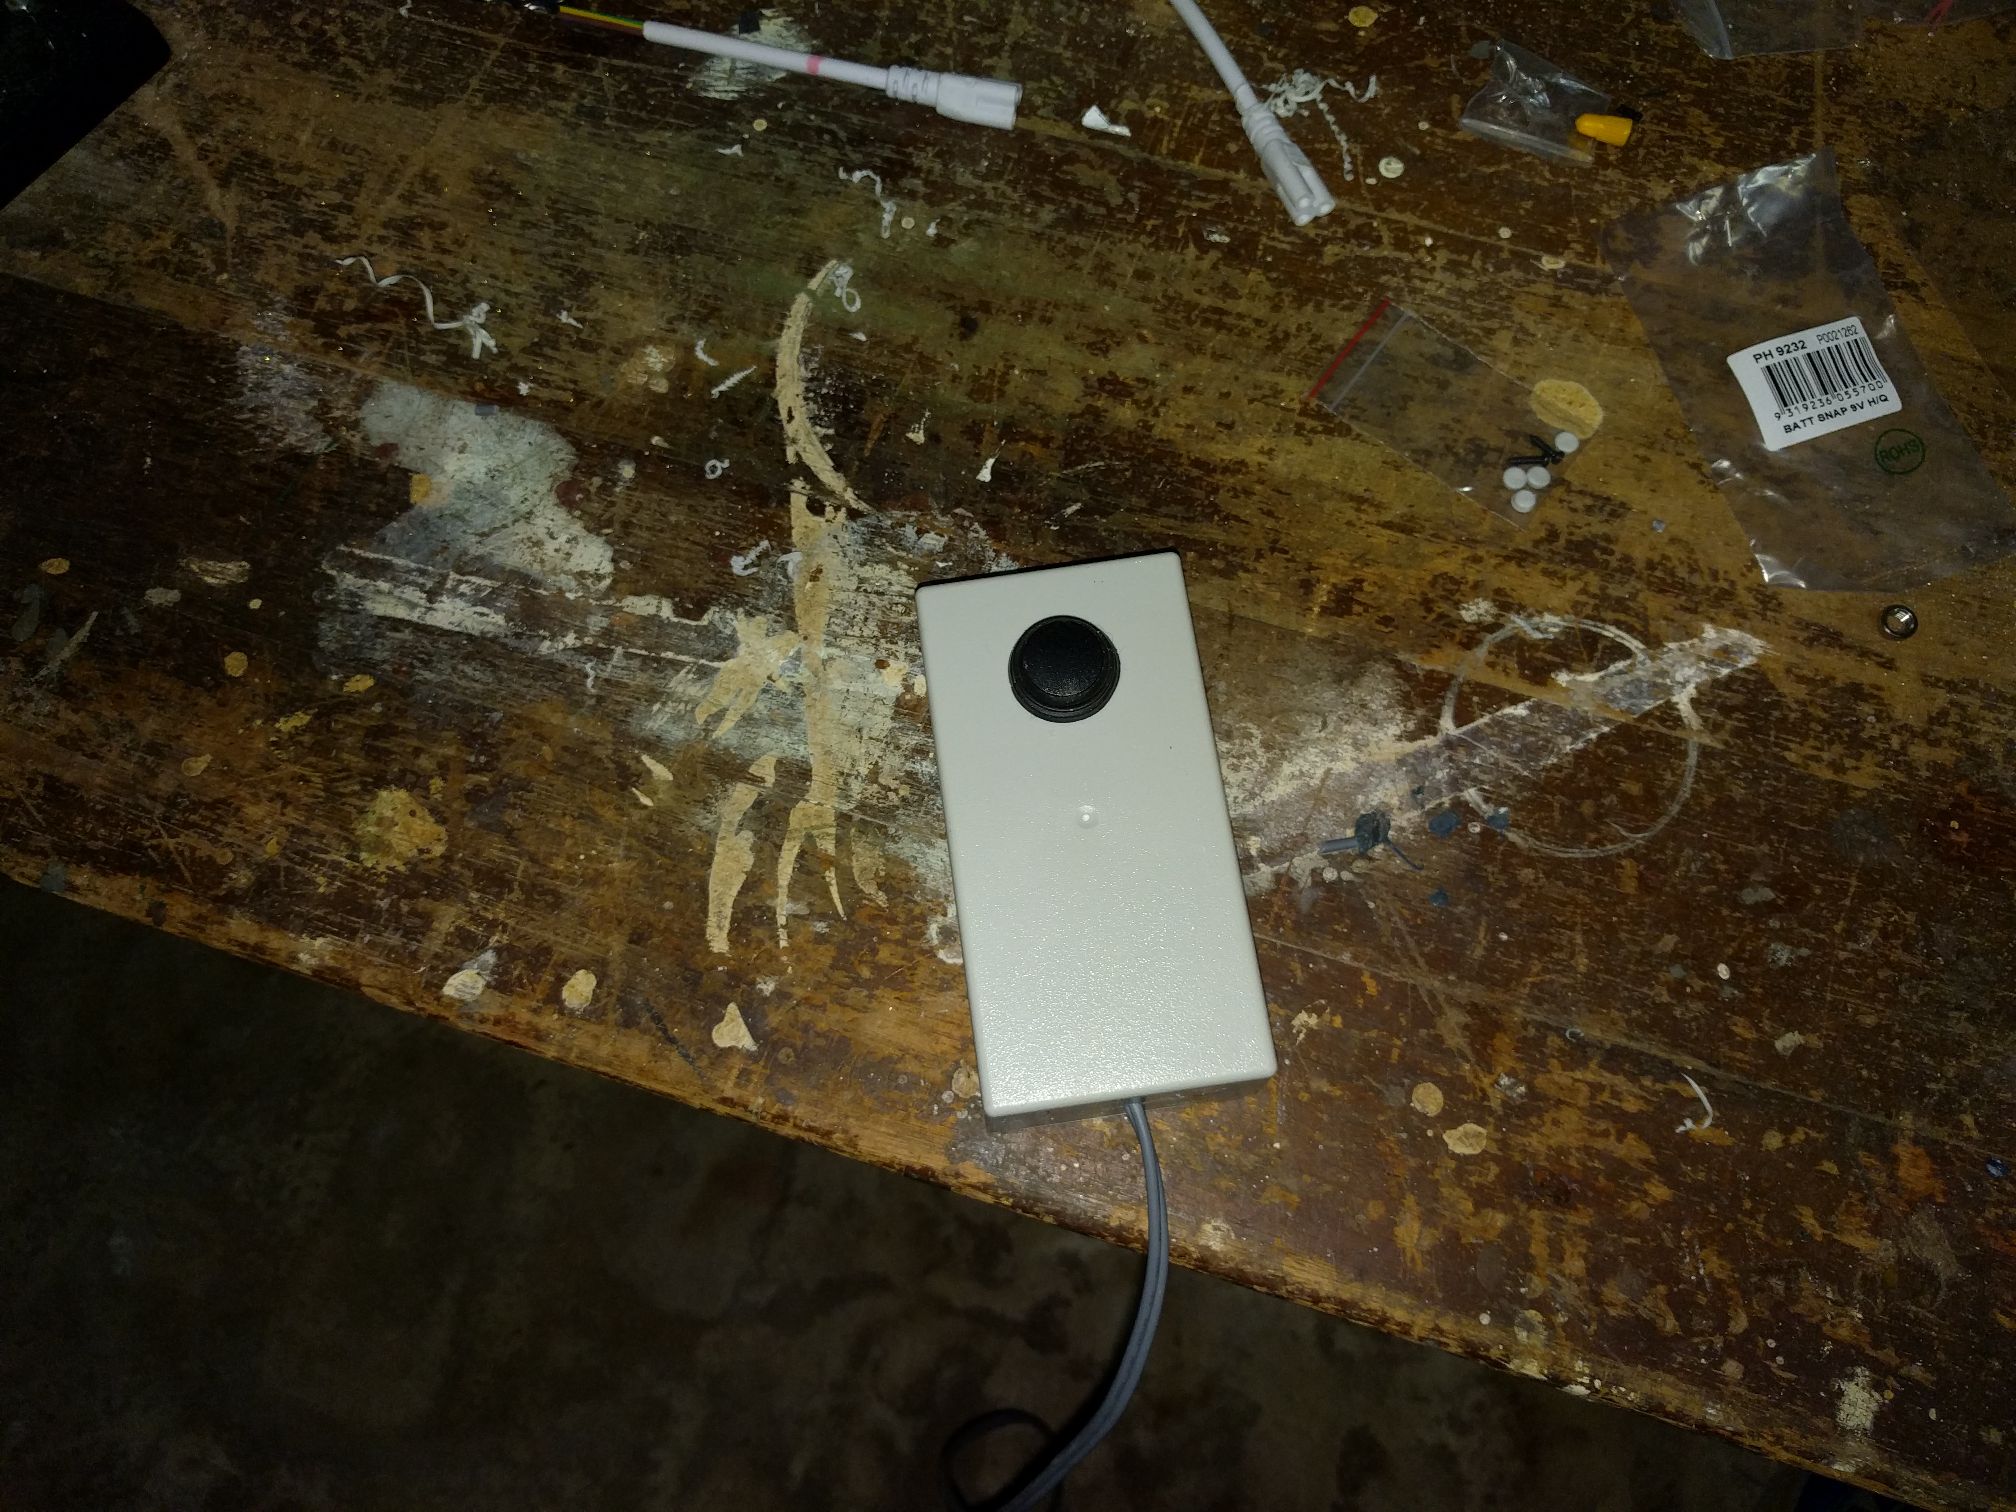
I then have another pipe that goes in the top, which the paper rocket sits one. It’s just lauched with a simple 9v battery in a box with a momentary switch:
Overall, it works great. I think I definitely over-built it, it doesn’t nearly need to be this big, could easily be half the size and still work well. I left two joins to be screwed-in, rather than sealed, so that it could be disassembled to lie flat.
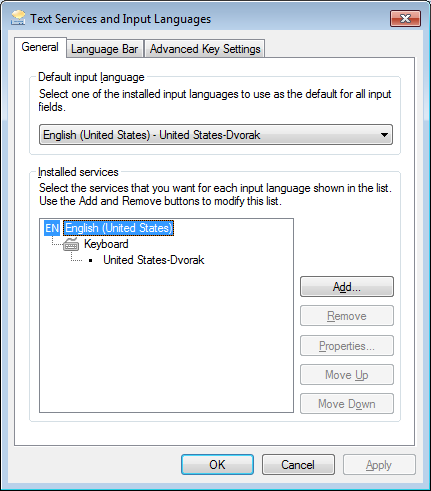
I’m currently working in a client’s office, on an extremely locked-down Windows 7 PC. As usual, I want to change to the dvorak keyboard layout, which is my standard. However, the environment on the computer is reset every couple of days, which wipes out my keyboard setting.
So I started looking for a way to change it through a powershell script. Unfortunately, Windows 7 only has an extremely limited version of powershell. But I was able to find a way to change it using an xml script at these two sites:
The trickiest part was finding the code for the dvorak keyboard, which is 0409:00010409
The code to execute the xml file is:
control intl.cpl,, /f:"Desktop\changekeyboard.xml"
Which I then put into a .bat file which I keep on the desktop. So, whenever, the keyboard changes, I just double-click the bat file, and the keyboard is fixed again, and I end up with the keyboards as so:
This is a bit of a follow-on from my previous post, in which I was setting up https access on my website.
Once you’ve got https set up correctly, you might, like I did, want to make sure that all traffic to your website now goes the the SSL connection, rather than through an unencrypted connection.
On Linux hosting, like I have with Quadra Hosting, this can easily be done by creating a ‘.htaccess’ file. Create one in the root level of your hosted directory (the one where you have your index.html file). In the .htaccess file, put in the following lines:
RewriteEngine On
RewriteCond %{HTTPS} off
RewriteRule ^(.*)$ https://%{HTTP_HOST}%{REQUEST_URI} [L,R=301]
This will redirect all traffic to the SSL connection.
I’d been wanted to build myself a new desk for a while. The current one I had, while being a good size, was pretty terrible as a desk. The top surface was all flaking off, and it was a simple trestle style. Many years of heavy monitors had given it a distinct bow.
The place I’ve got my desk is also quite large, I can fit in something bigger than a standard 1.5m or 1.8m long desk. Trying to find bigger desks is hard, and quite expensive. The solution came to me when I was looking around Bunnings one day. They sell extruded aluminium tubes, and a bunch of angle connectors to join them together. You can basically make anything that’s of square design. I sketched up a design. The main requirement was strength, I didn’t want the desk to bow, particularly with its long 2.3m length. So I added a third leg, a third beam along the top and lots of cross-bracing.
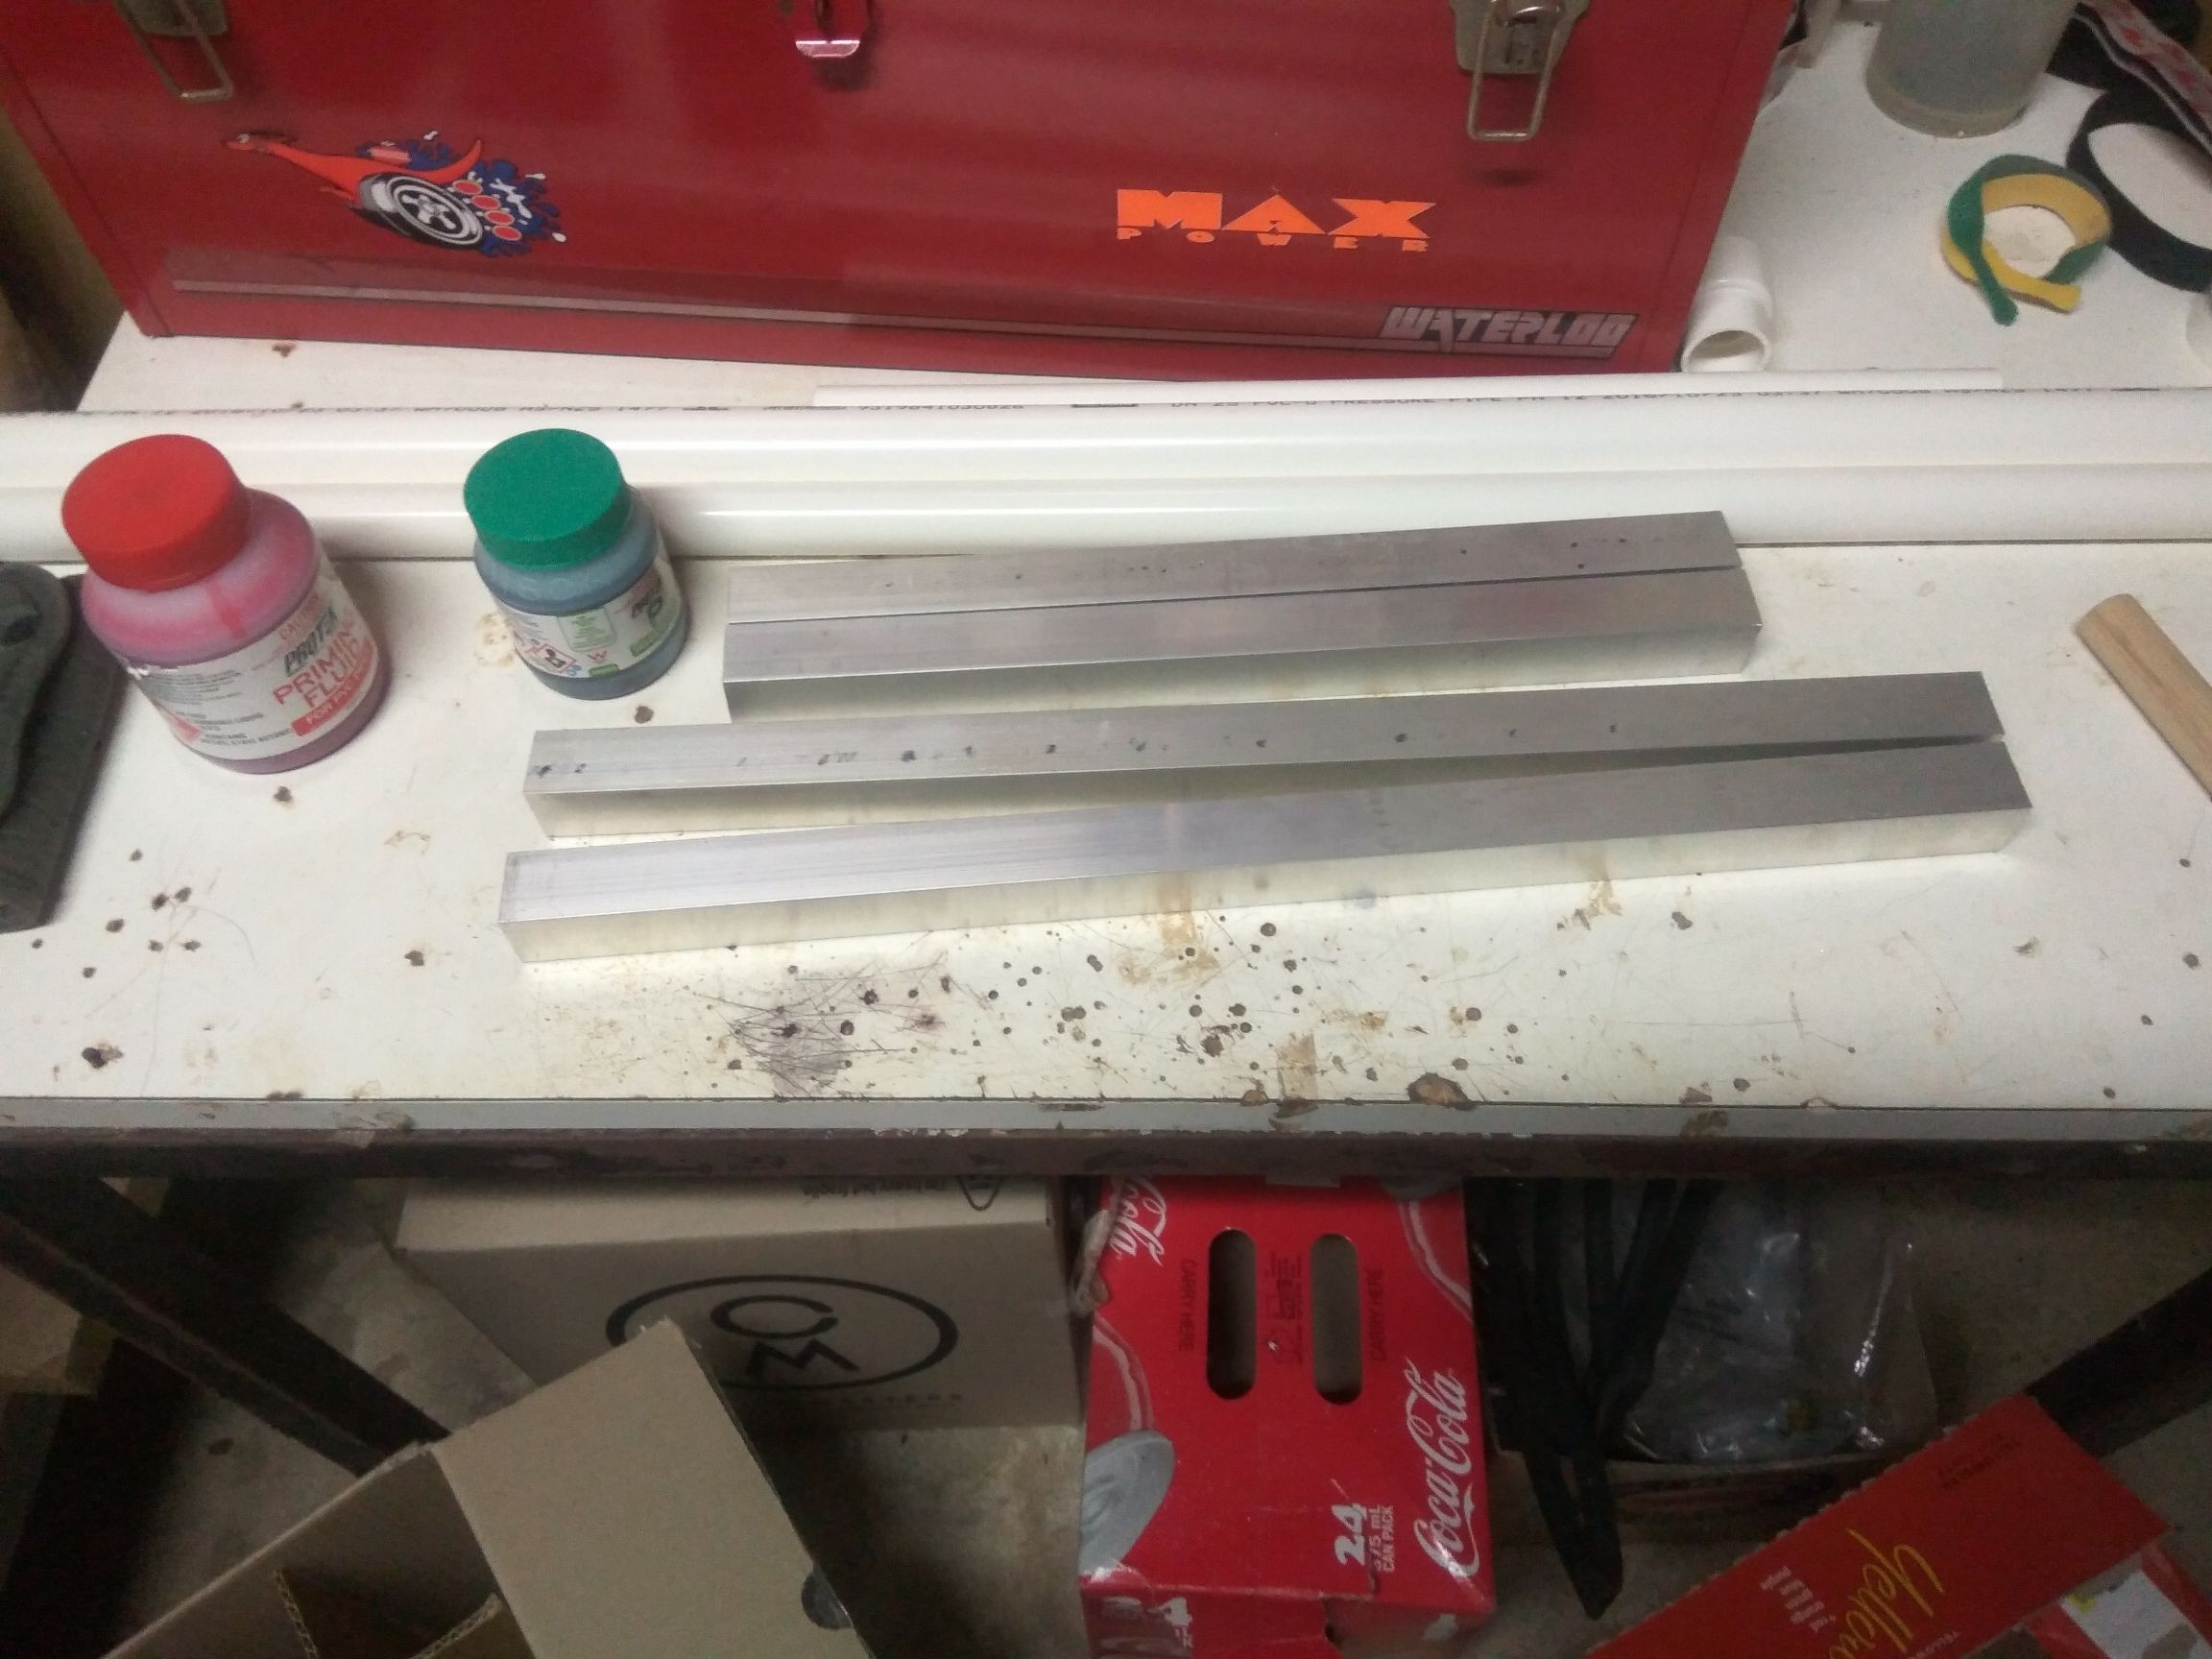
Here’s the pile of beams from Bunnings:
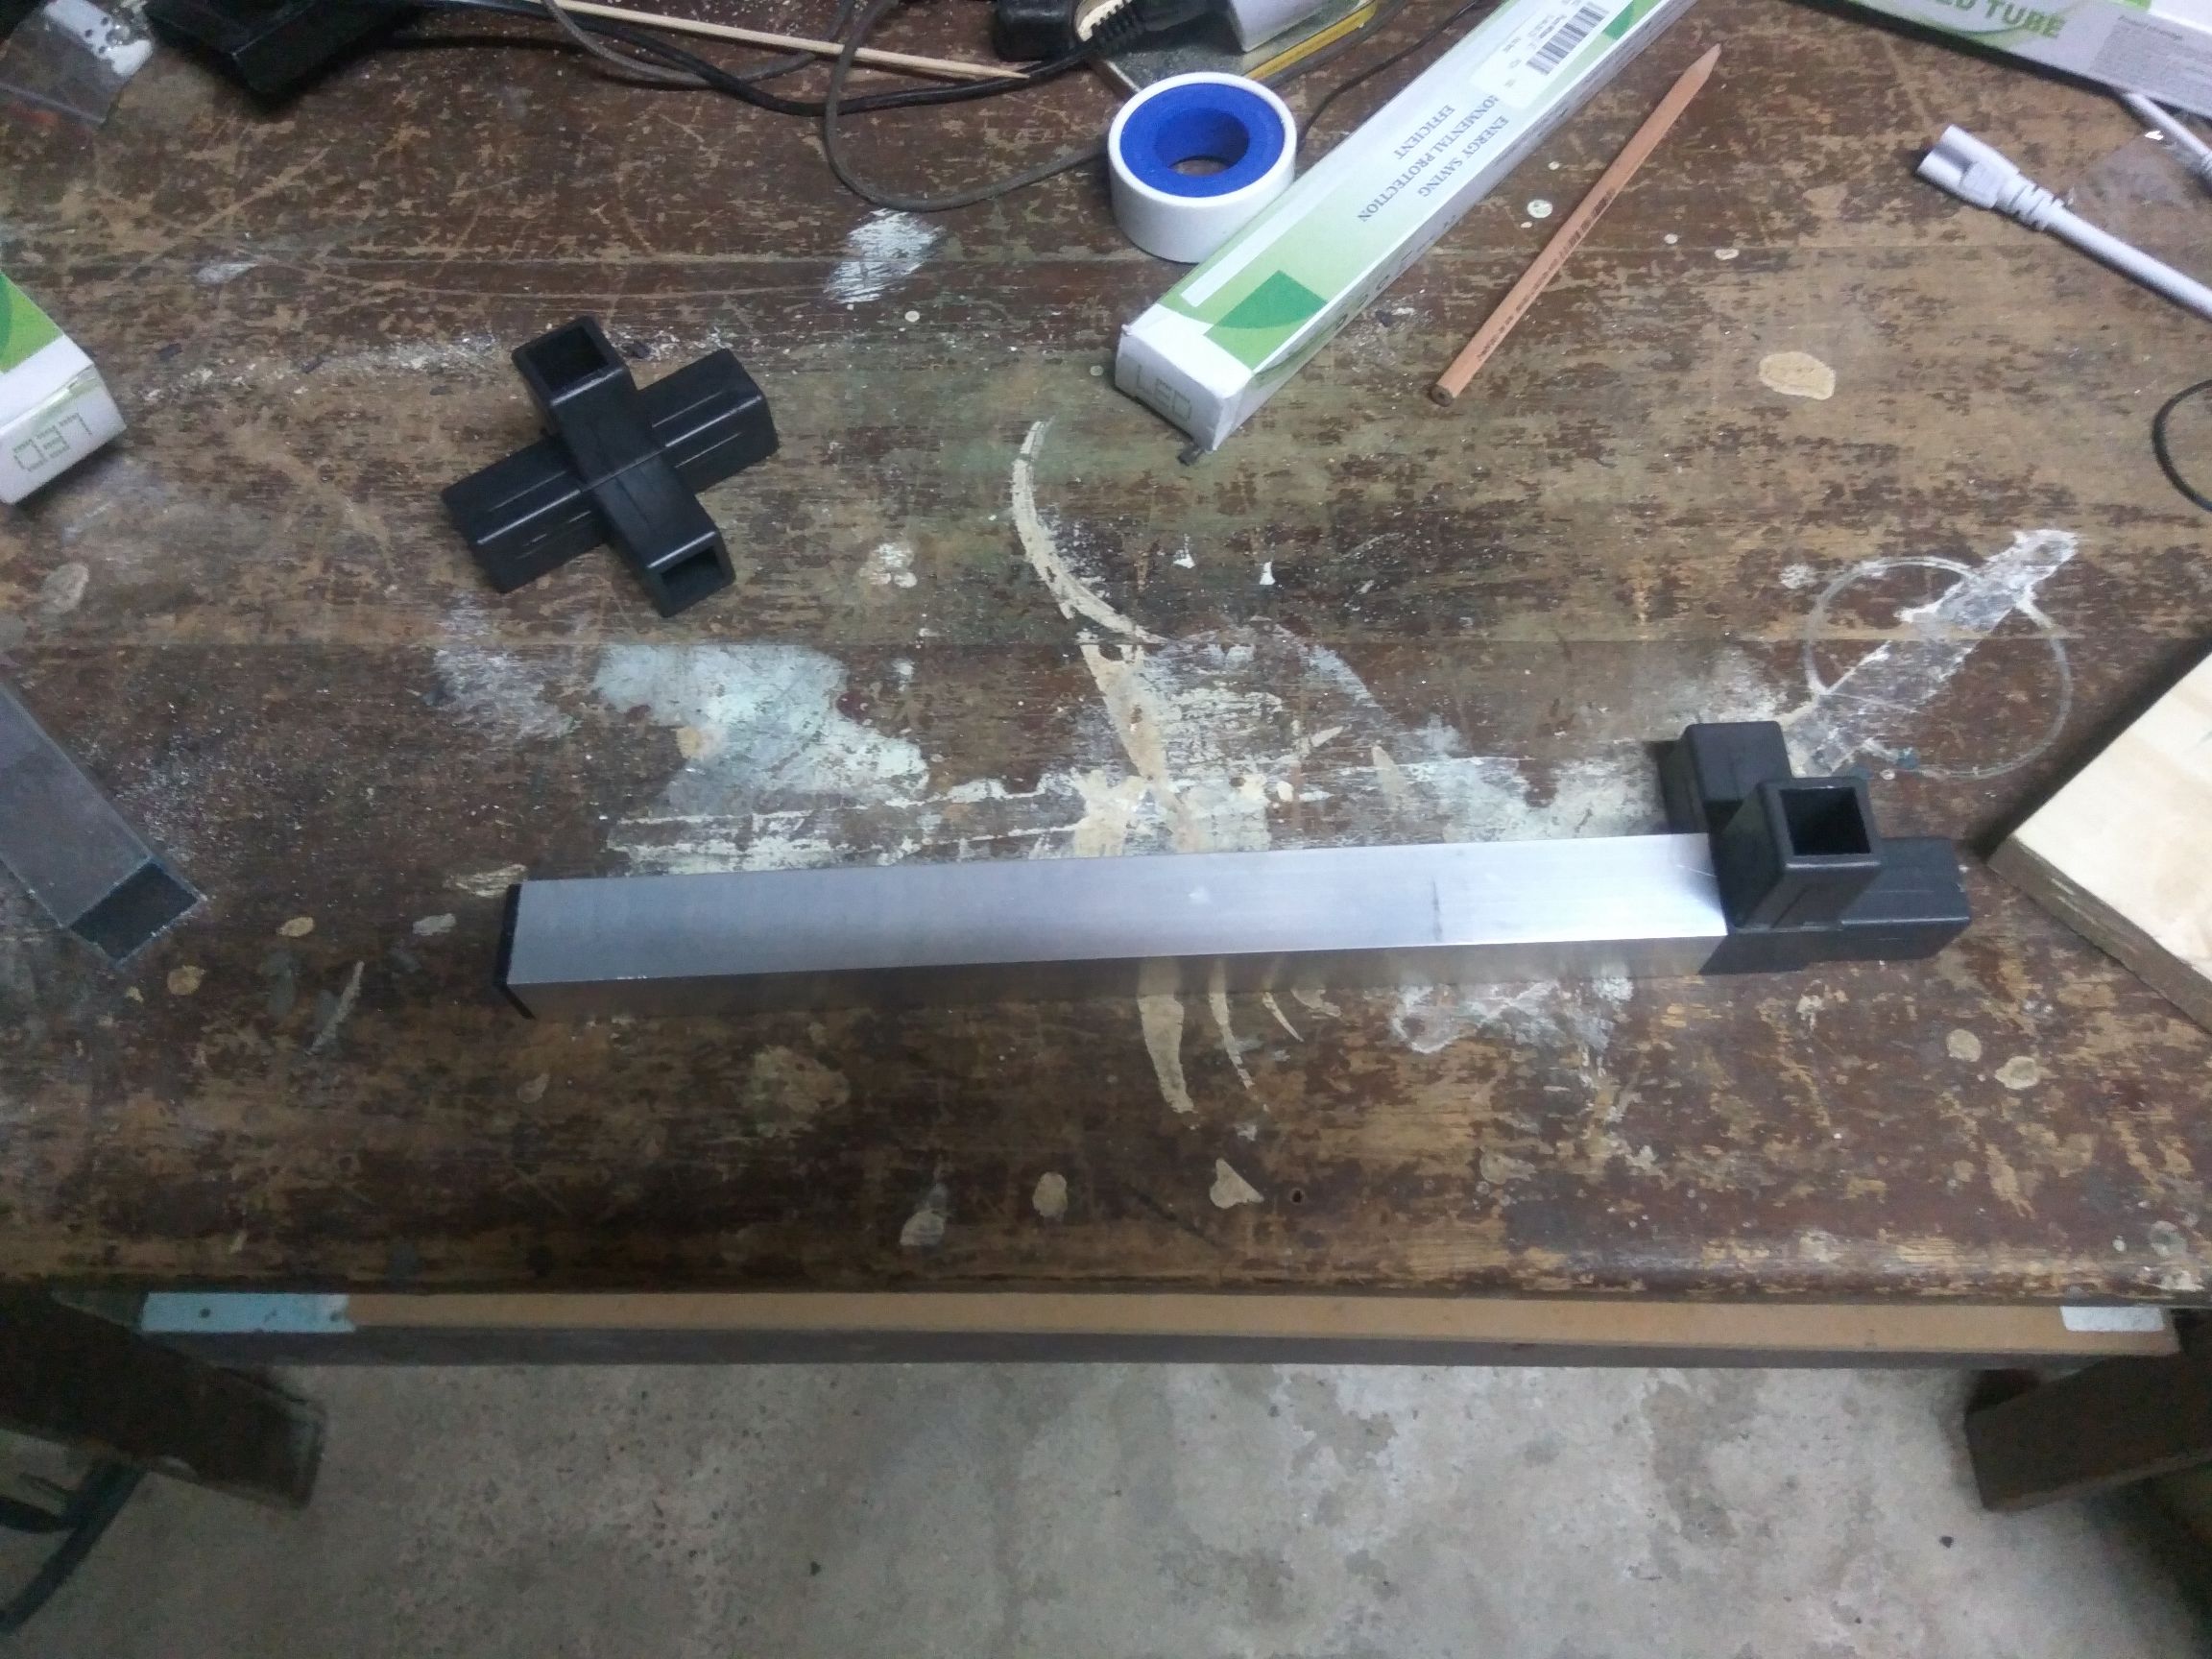
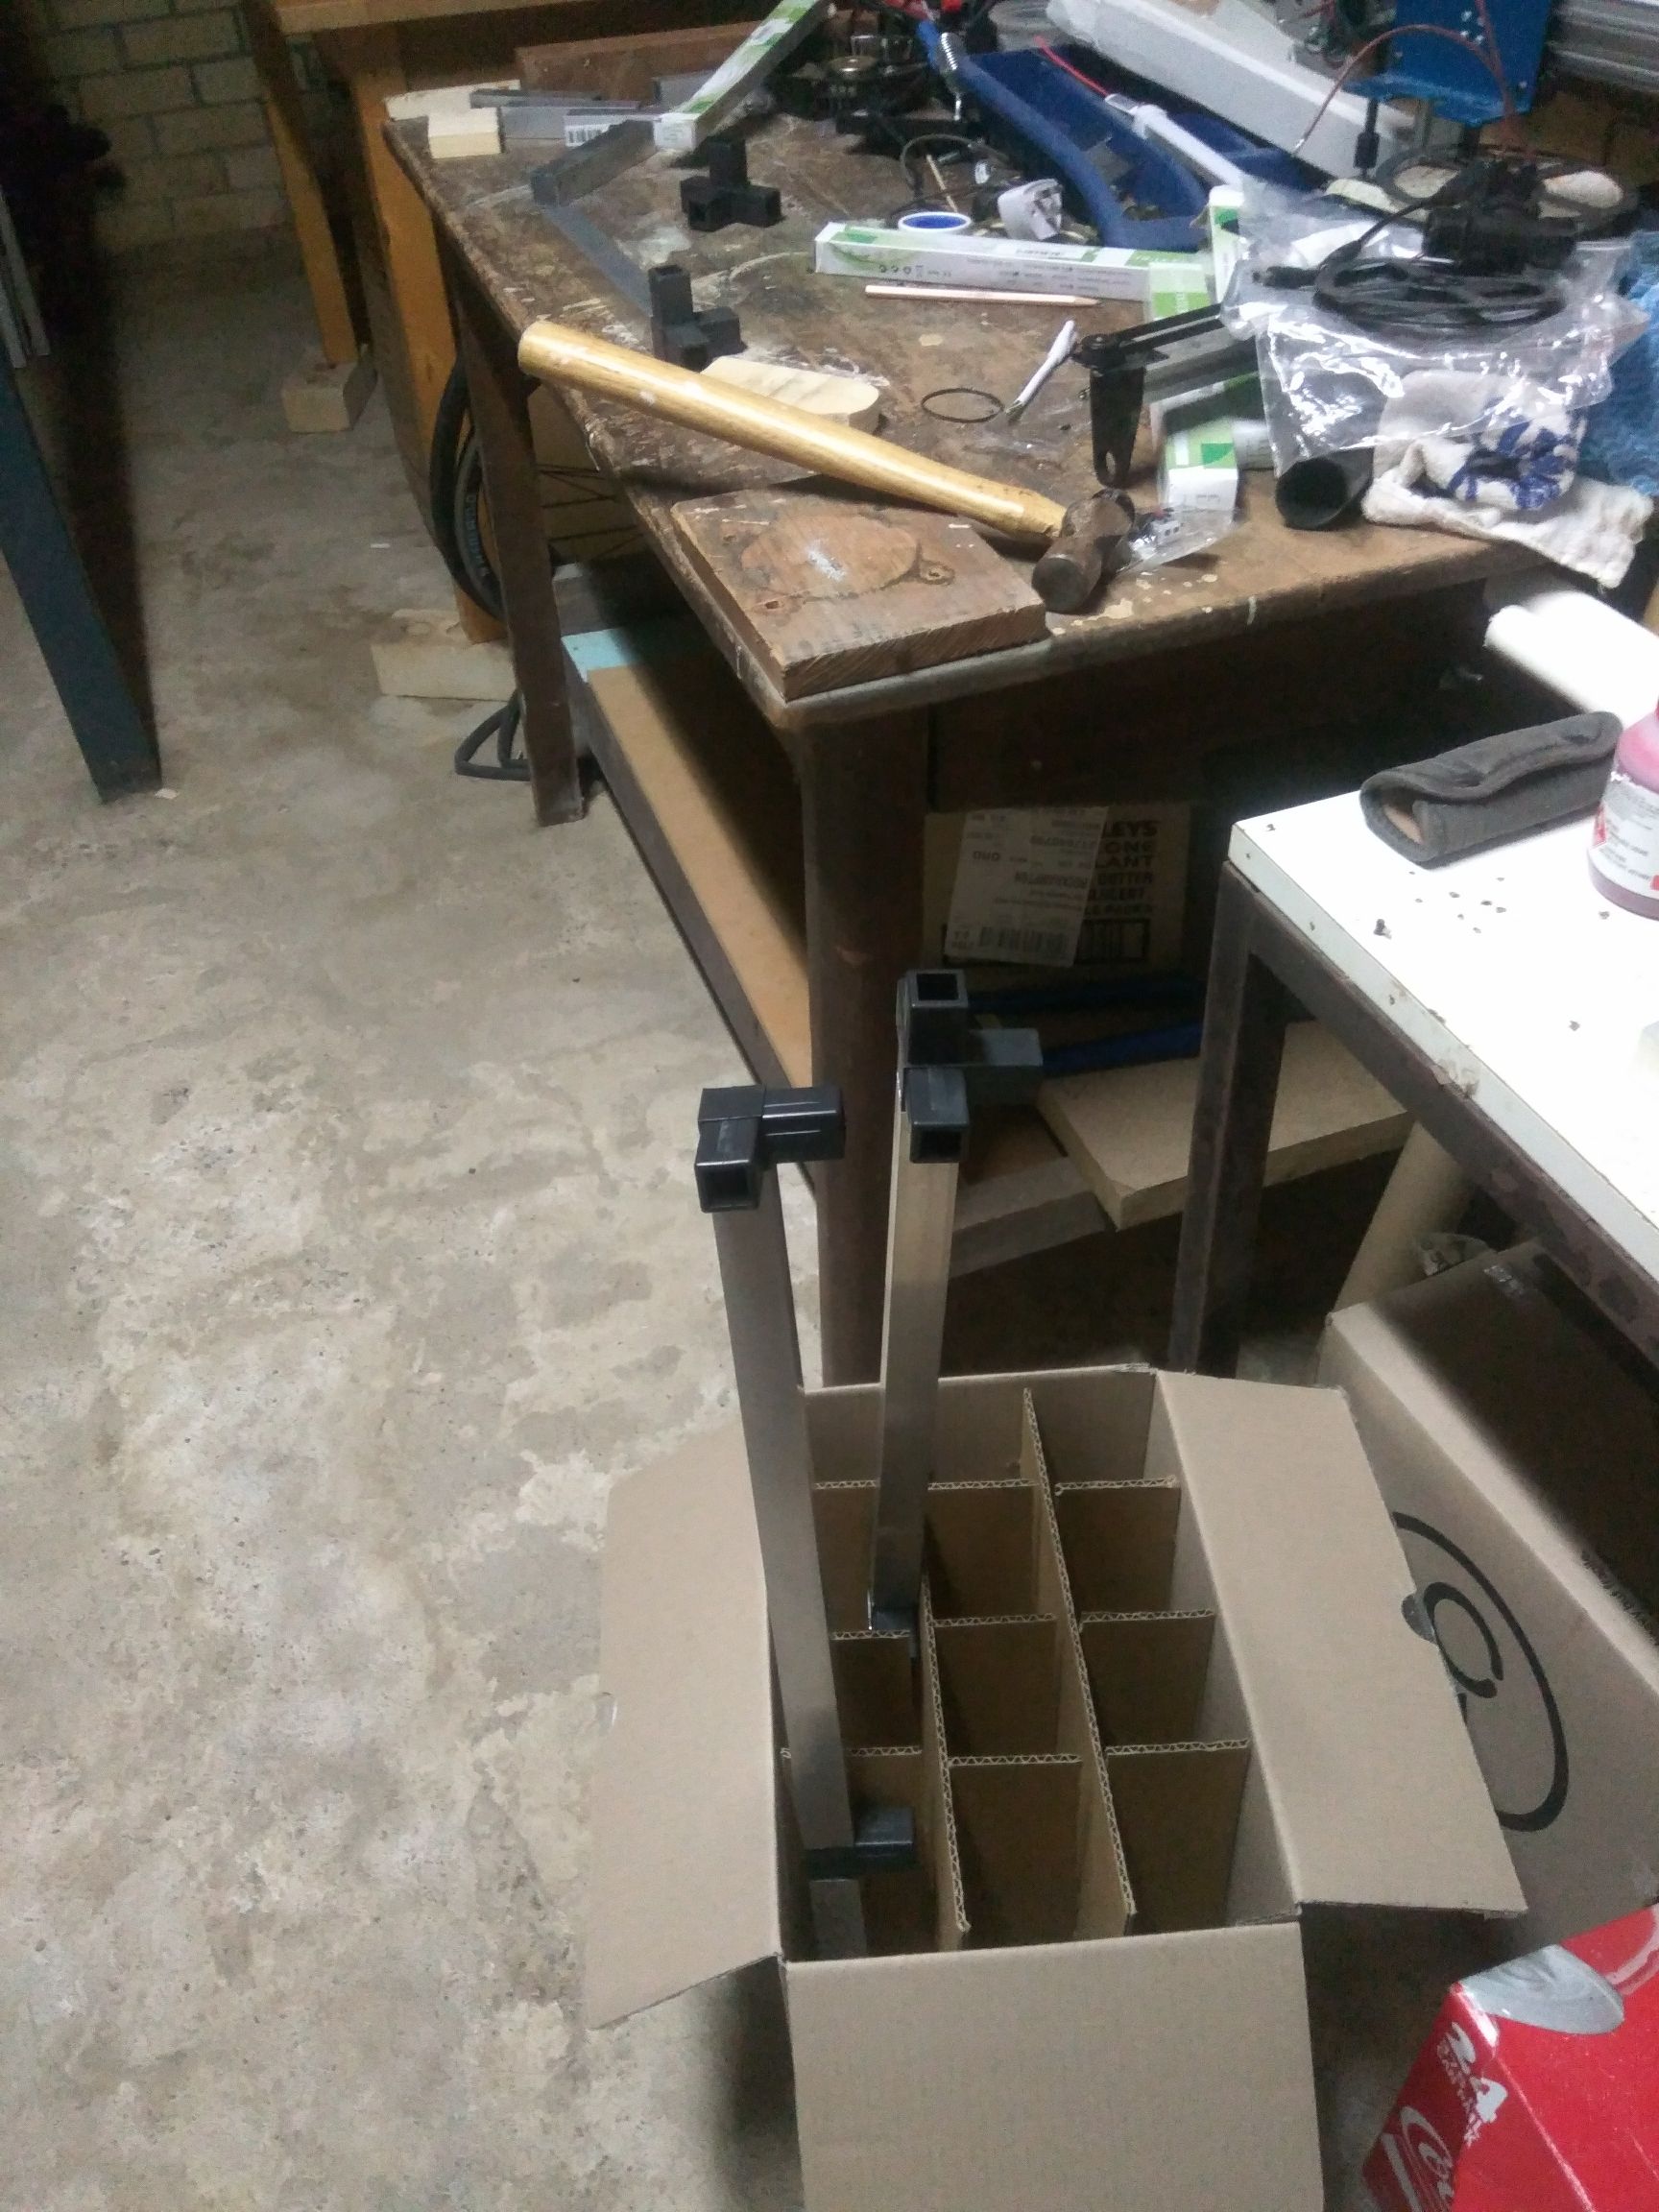
I then cut them into shorter lengths with a hacksaw, and started joining them together.
Here you can see a couple of the angle-connectors.
Partially-assembled leg parts in a wine box:
The top surface is a giant piece of 22m MDF. This is definitely overkill, I should have gone with a thinner piece of MDF.
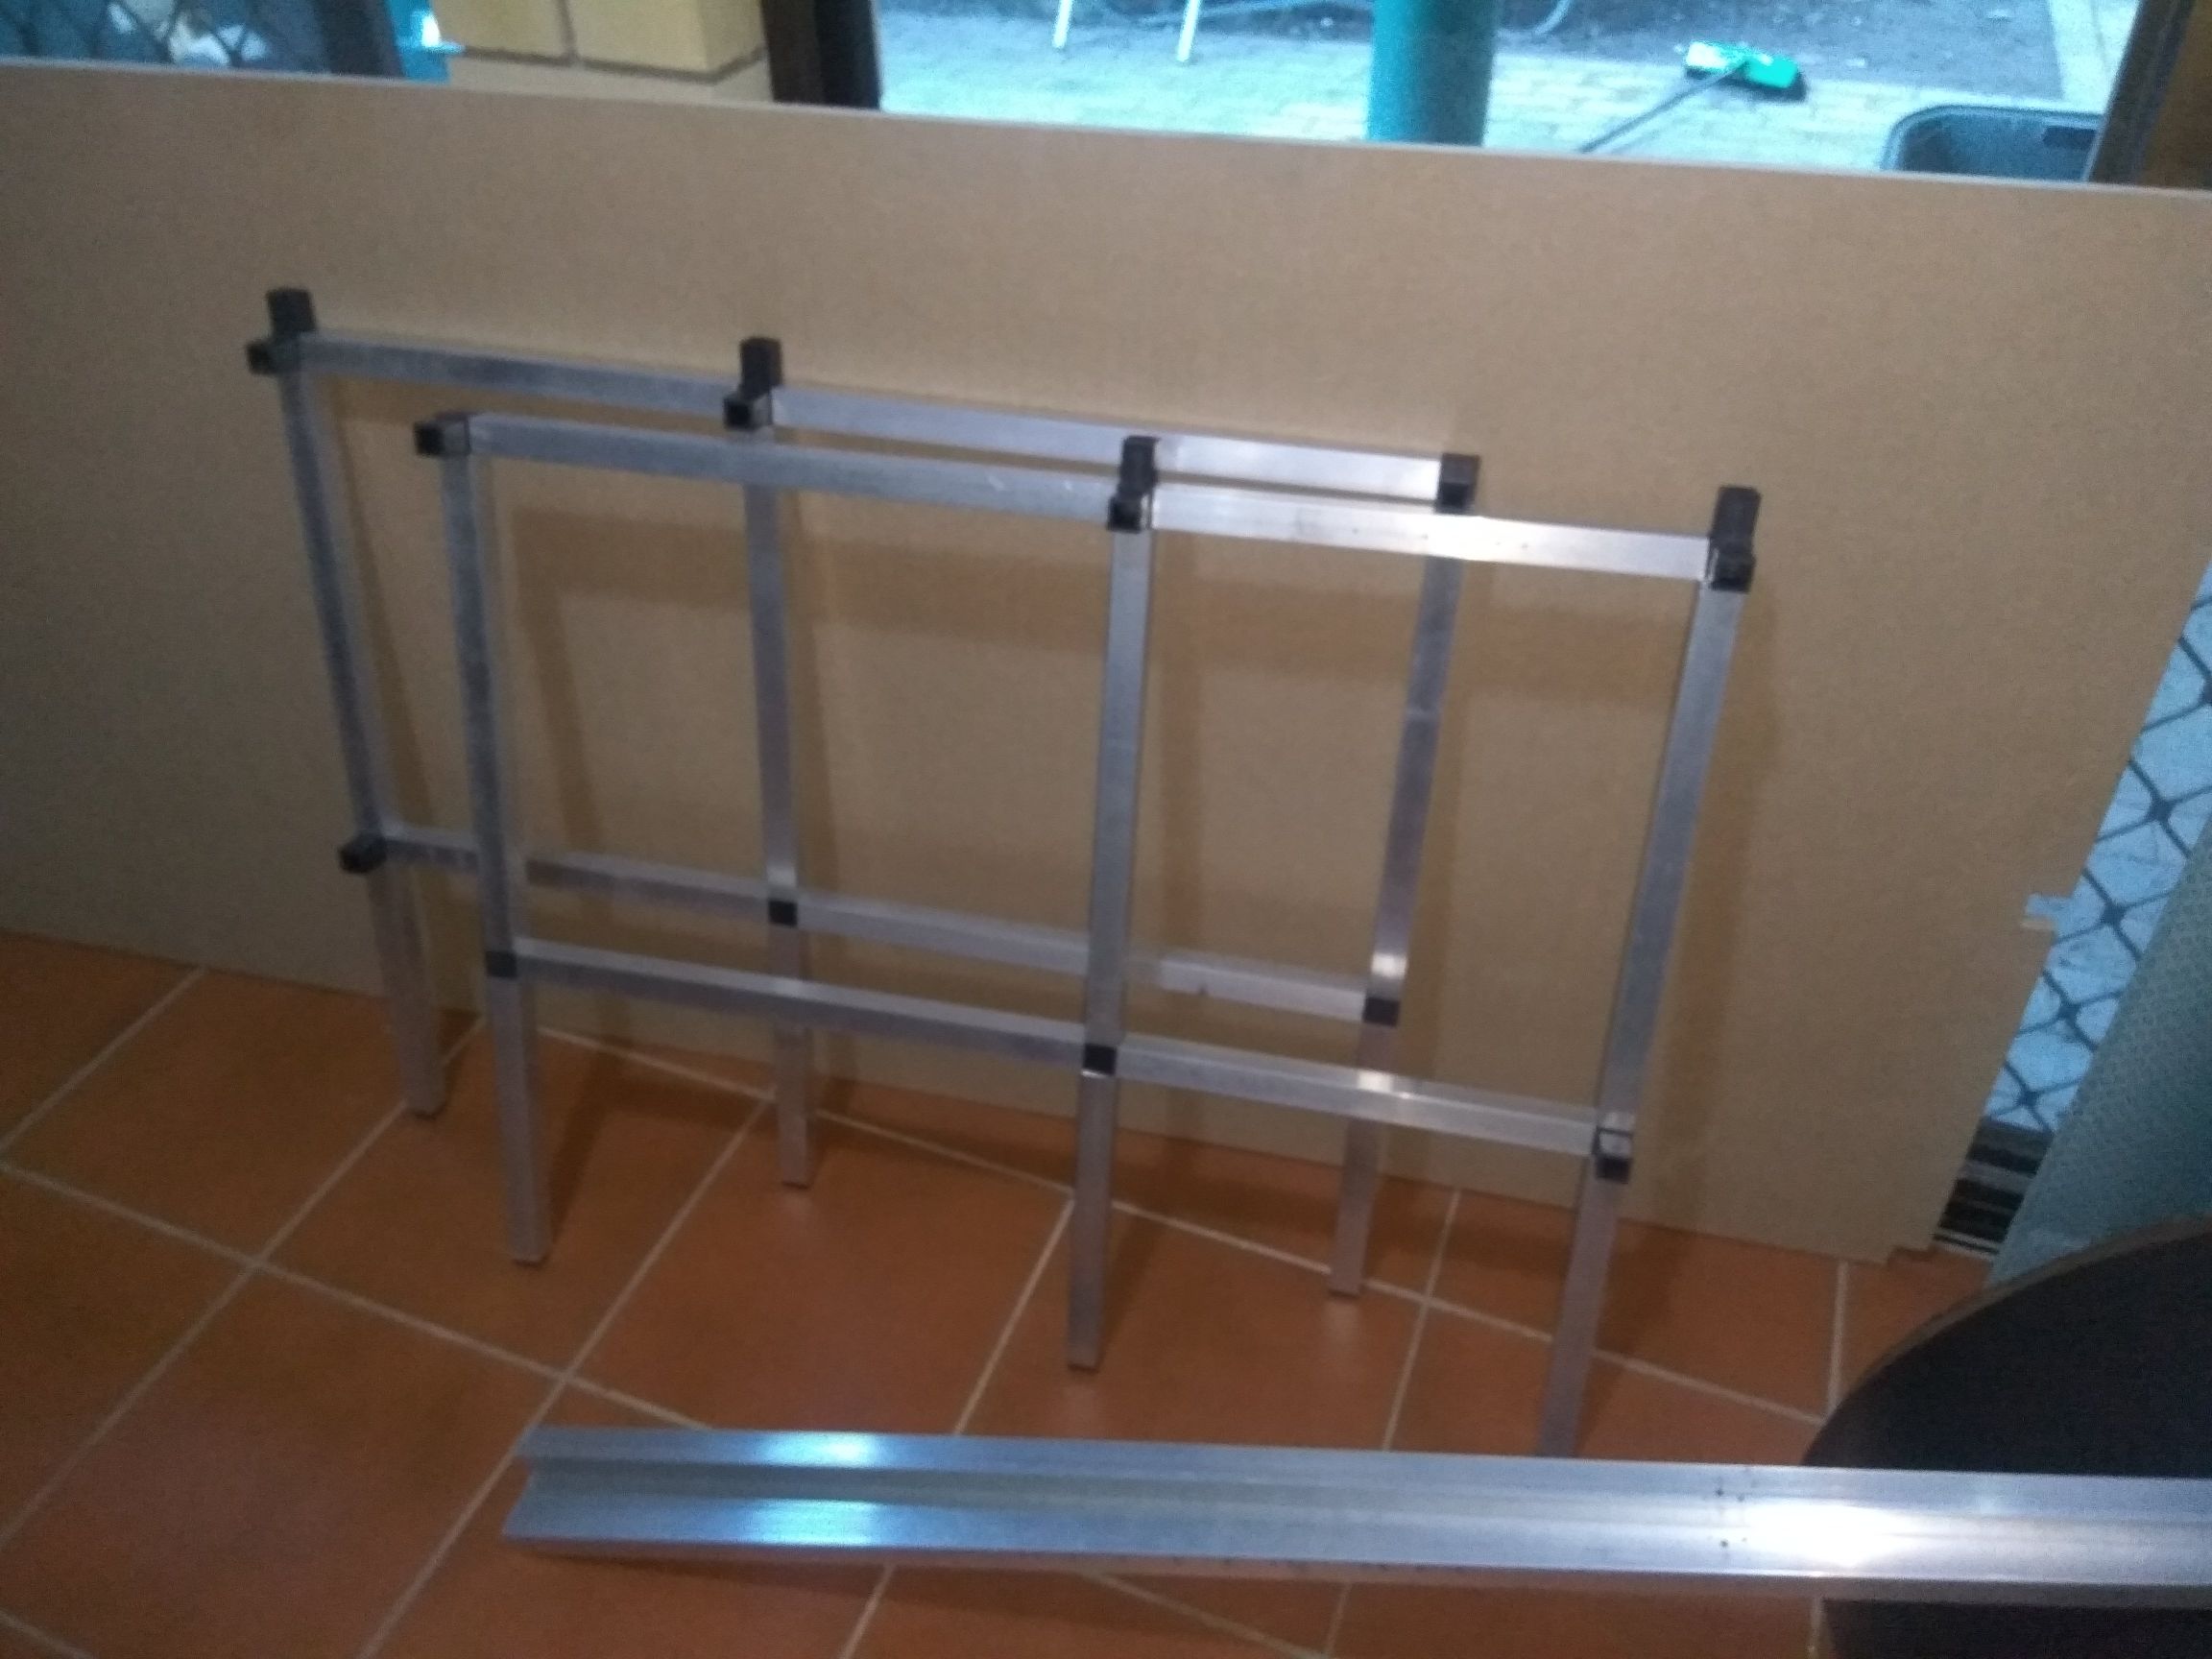
The two sides of the desk, with top. You can see the triple-leg design.
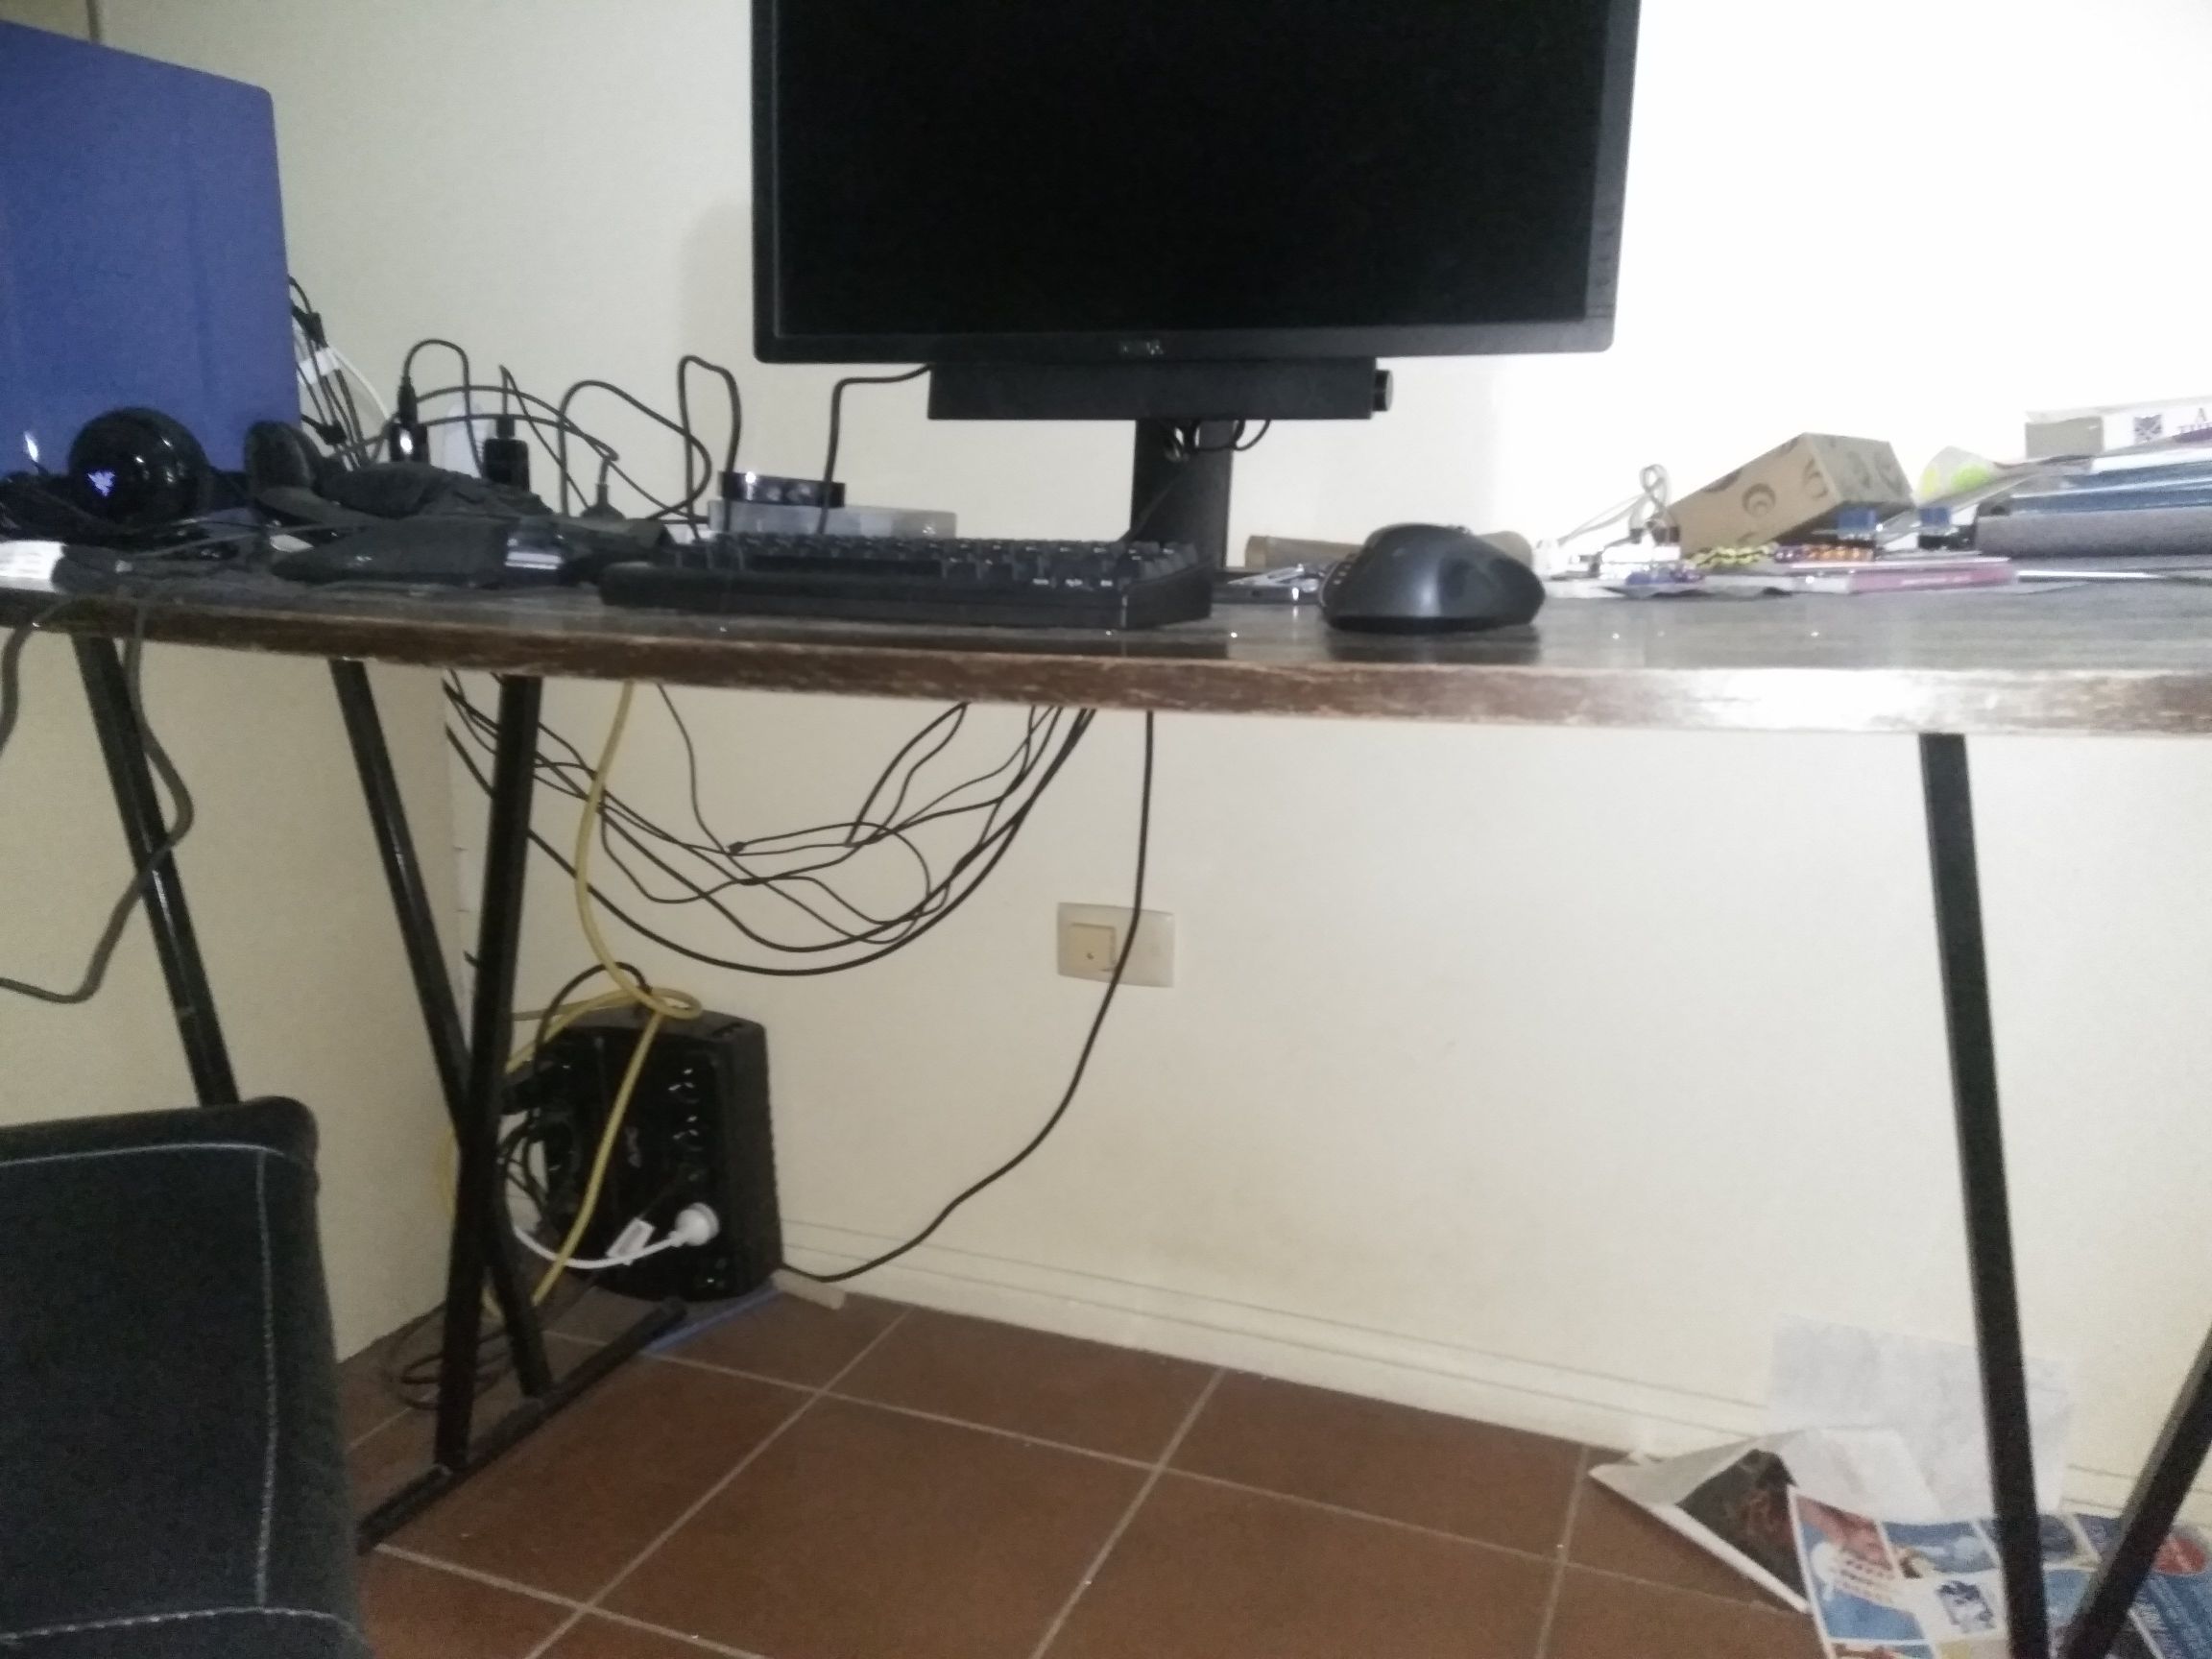
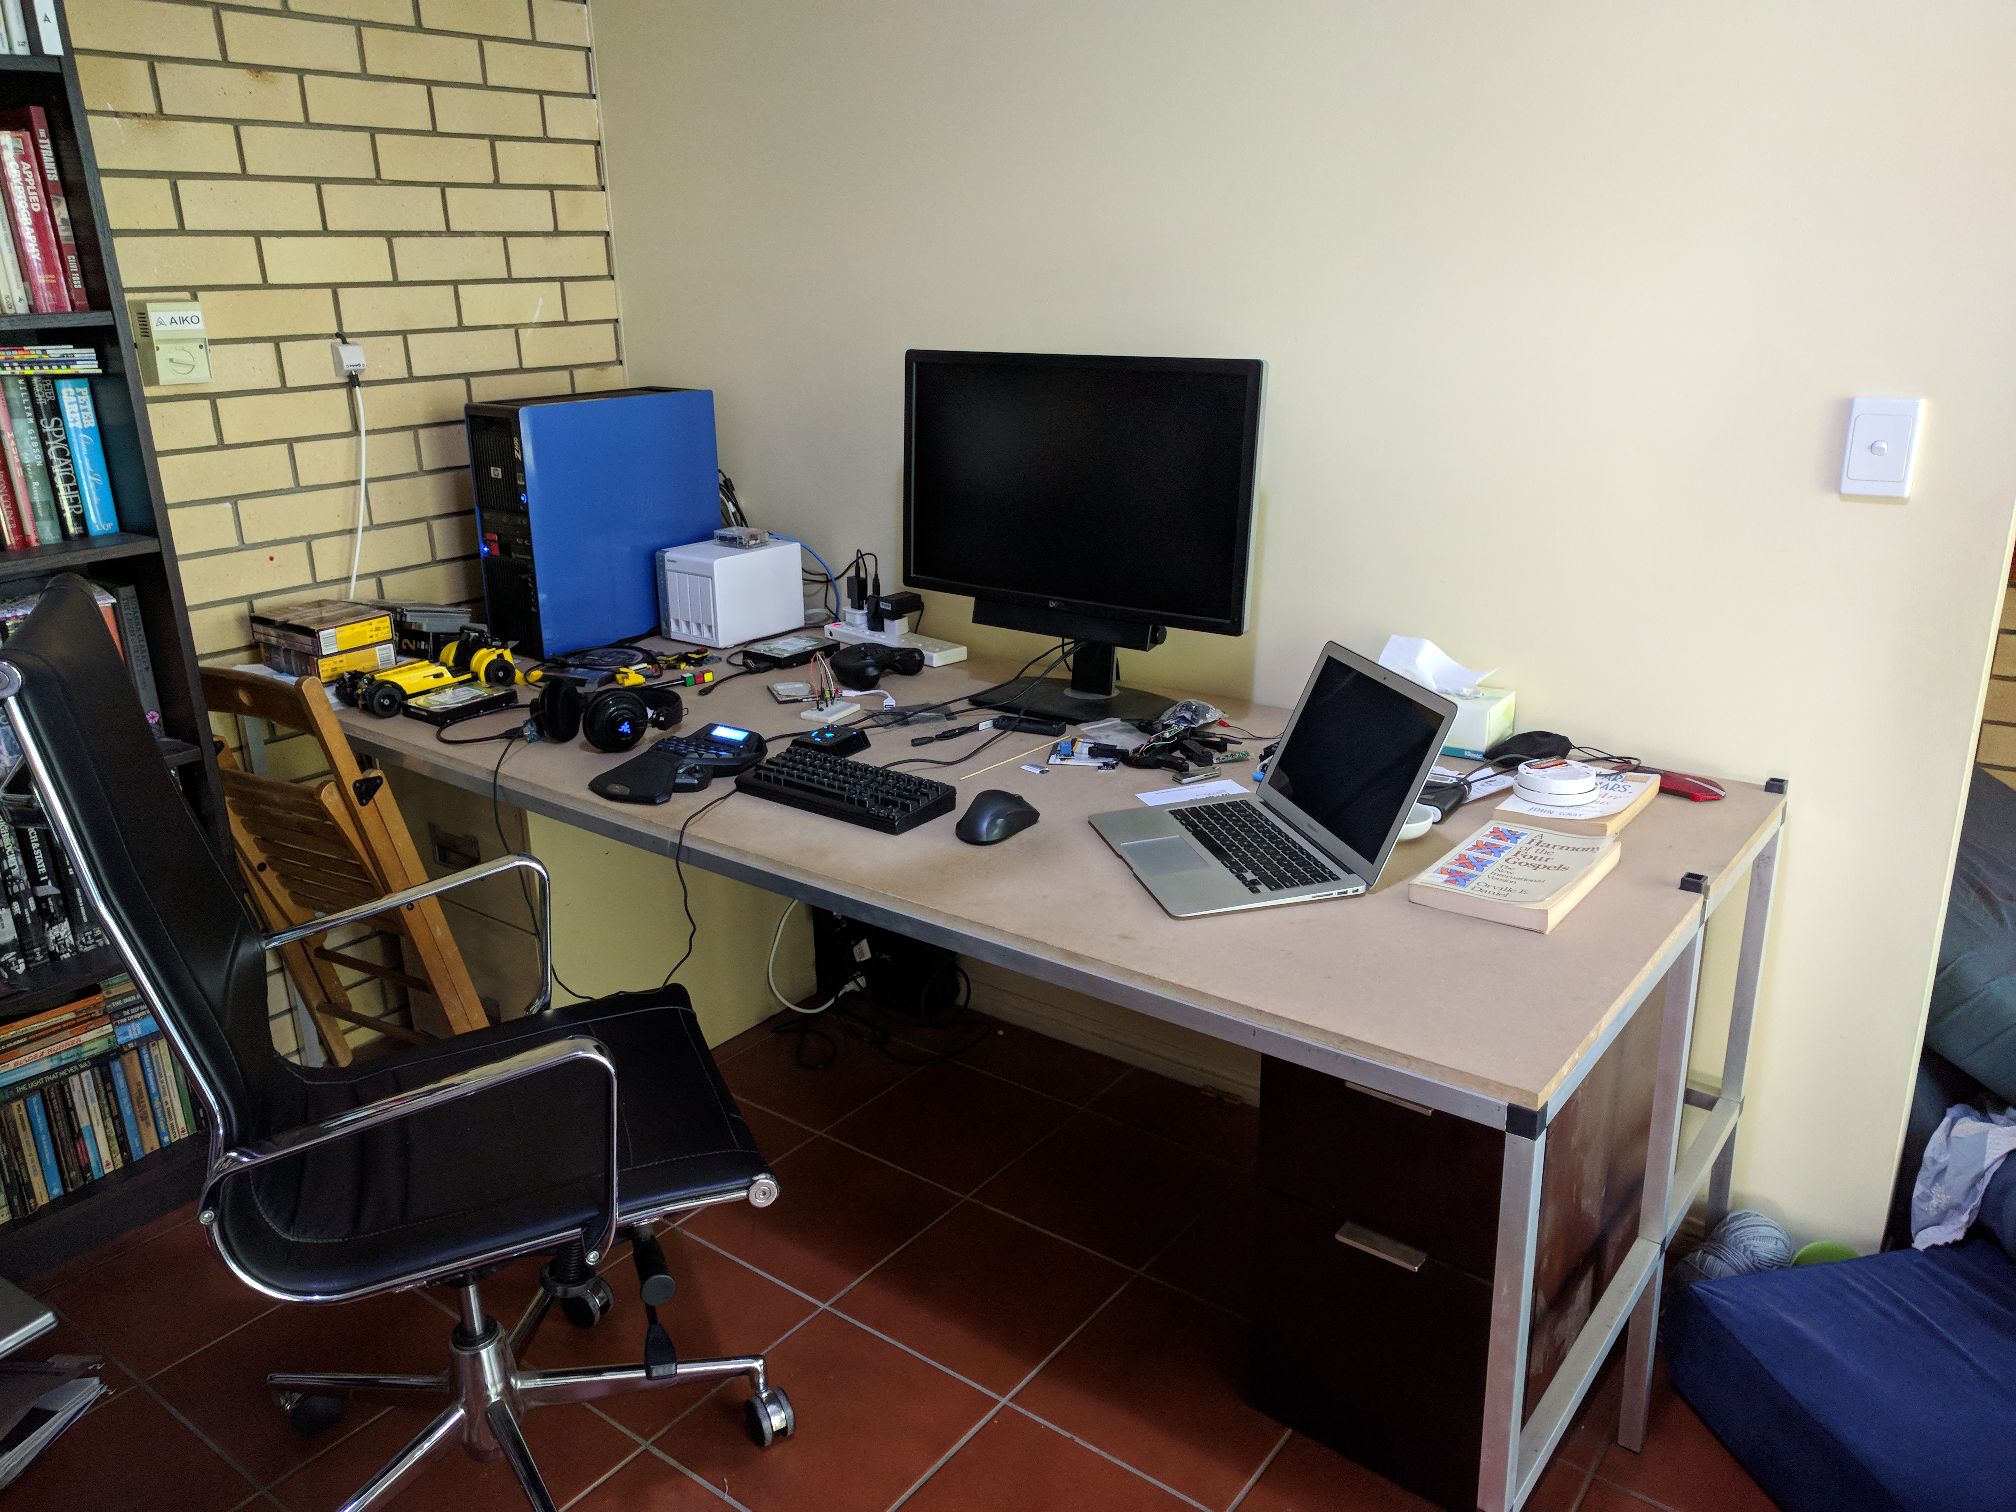
Here’s the final desk in action, complete with huge piles of crap.
The two vertical posts that you see on the right-side edge are for future upgrades – I’m thinking of putting some shelves above it. All up the total cost of the desk was about $220. I’m very happy with it. It’s large and strong, and doesn’t bend.
One of the games I really enjoy playing is called Warframe. I wrote this article for Wikia on my builds for the game. I thought I’d cross-post it here for my records.
I’ve been wanting to write an article for a while on my current Trinity builds, but I have been too lazy. I was finally jarred into action by this article on Reddit, which contained so many god-awful builds that I just had to jump in with my own (god-awful :)) builds.
Like many, I was originally disconcerted by the changes made to Trinity last year, but I didn’t join with many of the others who took up pitchforks to storm the DE offices. The usage of self-damaging Bless builds at the time was definitely unhealthy for the game as a whole and I agree that the changes needed to be made. However, since my main build at the time was Bless, I found myself a bit lost for a while, until I settled down on a new main build, which I’ll discuss below.
I love Trinity as a frame, so much so that I have eight of them (so far). At my current stats, I’ve got about 45% of my playtime with Trinity, with the next closest being at 10%. Her survivability is right up there with some of the frames that avoid damage completely, like Loki, and she can transfer most of this survivability to everyone in the squad.
I still remember the first time that Trinity ‘gelled’ for me: I was about MR8 doing a Infested survival mission with some friends. We were doing it tough, with one or the other of us going down fairly regularly. I was down in the pit that you get in the Eris tileset, completely surrounded by infested, and all the pieces of Trinity just came together for me. My train of thought basically ran like so:
I can build my energy and the energy of the team, that’s good, super useful.
I can use Link to reduce the damage I take.
If I wait until my health gets low, then hit Bless, I get great damage resistance.
Oh, wow. Now my whole squad is completely invulnerable for fifteen seconds.
These infested aren’t scratching me, and I’m obliterating them.
I can keep doing this forever!
At that point, I put away Oberon (my previous favourite frame), and mained Trin. I’ve never looked back. No other frame has come close to winning me over as Trinity has.
In my view, there are a few different character types.
DPS.
Individual survival
Team survival support
Team DPS support
Crowd Control
Just about all frames will fit into one or two of these categories. For example, Banshee is a classic DPS and ‘DPS support’ frame. Irradiating Disarm Loki is ‘Individual survival’ and ‘Crowd Control’. I believe that Abating Link Trinity (as described below) covers four of these five character types, making her (in my opinion) the most useful frame in the game. Her pure self-containment makes her robust enough to take into any mission type, and also play a leading role in the squad.
Builds
Whereas previously you needed two separate frames to have an ideal EV trin and an ideal Bless trinity, these days, with Bless being less important, you really only need the one frame to handle both builds, as they have the same polarisations. This is good, as really no-one but us die-hard Trin-heads will want to have more than one Trinity in their arsenal.
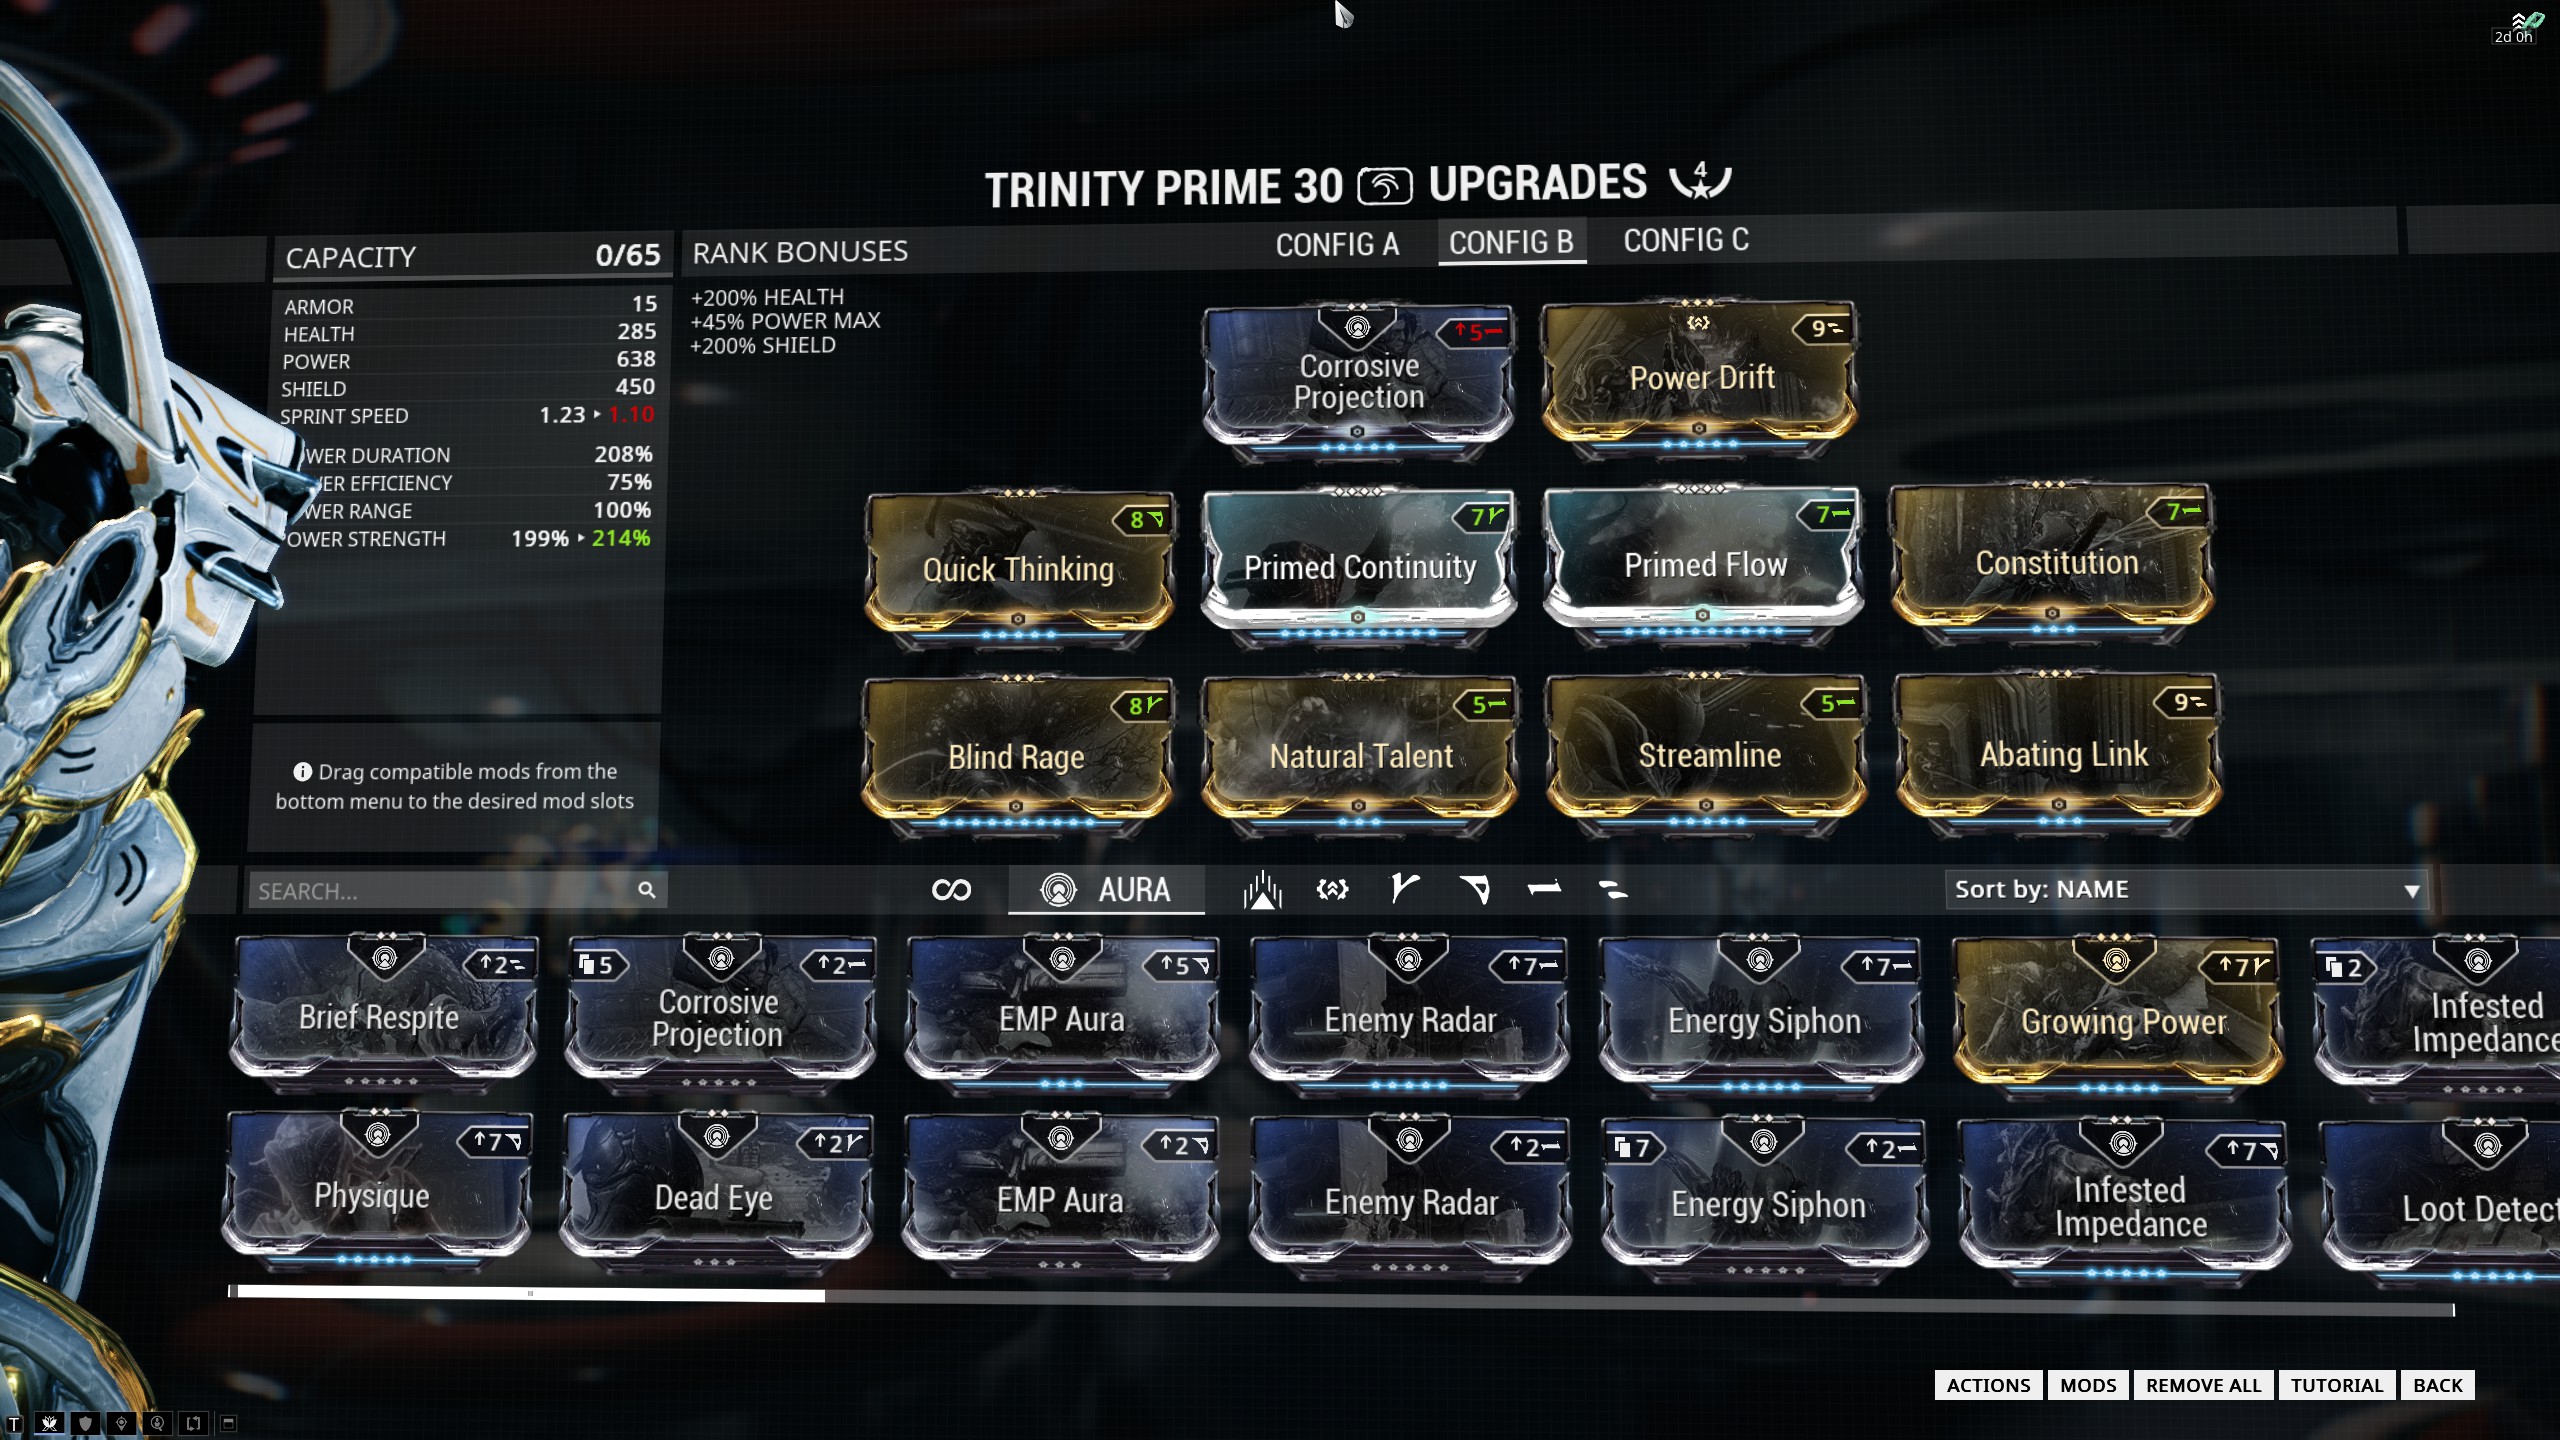
A note on auras.
You’ll note in both my builds below that the aura polarisation is ‘wrong’. I like to have builds which are independent of the aura polarity so that you can use whichever aura most suits the team you’re with. You can save a couple of forma if you go with a Corrosive Projection – defined slot, but I like being able to swap out with Steel Charge, or Rifle Amp, or whatever suits the current mission you’re on (Dead Eye, anyone? Anyone?)
EV Trin
I thought I’d start off with an EV build, since it’s been unchanged for years. Min duration, Max range, High Power Strength. The classic Energy Vampire build will keep your squad absolutely awash in energy, but will have no survivability whatsoever, other than that provided by overshields and Quick Thinking. A single stray bullet will take you out in high-end content, since it’ll ignore QT. Your Bless will heal your squad, but have an damage-resistance duration of just over one second.
EV Trinity build
Without a doubt, it’s useful, if very narrowly focused. Fortunately, the advent of the Zenurik Energy Overflow passive has made EV Trin largely obsolete, with the exception of extremely cheesy squads.
Abating Link Trinity
Now on to the ‘real build’ of this article. As I mentioned above, after the Trinity nerf in mid-2016, I was a bit lost for a while on how best to play Trinity. My current Bless build still had 30 seconds of duration, but was only doing a flat 50% damage resistance. I could get it up to about 70% without losing much duration, but it just didn’t have the same useful feel as before.
An off-hand comment on Reddit provided the solution. Someone mentioned Abating Link, but said that it was only okay, as it was too compromised. Too little duration, or not enough armour strip. I set about fiddling with my builds, trying to get a good build going.
The build I eventually ended up with is fantastic (IMHO). It gives excellent duration, with 100% armour strip. A combined Link / Bless will give you 92% damage resistance – right up there with the old Bless builds, but it’s available at will, and with none of the risk that surrounded the self-damage builds. (Hands up those who died because they were stuck in a QT stagger-lock after getting hit by a mob after throwing your glaive. Thank you.)
If you haven’t experienced it before, let me say that 100% armour strip is amazing. Grineer and Corrupted just absolutely melt from underneath you. In long survivals and the like, I almost always end up with the highest damage percentage.
I take this build into all missions, including those with Corpus and Infested enemies. You may ask why, as those factions don’t have armour. A few reasons:
Laziness. The most powerful force in the universe. Yes, even more powerful than a Mirage with a Simulor.
Bursas. While Corpus doesn’t have armour in general, Bursas do. A lot of it. However, a Bursa – immobilised by Energy Vampire – with its armour stripped will just disappear underneath your melee weapon.
Juggernauts. As with Bursas, Juggernauts without armour are very squishy.
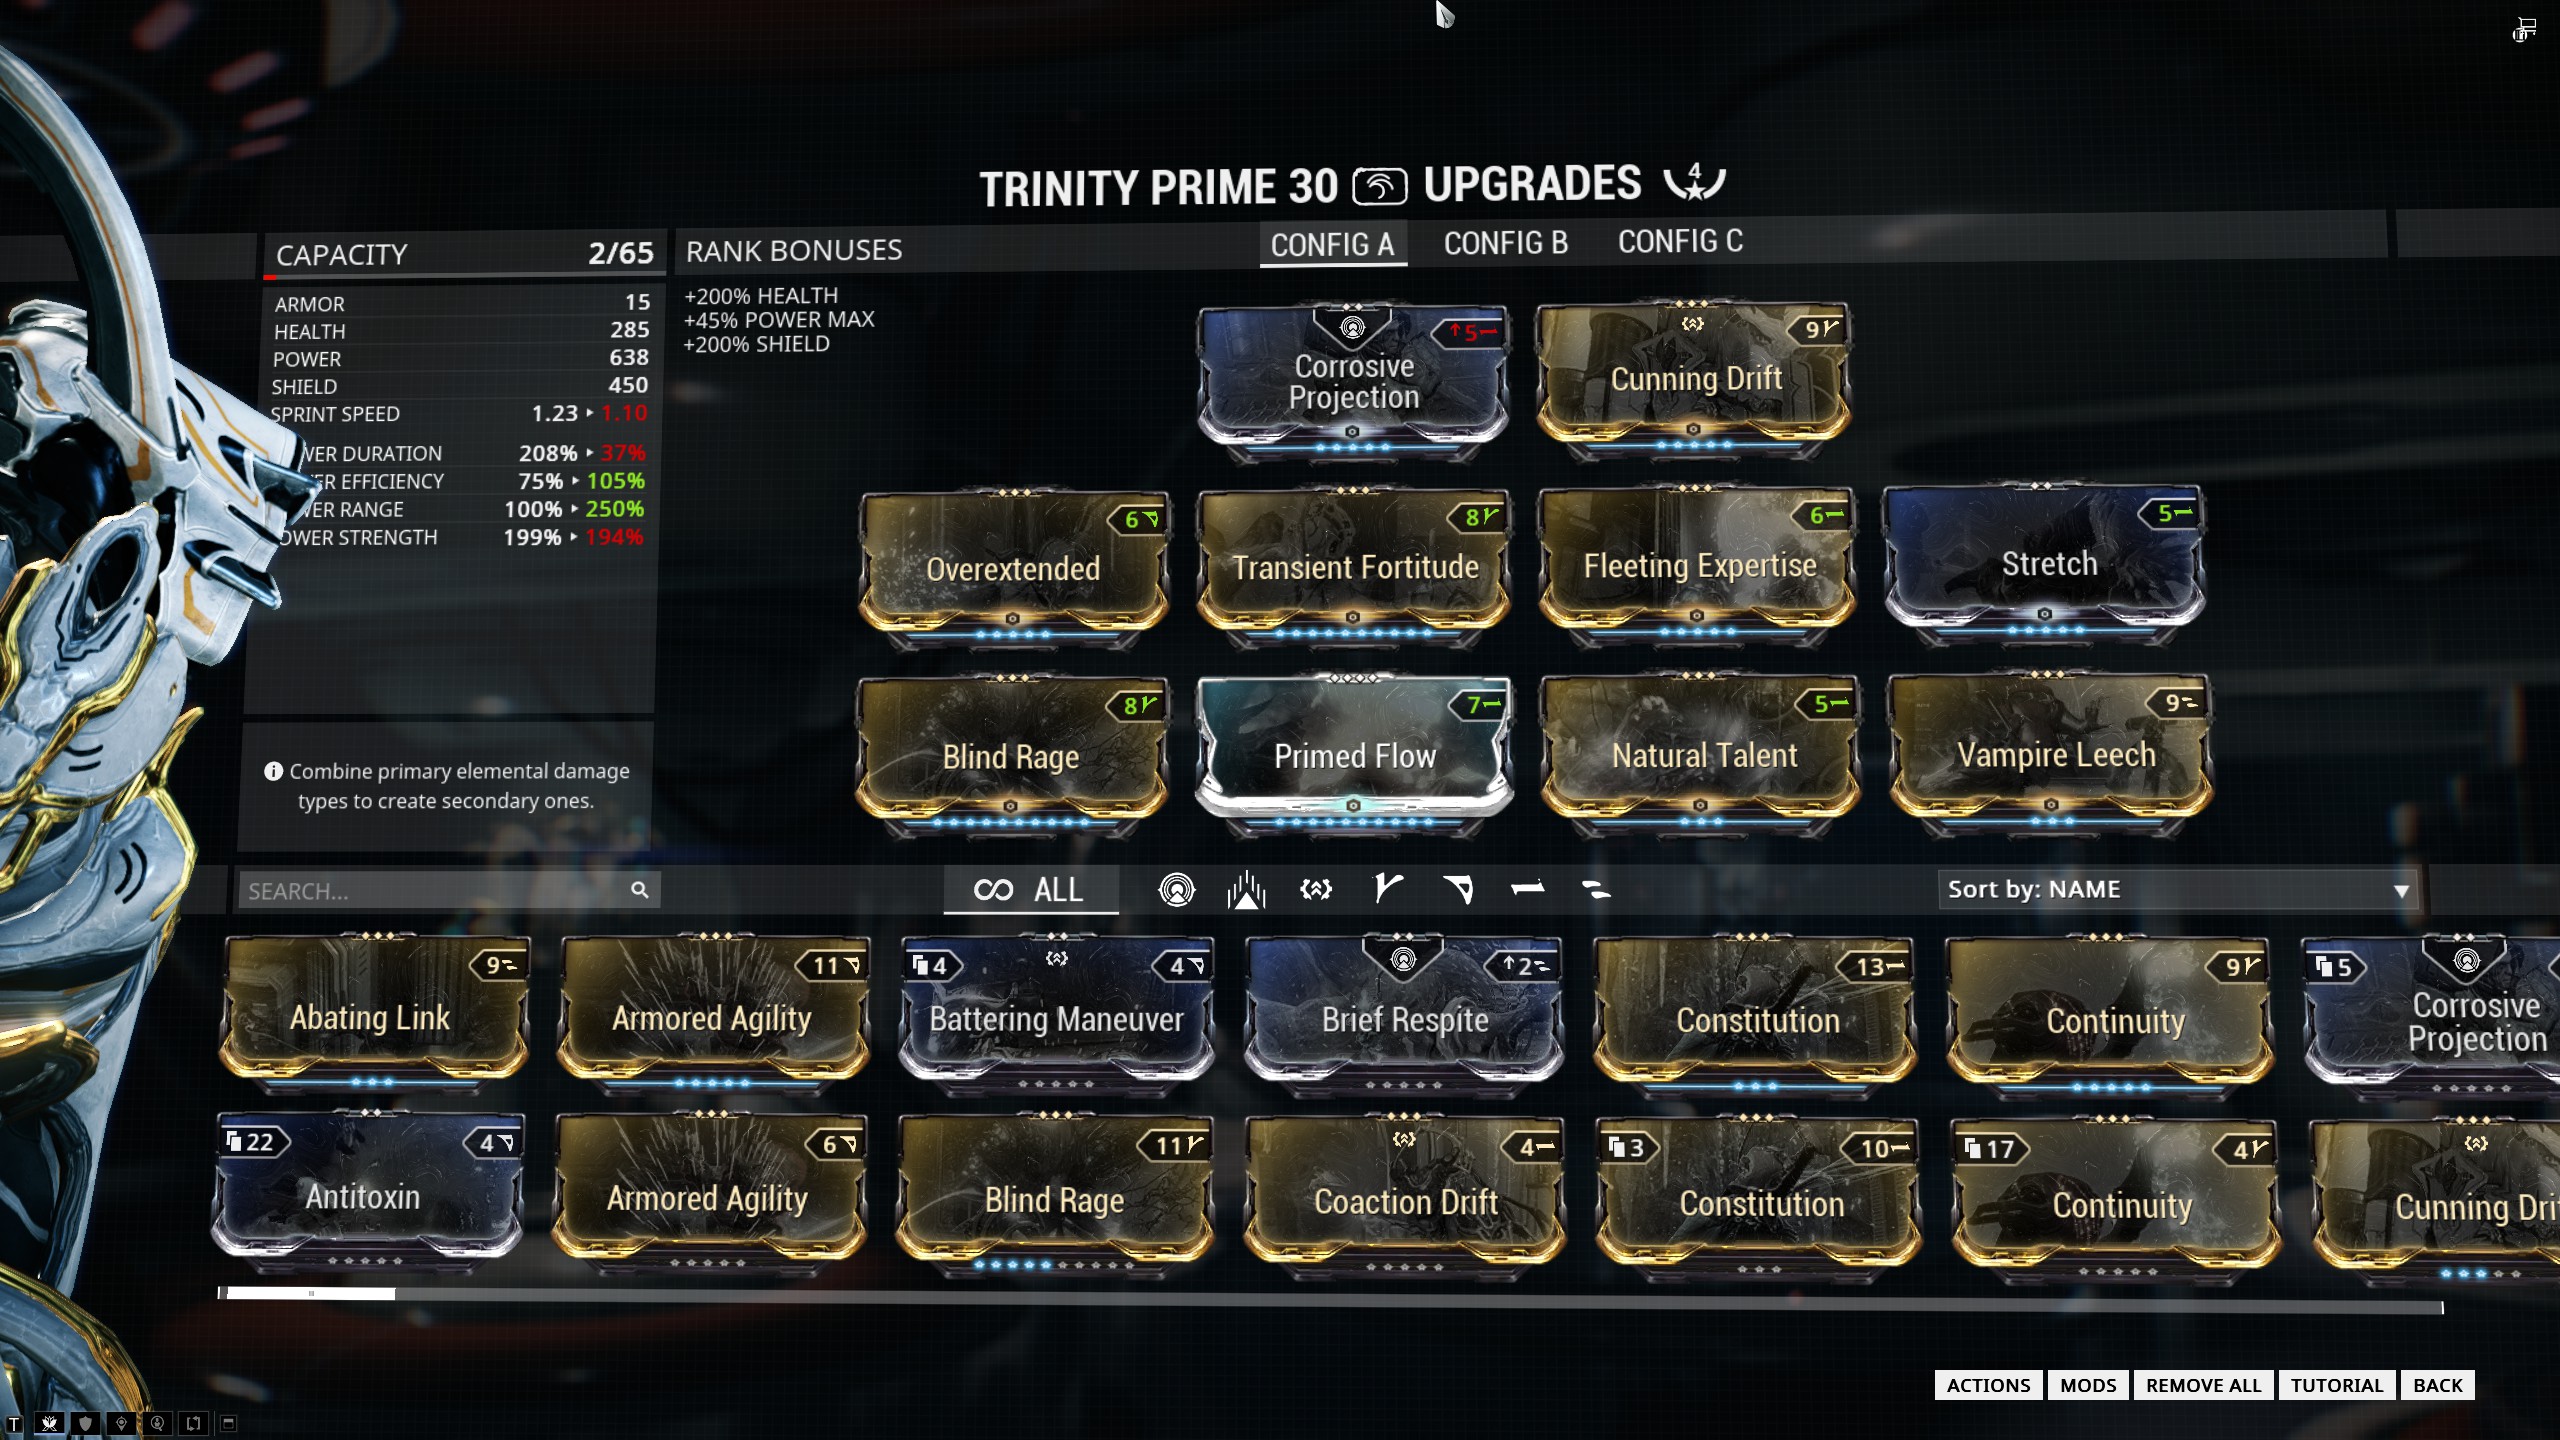
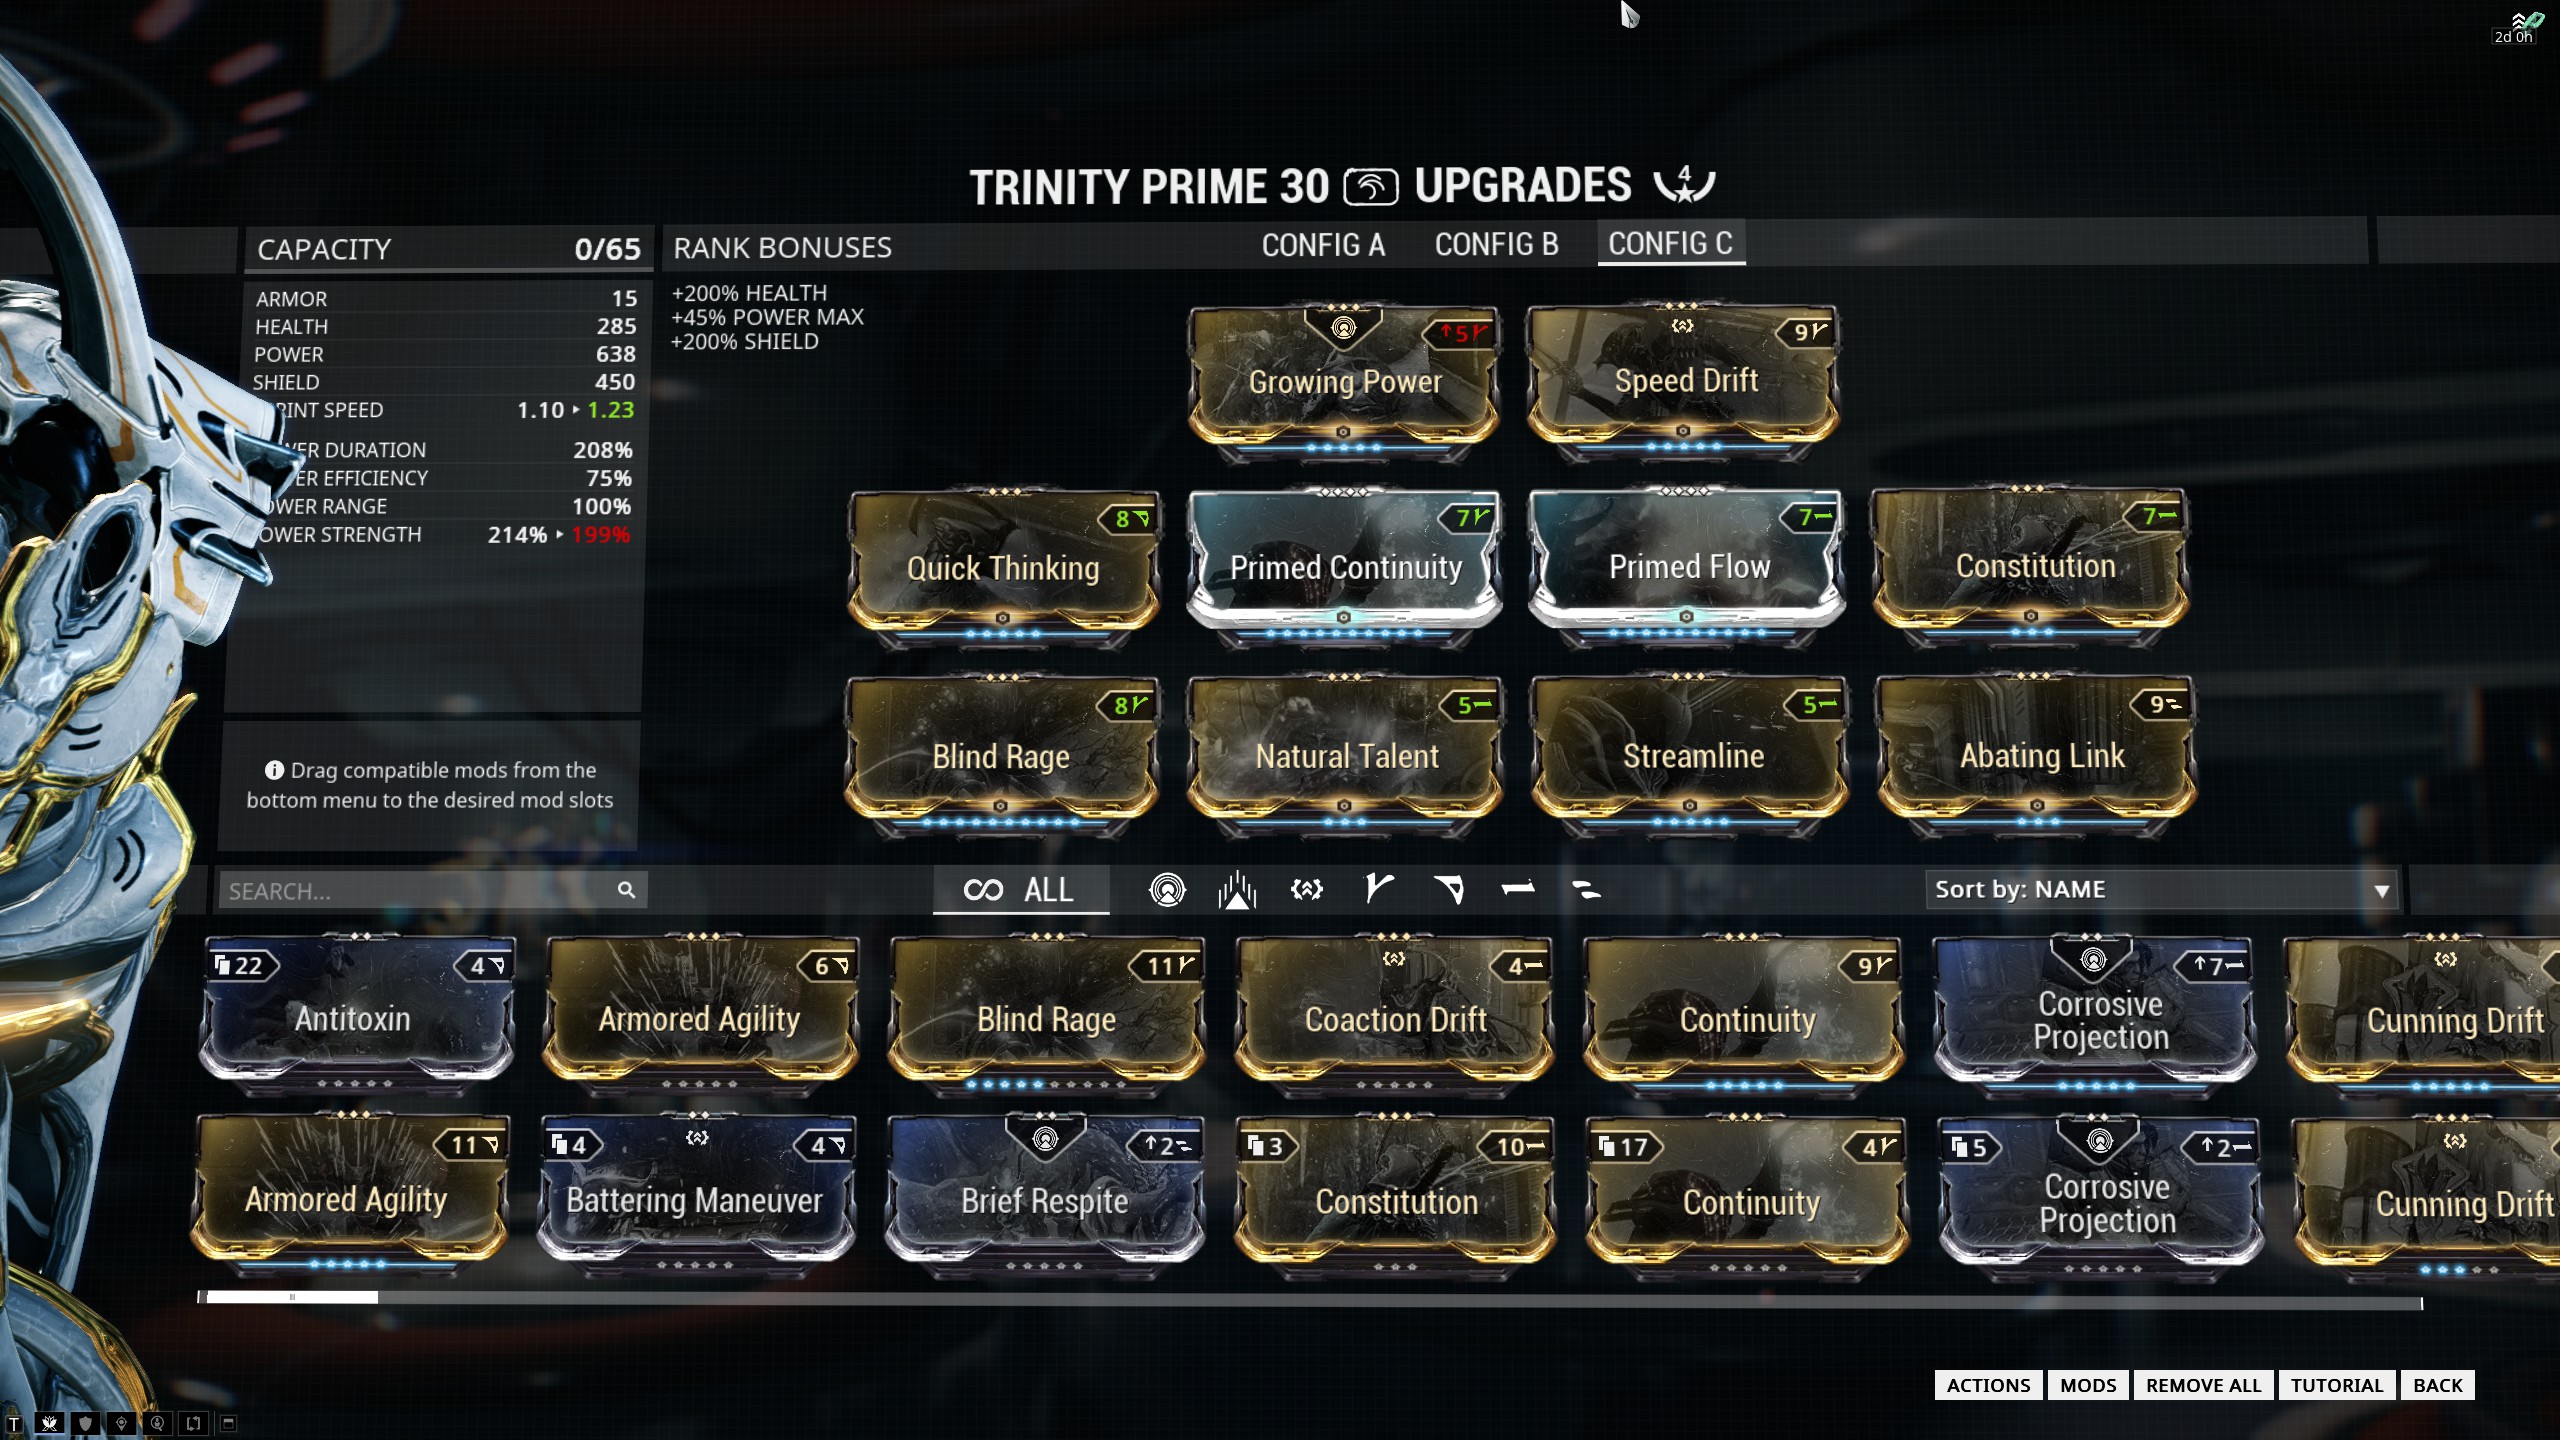
So here’s the build:
Abating Link Trinity build
As you can see, the key is getting up to the critical 223% Power Strength that you need to give you 100% Armour Strip. This build gives 224%. On top of that is keeping the range steady and upping the duration as much as possible. Efficiency is the dump stat, since you’re Trinity, and you can recover energy at will, and the high power strength means that you get a lot of energy for each EV cast.
Abating Link: This is the linch-pin of the build. It doubles the practicality of Link, since it turns it from straight damage-resistance to damage resistance and damage-boosting, greatly amplifying the DPS capabilities of Trinity.
Growing Power: This isn’t a mod you see a lot in people’s builds, but it’s extremely useful in this one. It steps up the armour strip from a very-useful ~90% to an enemy-melting 100%. It gives you that extra 25% Power Strength that you need without taking up a regular slot. It’s easy to trigger, as you only need to generate a status proc. Since, in high-end combat, you’re almost always using a weapon with at least a moderate status chance, the counter is running all the time. (If you’re using a weapon that has no real status whatsoever, bring along Taxon, and it’ll keep growing power continually running).
It’s a fairly new mod to the game, but very useful, as it now ups the maximum possible power strength to 374%. (As an aside, once you get it, make a 374% power strength Eternal War Valkyr. It’s amazingly fun.) It’s not the easiest mod to get, but as long as you take your scanner with you on every mission, you’ll easily pick up the plant scans that you’ll need in a reasonable time-frame.
(Primed) Continuity, Constitution: Duration. Duration is good, as you don’t want to have to recast too often. With the Arcane Aura helmet, the duration for Bless is up over 20 seconds.
Quick Thinking, Natural Talent, Primed Flow: These mods are pretty straightforward, and speak for themselves. I put Quick Thinking on any frame that has >600 energy pool, as it greatly increases survivability. Natural Talent is also an essential on all heavy-casting frames.
Exilius Slot: For me, this is the only ‘variable’ slot in the build. As I see it, you have two options here – Cunning Drift for the increased range, or Speed Drift for reduced cast time. I’ve gone with Speed Drift, as casting time is critical, since you’re casting a lot. I don’t see the extra range as being particularly useful. If you’re on a big map, you’re primarily relying on Bless to give you the damage resistance you require while you close in on the enemy.
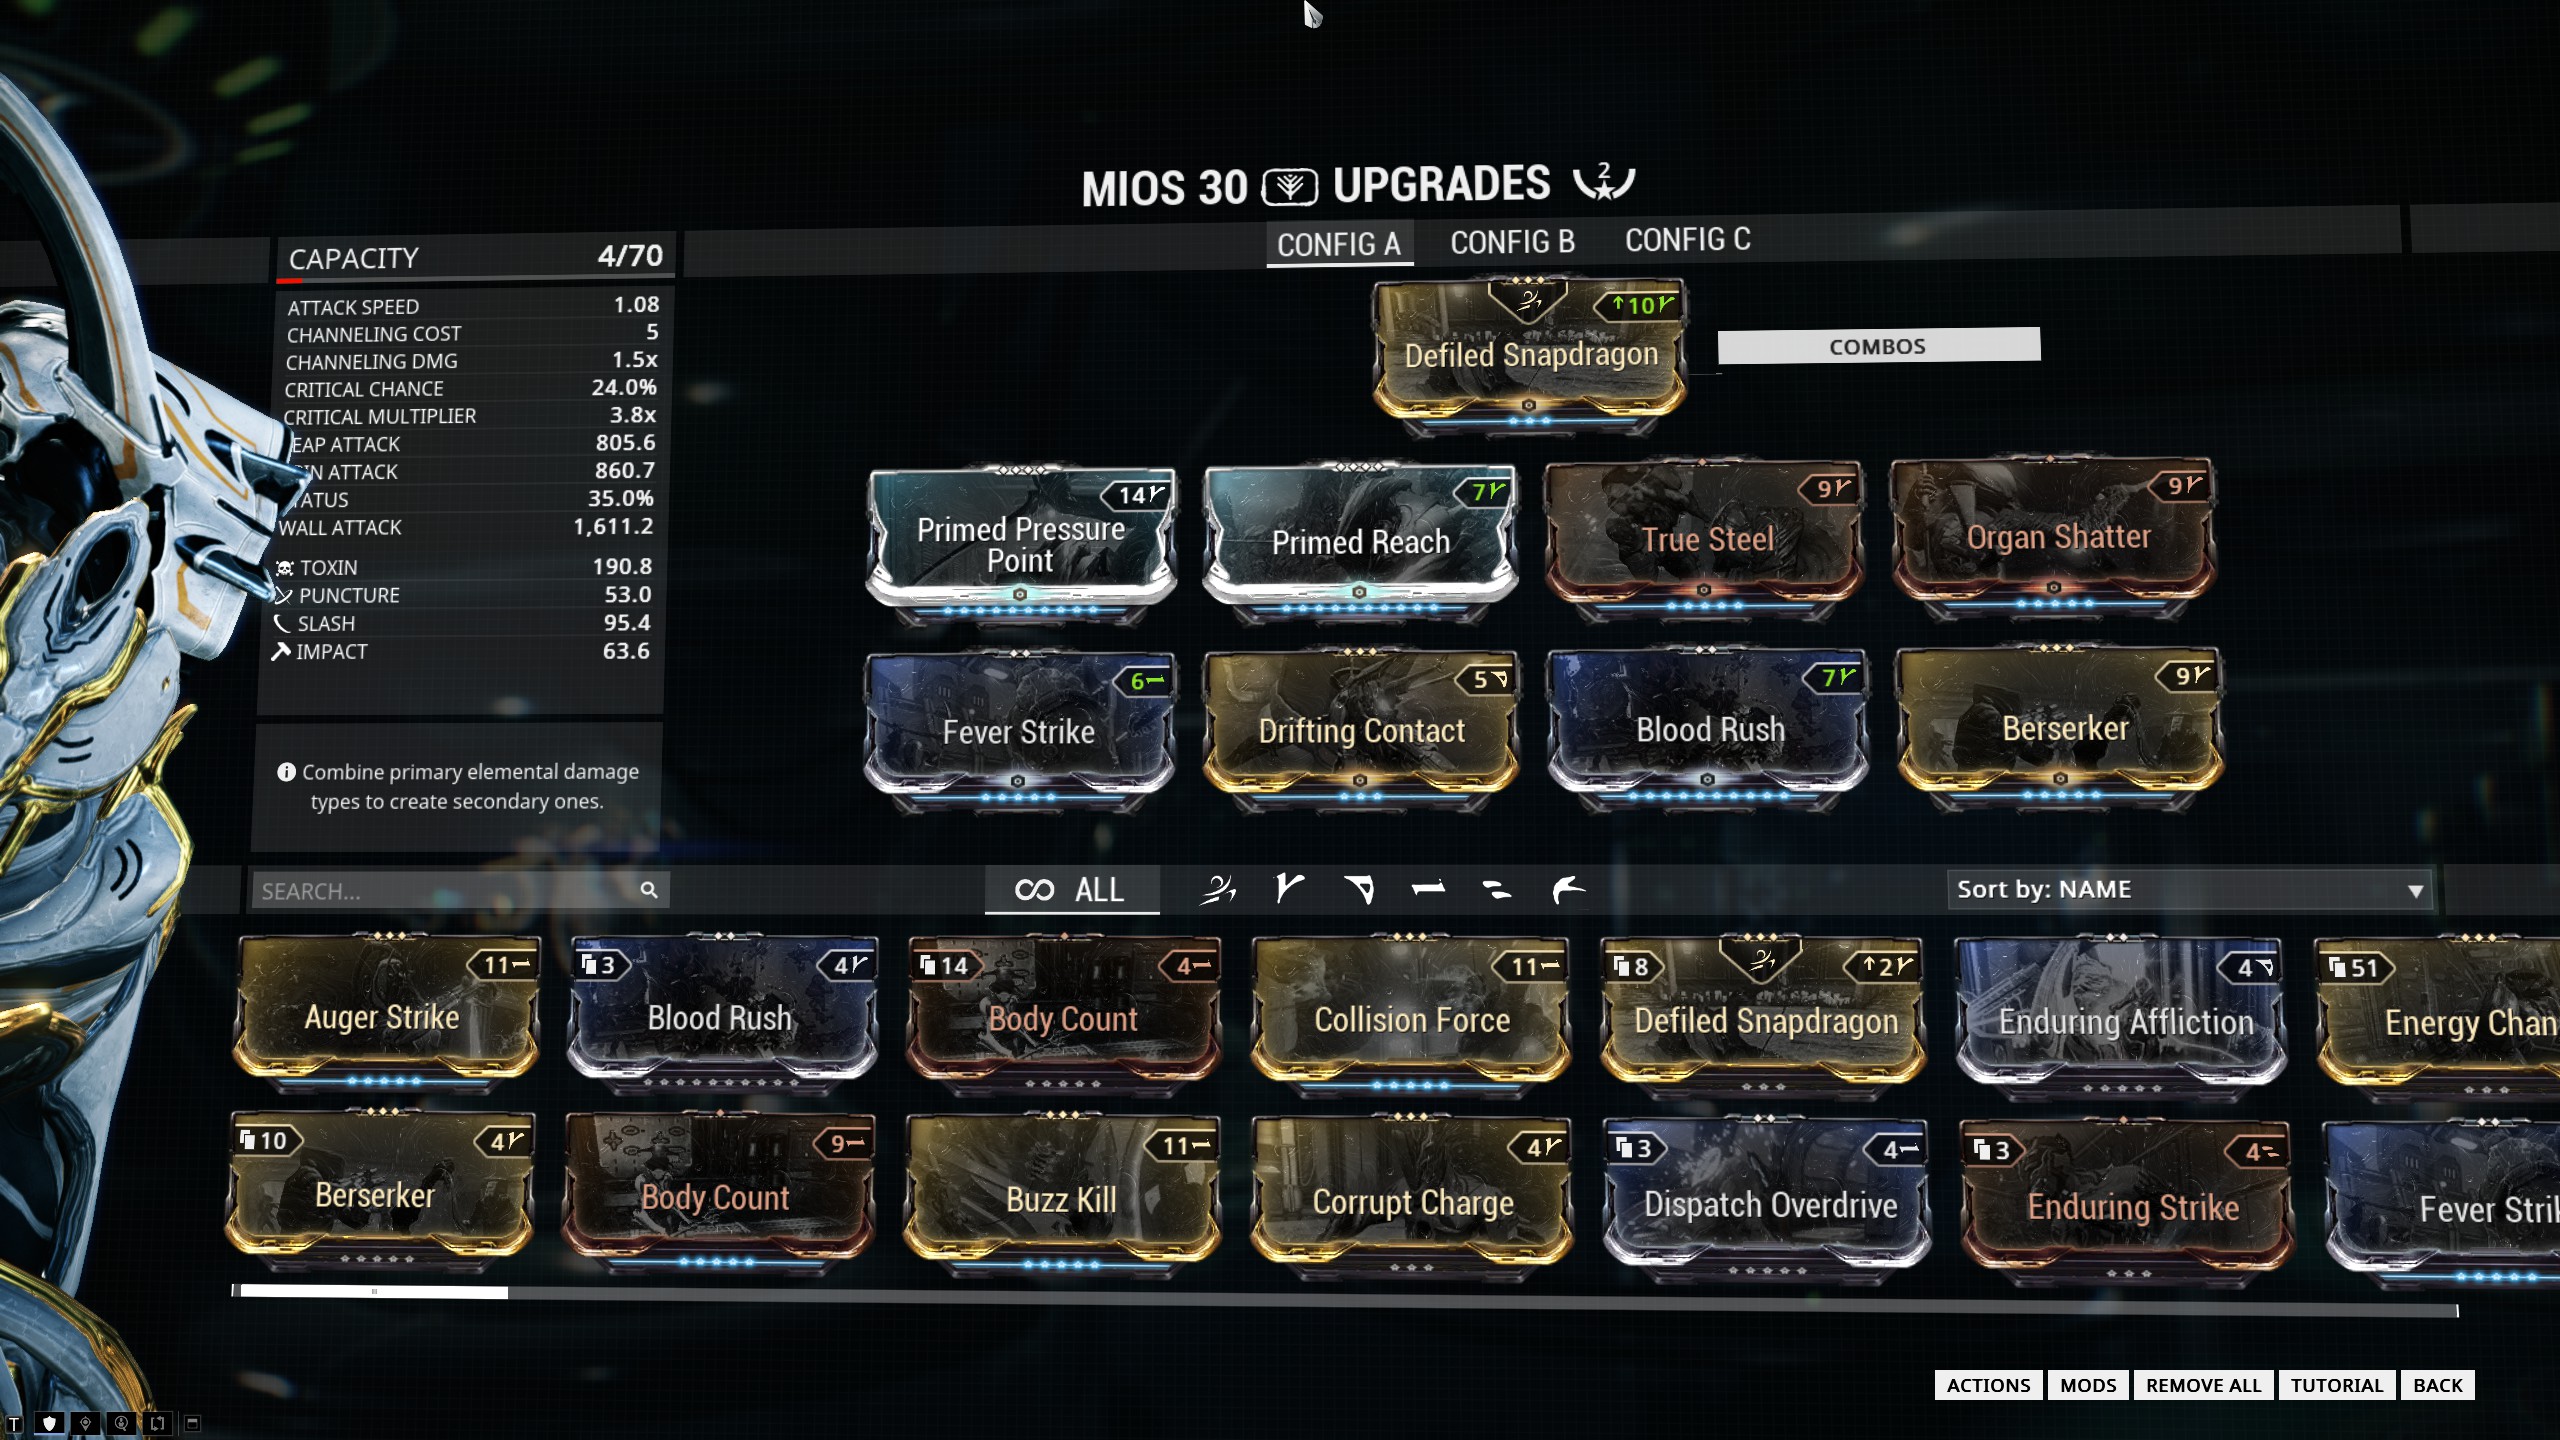
Weapons: I prefer to go melee with this build. Since you’re focussing on Link to provide you with both damage boost and damage resistance, you’re in fairly close range already. Close that gap a little further and go melee. The primary weapon that I use with Trinity is Mios. Good status chance, enormous range and great attack speed. The range and the rag-doll that Mios does gives the CC boost that Trinity needs. Another top weapon option is Lesion with its pure elemental damage and bonus toxic proc. It’s got some advantages in that it doesn’t need the ‘spool up’ time that a critical-damage weapon like Mios has. Primary and Secondary are whatever you feel like, but focus on Toxin and Slash damage.
Mios build
I prefer the Mios for missions in which there is a continuous stream of enemies, like Survivals, and also missions which have a lot of Nullifiers. The enormous range helps pop the bubbles safely.
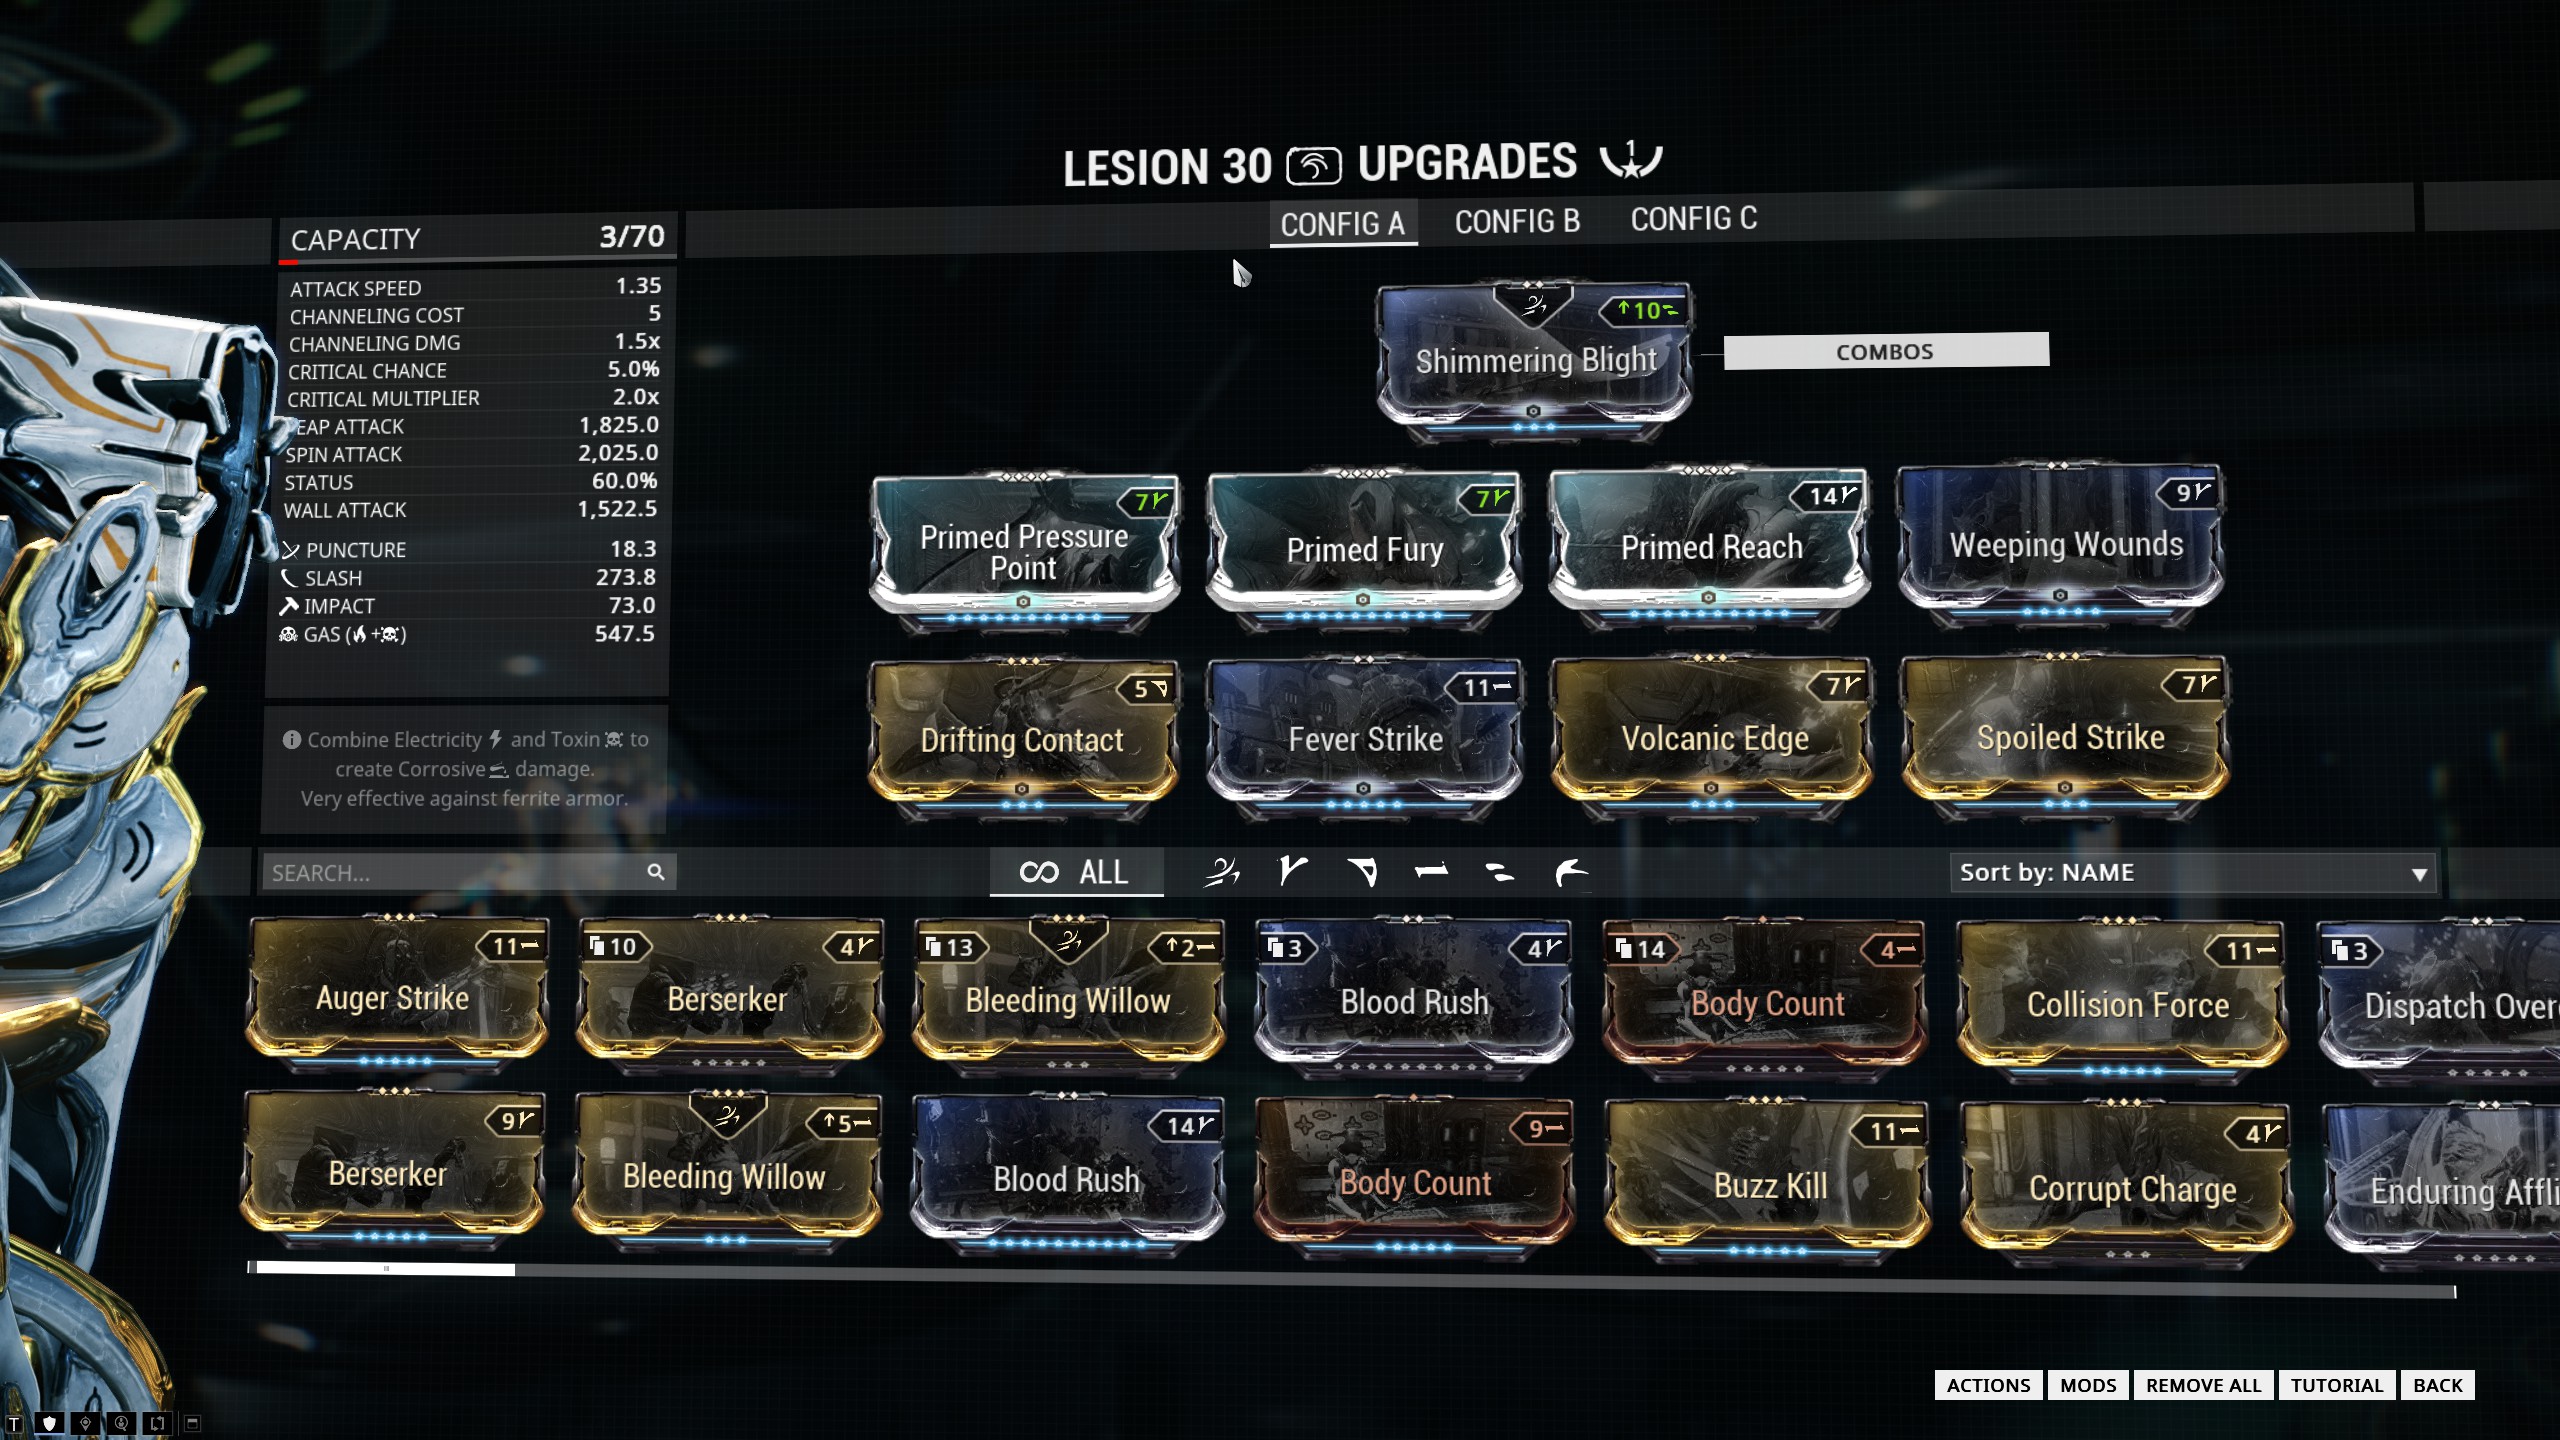
Lesion build
The Lesion works better for missions in which the enemies are start-stop, like Defense, where you can’t keep your combo counter up continuously.
Energy Reduction Sortie
This is a significant weakness with the build above. In an energy-reduction sortie, you’ve only got 150 energy, which is not enough to pop Link, Bless and then have enough energy left over to cast Energy Vampire to top your energy pool back up. In these sorties, I swap out the Blind Rage with an Intensify.
‘Poor Man’s’ Abating Link build
If you would like to try out Abating Link, but don’t want to have to sink five forma into Trinity and get Growing Power, try this build. It’ll give you 97.2% armour strip, which is great, but won’t give you those tasty red bars.
Abating Link build 2
The main loss here is the 15% casting speed, and the 10% power strength.
How to Play
It’s fairly straightforward. The most dangerous part of the mission for a Trinity is literally the first 20 seconds, until you can start building your energy pool. With a small starting energy and low efficiency, you don’t have enough to cast Link or Bless, and then cast Energy Vampire. So you have to cast EV first, which means getting close to an enemy without any protection. So find your first enemy, EV, then drop Link. After that, it’s pretty smooth sailing. Just keep Link active all the time, for the protection and armour strip. Pop Bless when you or your squadmates need it, and keep topped up with energy. Have fun!
Here’s a video of the build in action, versus twenty level 145 Corrupted Heavy Gunners.
For the last few years, I’ve been using Quadra Hosting for my web hosting needs. Their servers are great, with good speed and connection, and they’re reasonably priced. They also have the best customer and technical support that I’ve ever seen, bar none. I highly recommend them if you’re looking for a new web host.
Let’s Encrypt is a project that has set out to ensure that all web traffic is encrypted. To that end, they have changed the traditional process of obtaining SSL keys to a much simpler one, and provide them for free.
Also, Chrome will soon be warning users anytime they visit an unencrypted website. With these two factors, I thought I’d set about trying to install a Let’s Encrypt key onto my Quadra hosting account. As you can see from the green lock in the address bar for this site, you can see that I was successful!
Let’s Encrypt’s preferred method of installation is via CertBot client that runs on the server, and installs and renews the keys. However, a quick check with the technical support team at Quadra, and I realised that this wasn’t going to work on shared hosting, where I don’t have low-enough level access to the server.
Fortunately, Let’s Encrypt and others have provided a variety of different ways to install some keys. They have scripts for a variety of different languages. One that I came across was a bash script that can run on shared hosting without root access. It’s simply called acme.sh. It worked really well.
Here’s the process that I went through to set up Let’s Encrypt with the acme.sh script.
Go to your Quadra Hosting control panel, and turn on SSL connections, by going to ‘Domain Settings’, then ‘SSL’ and then clicking the ‘Generate self signed SSL certificate’.
Click ‘submit’ on the next page, then just ignore the page of keys that comes up after that. You won’t be using those keys, but it has activated the SSL functionality for the server for your domain.
2. Next you’ll need to install the acme.sh script. To do this, and most of the rest of the steps, you’ll need shell access. It’s not turned on by default, so you’ll need to fill out the shell access request form and send it through to the Quadra Hosting support team. Then, when you’re logged on, enter
curl https://get.acme.sh | sh
This will download and install the acme script. At this time, it tries to install an alias to acme.sh, but it failed for me. I had to manually edit the .bashrc file and added in the following line:
alias acme.sh='~/.acme.sh/acme.sh'
This can be done simply by entering the following line
This contacts the Let’s Encrypt servers and will generate some SSL keys, and copies them to the acme install directory. It’ll give the location of these new certificates:
[Thu Nov 10 01:46:53 GMT 2016] Your cert is in  /hsphere/local/home/xxxx/.acme.sh/systematictechnology.net/systematictechnology.net.cer
[Thu Nov 10 01:46:53 GMT 2016] Your cert key is in  /hsphere/local/home/xxxx/.acme.sh/systematictechnology.net/systematictechnology.net.key
[Thu Nov 10 01:46:53 GMT 2016] The intermediate CA cert is in  /hsphere/local/home/xxxx/.acme.sh/systematictechnology.net/ca.cer
[Thu Nov 10 01:46:53 GMT 2016] And the full chain certs is there:  /hsphere/local/home/xxxx/.acme.sh/systematictechnology.net/fullchain.cer
4. Next up, you need to install the newly created certificates. This is done in two ways. Firstly, through the control panel, then through the command line. This is so that both Quadra and the script know the certificates.
Firstly, log onto the server with an FTP client and download or view the four certificates which were listed in the key creation message (above).
On the control panel, go to ‘web options’ then select ‘edit SSL support’.
This will bring up a page with some areas in which you can paste in the keys. Put in:
Install yoursite.key to ‘Certificate key’
Install yoursite.cer to ‘Certificate file’
Install ca.cer to ‘Certificate Chain file’
The Certificate Key and Certificate file can be uploaded at the same time, but the Certificate Chain File will need to be uploaded separately.
Once that is done, go back to the command line. You’ll need to change the permissions on the ssl key folder:
Note that this will throw a few errors: The script will also try and install some backup keys, which it won’t be able to do. I don’t consider this a problem, as the keys primary location is in the acme.sh directory anyway.
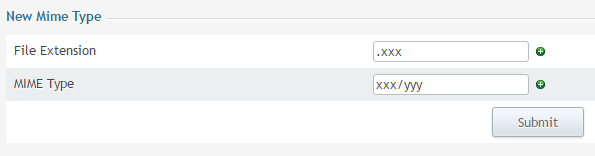
5. Reboot your apache instance to reload the new keys. There is no direct to do this, but the Quadra support team suggested a simple workaround. Go to Web Options for your domain in the control panel, then click on the ‘Mime Type’ button. On the window that pops up, enter some dummy data, hit ‘submit’
Then click on Save / Apply in the Web Options window. Wait a few minutes, then click on the red ‘X’ next to the new Mime type. This will delete the new entry.
Click Save / Apply again. This will reboot the apache instance, and load up the new keys.
6. Test the installed certificate. Wait for five minutes for the server to reboot, then go to https://yoursite.com . If all the steps above have worked then it should be working nicely. Next, check that the cron job to renew the certificates has installed correctly. This should have been done when the acme.sh script was installed. Check it now.
This can be done through either the control panel (go home -> tools -> cron) or through the command line:
crontab -l
You can also go to SSL Lab’s SSL test to see that everything is working correctly.
7. Celebrate! You’ve now got SSL working on your site, celebrate that you’re doing your small bit to make the whole web a bit more secure.
Addendum:
After I posted this article, I sent a link through to Quadra support with a note along the lines of ‘here’s a guide I made up, please feel free to send it to any other customers who might be trying to do the same thing.’
I shortly got a response from the support team. The team member who’d been helping me with this setup not only responded and corrected some mistakes I’d made, but he also wrote: “You could also mention that we would be happy to do all this for them if they asked us to, e.g. if they are not used to shell commands.”
This surprised me no end. The Quadra Hosting team sell a one-click SSL implementation, which only costs $30, and requires no technical skills at all. Rather than suggest “You could also mention that we have a cheap one-click SSL implementation if they are having difficulty with Let’s Encrypt.”, they instead suggest that they could forgo making that money, and instead spend time help you implement a no-cost alternative.
If you’re not with Quadra yet for your hosting, change. This is just a small example of how good they are.